SparkView integration guide
- 1. – Deployment
- 2. – Integration without programming
- 2.1 – Microsoft RD Web Access portal
- 2.2 – Active Directory and LDAP
- 2.3 – Radius
- 2.4 – OAuth2
- 2.5 – SAML
- 2.6 – Single Sign-On (SSO) with HTTP basic authentication
- 3. – Client side (browser) integration
- 3.1 – Use 8 lines of code to start a remote connection from a web page
- 3.2 – Using object or cookie for parameters
- 3.3 – Resource redirection and parameters
- 3.4 – Start a program on connection (as shell)
- 3.5 – Start RemoteApp
- 3.6 – Virtual Channel (VC) and Dynamic Virtual Channel extension
- 3.7 – Gateway channel
- 3.8 – Configuration file and others
- 3.8.1 – Start up a server or application automatically after login
- 4. – Server side integration
- 4.1 – HTTP API
- 4.2 – Plug-in
- 4.2.1 – Start gateway and the plug-in example project in Eclipse
- 4.2.2 – Handshake plug-in
- 4.2.3 – Deploy your plug-in
- 4.3 – Downloading files unprompted
- Appendices
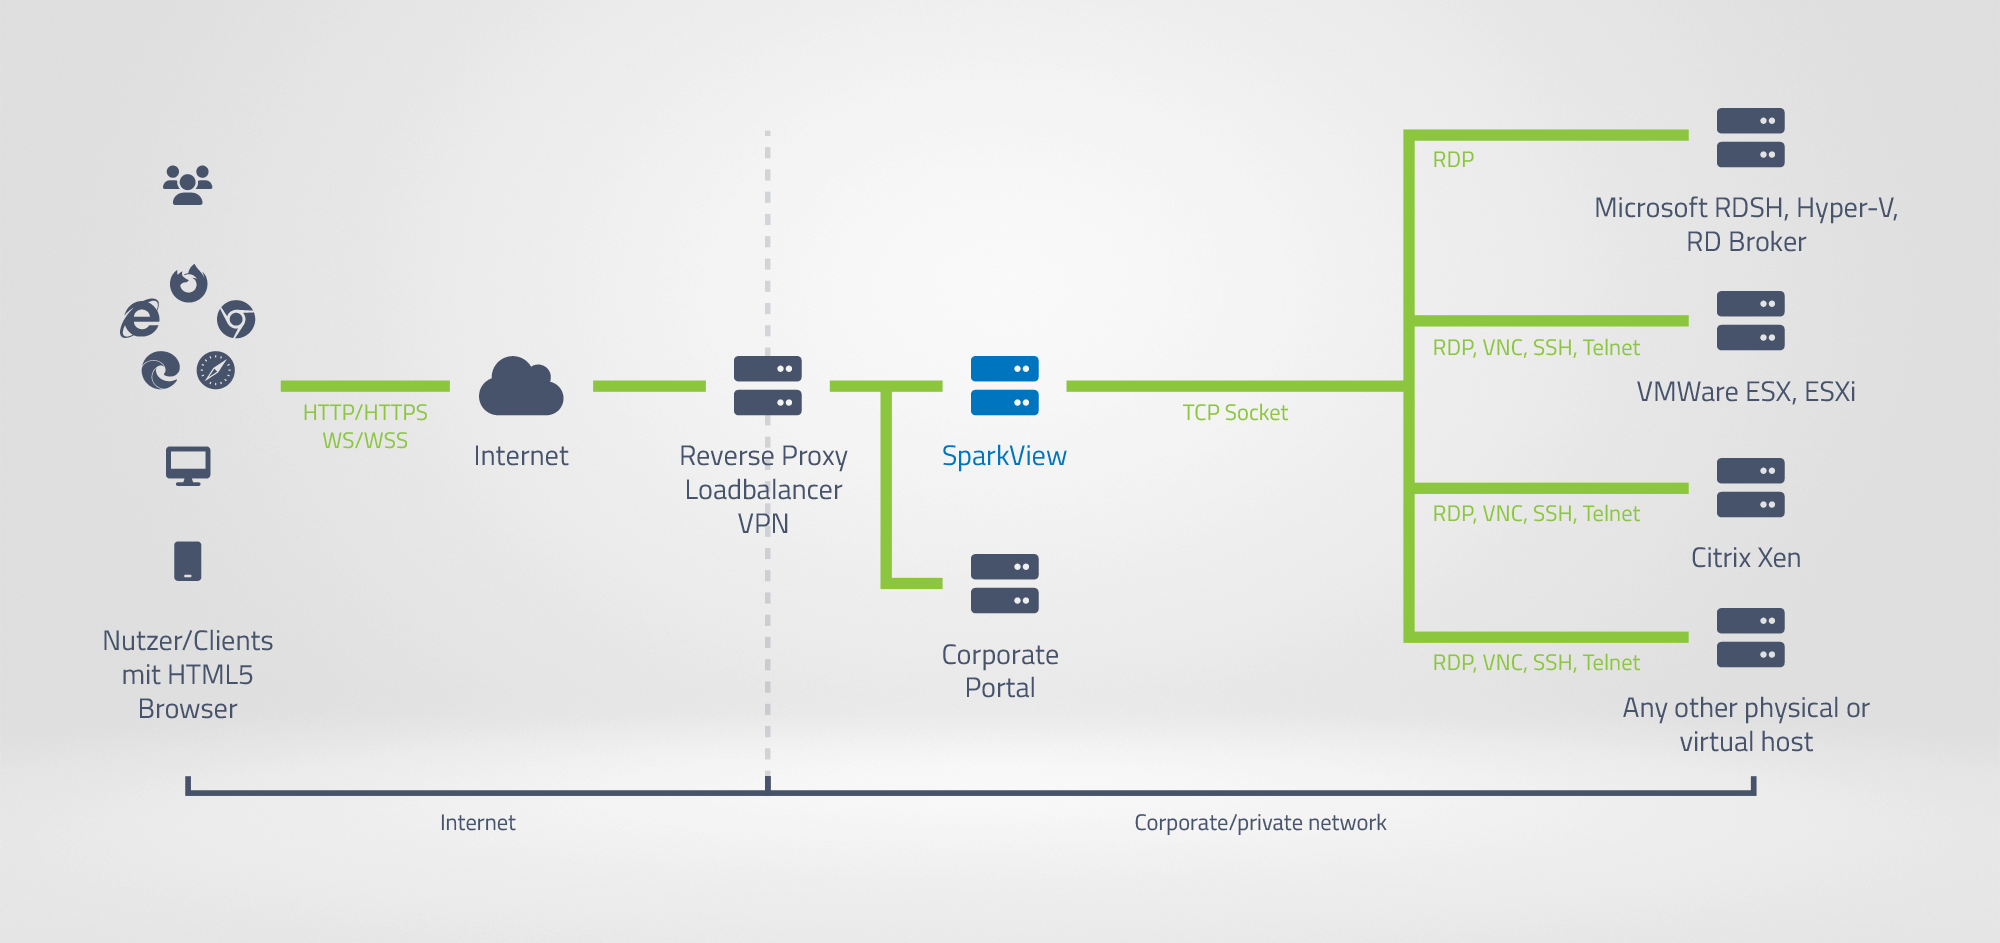
1. – Deployment
1.1 – SparkView only

Pros:
- Easy and fast, 15 minutes to installation of Java and SparkView
- Use SparkView as a normal RDP client with white list and black list.
- Integrate with Active Directory, LDAP, RADIUS, OAuth2, MS RD Web Feed easily.
- No need for another web server.
Cons:
- You can customize the static web page, but if you need a dynamic web page, you’ll need to write a plug-in for SparkView
1.2 – SparkView with reverse proxy, load balancer or VPN
Pros:
- High availability
- No need to expose SparkView
- Seamlessly integrate into current environment
- Tested on Nginx, Apache; VPNs from F5, Fortinet, Sophos, Cisco, Juniper, Dell, Check Point etc.
- Programming on your existing portal with familiar technology, like JSP, ASP.NET, PHP etc.
2. – Integration without programming
2.1 – Microsoft RD Web Access portal
Assume your web portal address is: https://MyRDPortal/RdWeb. You need to set up the following two entries in gateway.conf:
webfeed = https://MyRDPortal/RDWeb/feed/webfeed.aspx
directoryIndex = login.html
Checklist:
- Verify the web feed URL with your browser. You’ll see a cookie or XML displayed.
- Clean the browser cache if your gateway start page is not changed to login.html
- Make sure NTLM authentication on IIE is enabled: https://technet.microsoft.com/enus/library/cc754628(v=ws.10).aspx
- Make sure RDWeb/Pages and RDWeb/Feed on IIS is using “Windows authentication” authentication mode instead of “Forms Authentication”.
2.2 – Active Directory and LDAP
If all your users are domain users, please create a plain text file (encoding: UTF-8 without Byte Order Mark) with following context:
{
  "source":{
    "type": "AD",
    "properties": {
      "server": "ADServerAddress"
    }
  }
}
Save it as users.json or other name and specify the location of this file in gateway.conf:
user = C:\\workspace\\data\\users.json
You can configure servers used by all the users in servers.json and specify the location of servers.json in gateway.conf:
server = C:\\workspace\\data\\servers.json
If you are using a LDAP server, please change the type to “LDAP”. You can also configure AD/LDAP users in users.json:
{
"users": [
  {
    "name": "user1",
    "password": "user1",
    "servers": [
      "RdpServer1",
      "TEST",
      "Excel 2010"
    ],
    "isDomainUser": true,
    "transferCredential": true,
    domainServer: "serverAddr"
  }
}
2.3 – Radius
{
  "source": {
    "type": "RADIUS",
    "properties": {
      "server": "192.168.12.128",
      "port": "1812",
      "accountingPort": "1813",
      "sharedSecret": "test123"
      "timeout": "60000",
      "retryCount": "3"
    }
  }
}
- Make sure the IP of Spark Gateway is listed as a client on RADIUS server.
- Make sure the timeout is at least 60000 milliseconds if your RADIUS server is using multi factor authentication, like Azure MFA.
2.4 – OAuth2
First, save your OAuth2 provider configuration into a JSON file, for example:
{
  "providers" : [{
    "name" : "Google",
    "client_id" : "650561938988-t2r66k1ms3hpoi3k1e2g7l2adlarau8s.apps.googleusercontent.com",
    "client_secret" : "-D-nhxWn2E97tZWWLg5IQ6Ak",
    "request_uri" : "https://accounts.google.com/o/oauth2/auth",
    "redirect_uri" : "http://localhost/oauth2callback",
    "access_token_uri": "https://oauth2.googleapis.com/token",
    "auth_uri": "/login_chrome.html",
    "scope": "openid email"
  },
  {
    "name" : "Live",
    "client_id" : "0000000040133A31",
    "client_secret" : "p9WwBr2Pyrq6mtaeZCwTSwqbIF39Br3Z",
    "request_uri" : "https://login.live.com/oauth20_authorize.srf",
    "redirect_uri" : "http://www.remotespark2.com/oauth2callback",
    "access_token_uri": "https://login.live.com/oauth20_token.srf",
    "scope": "wl.emails",
    "profile_uri": "https://apis.live.net/v5.0/me"
  }]
}
Second, specify the position of this file in gateway.conf:
oauth2 = \\user\\local\bin\\SparkViewGateway\\oauth2.json
For more information, please check the source code of login.html.
2.5 – SAML
You can get the integration of SAML from this document.
2.6 – Single Sign-On (SSO) with HTTP basic authentication
You can enable HTTP Basic Authentication on SparkView by setting authorization=Basic in gateway.conf, so all the RDP connections will use credentials from the HTTP Authorization header.
This can be used for VPN SSO integration etc
3. – Client side (browser) integration
3.1 – Use 8 lines of code to start a remote connection from a web page
Save a JavaScript file as tutorial1.page.js with the following content:
window.onload = function() {
  var gateway = '192.168.12.111', //change this to your Spark gateway address
  server = '192.168.12.117', //change this to your RDP server address
  url = 'ws://' + gateway + '/RDP?server=' + server + '&user=vmuser&pwd=password';
  var r = new svGlobal.Rdp(url);
  r.addSurface(new svGlobal.LocalInterface());
  r.run();
};
Save a web page as tutorial1.html with the following content:
<!doctype html>
<html>
<head>
  <meta http-equiv="X-UA-Compatible" content="IE=edge">
  <meta http-equiv="Content-Type" content="text/html; charset=utf-8" />
  <title>Spark View (RDP)</title>
  <meta name="viewport" content="width = device-width, initial-scale = 1.0, user-scalable = yes, minimum-scale = 0.1, maximum-scale = 8" />
  <meta name="apple-mobile-web-app-capable" content="yes" />
  <link rel="stylesheet" href="../hi5.css" />
  <link rel="stylesheet" href="../rdp.css" />
  <script type="text/javascript" src="../appcfg.js"></script>
  <script type="text/javascript" src="../resource.js"></script>
  <script type="text/javascript" src="../hi5core_min.js"></script>
  <script type="text/javascript" src="../hi5_min.js"></script>
  <script type="text/javascript" src="../surface_min.js"></script>
  <script type="text/javascript" src="../rdpcore_min.js"></script>
  <script type="text/javascript" src="../rdp_min.js"></script>
  <script type="text/javascript" src="tutorial1.page.js"></script>
</head>
<body>
  <div>
    <canvas id="remotectrl"></canvas>
  </div>
</body>
</html>
Double click on the html file and open it in your browser. You don’t even need a HTTP server for this demo.
Checklist:
- to enable HTML5.
- <meta http-equiv="X-UA-Compatible" content="IE=edge"> to suggest Internet Explorer using the edge web engine.
- Viewport meta tag for touch interface
- “apple-mobile-web-app-capable” meta tag to allow users to create shortcut on home screen (iOS).
- SparkView JavaScript libraries for RDP connection: appcfg.js (configuration), resource.js (language resource), hi5_min.js (common utilities), surface_min.js (UI), rdp_min.js (RDP decoder). Don’t forget hi5.css and rdp.css style sheets.
- A canvas element with id “remotectrl” to display the remote connection. If you are using a different id, you need to specify it when creating the LocalInterface in your JavaScript code:
new svGlobal.LocalInterface(‘MyCanvasId’) - Make sure the JavaScript library is loaded before you start a remote connection. A good place is the window.onload event.
- SparkView client will manage the width and height of canvas. Never try to set it up in your code. Never set up the width and height with CSS.
- Make sure you include hi5core_min.js and rdpcore_min.js since 5.0.
- You can set
userWorker: falsein appcfg.js to disable Web Workers (JavaScript threads).
Troubleshooting:
- Check the JavaScript console log from your browser (F12 or Developer Tools)
- Check SparkView log (InstallDir/logs/)
- Internet Explorer may still be in legacy mode.
- You may need to configure hi5.libPath if you are using the JS library in your portal. For example, you can configure this in appcfg.js:
hi5.appcfg = {…}; hi5.libPath = ‘pathRelatedToYourWebRoot’; - The web worker will load rdpworker_min.js, hi5core_min.js, rdpcore_min.js at runtime. They are supposed to be in the same directory with your web page by default. If not, you can configure hi5.libPath to resolve this issue, but if your gateway is behind VPN and JavaScript rewriter is used by the VPN, this path can be rewritten with a wrong value (VPN JS rewriter bug). In this case, you can leave hi5.libPath as blank and copy those 3 js files to the web page directory as a workaround.
3.2 – Using object or cookie for parameters
You can also use objects or cookie for parameters:
Object parameters with Rdp2:
window.onload = function() {
  var parameters = {
    gateway: '192.168.12.111',
    server: '192.168.12.117',
    user: 'vmuser',
    pwd: 'password'
  };
  var r = new svGlobal.Rdp2(parameters);
  r.addSurface(new svGlobal.LocalInterface());
  r.run();
};
window.onload = function() {
  document.cookie = 'gateway=192.168.12.111';
  document.cookie = 'server=192.168.12.117';
  document.cookie = 'user=vmuser';
  document.cookie = 'pwd=password';
  var r = new svGlobal.Rdp2();
  r.addSurface(new svGlobal.LocalInterface());
  r.run();
};
You can only set cookies if the web page is from http server.
HTTP Header parameters:
Following parameters can also be transferred within HTTP Headers:
gw_server, gw_port, gw_symlink, gw_user, gw_pwd
Best practices:
Don’t mix your web page with JavaScript code. You should always put your JavaScript code into external files because:
- Content-Security-Policy HTTP header can block this kind of mixed content.
- This is blocked by Chrome Web Store App.
- You cannot “pretty print” your code in browser’s Developer Tool, which is helpful when the JavaScript code is minified.
- You cannot dynamically modify your code in the Developer Tool, which is really helpful on debugging and verifying your fix.
- It’s better to put the Canvas element in a DIV.
- You can have multiple Canvas elements in one page (using iframe or DIV) for multiple remote connections.
3.3 – Resource redirection and parameters
SparkView has resource redirection (clipboard, drive, audio redirection etc.) disabled by default for safety reasons. You need to implicitly enable them by setting up extra parameters.
Resource redirection can be enabled on both, client side using the JavaScript library and server side using the servers.json.
| Resource redirection | Parameter |
|---|---|
| Clipboard | mapClipboard=on |
| Drive | mapDisk=on Also need to configure tmpdir in gateway.conf |
| Printer | mapPrinter=on printer=Your Printer Name You can also configure printerDriver and printer (name) in gateway.conf You also need to install a PostScript to PDF converter or PCL to PDF converter (depends on your printer driver) on the gateway computer (no need to install it on RDP server) and configure the location and command arguments for the converter in gateway.conf: converter = D:\Programs\gs\gs9.16\bin\gswin32c.exe arguments = -dBATCH -dNOPAUSE -dUseCIEColor -dPDFSETTINGS=/printer -sDEVICE=pdfwrite -q -sOutputFile=%1 %2 |
| Audio Playback | playAudio=0 soundPref=0: low audio quality, low bandwidth usage. soundPref=1: high audio quality, high bandwidth usage. |
| Audio Input (Microphone) | audioRecord=on |
| Time zone | timezone= encodeURIComponent (‘(GMT-07:00) Mountain Standard Time’) |
Please check the Administrator’s Manual for all parameters you can use.
Example of “enable clipboard redirection”:
var r = new svGlobal.Rdp('ws://gatewayAddr/RDP?server=192.168.12.117&mapClipboard=on');
Frequently used parameters:
| Parameter | Value |
|---|---|
| port | Integer, RDP listening port. Optional, default is 3389 for RDP, 5900 for VNC, 22 for SSH, 23 for Telnet |
| user | String, user name (Windows User). |
| pwd | String, password for user name. |
| domain | String, domain name. |
| keyboard | Integer, keyboard layout, default is 0x409 (US) |
| width | Integer, screen width of RDP session. Default is 800 |
| height | Integer, screen height of RDP session. Default is 600 |
| vmid | Hyper-V VM GUID, For example: B3D5444C-2611-405A-9CA0-7AA8DA94DF0B, it’s for Hyper-V console connection. |
| minWidth | Minimum width, some applications can only work on a minimum resolution |
| minHeight | Minimum height, some applications can only work on a minimum resolution |
Printer driver issue:
(Since version 5.7, Spark View can choose the best available driver automatically. It’s not recommended to set up the printer driver unless you have special needs. The followings is for reference only)
SparkView will use “MS Publisher Imagesetter” as the default printer driver, because all Windows have this driver installed by default. We found some problems with this driver: It woks good if you print only few pages, it’ll generate huge raw printing file (>1GB) if you are printing more than 50 pages. It’s better to change the printer driver in the gateway.conf:
printerDriver = HP Color LaserJet 8500 PS
You should make sure your RDP server has this printer driver installed. This is how to find a PostScript printer driver:
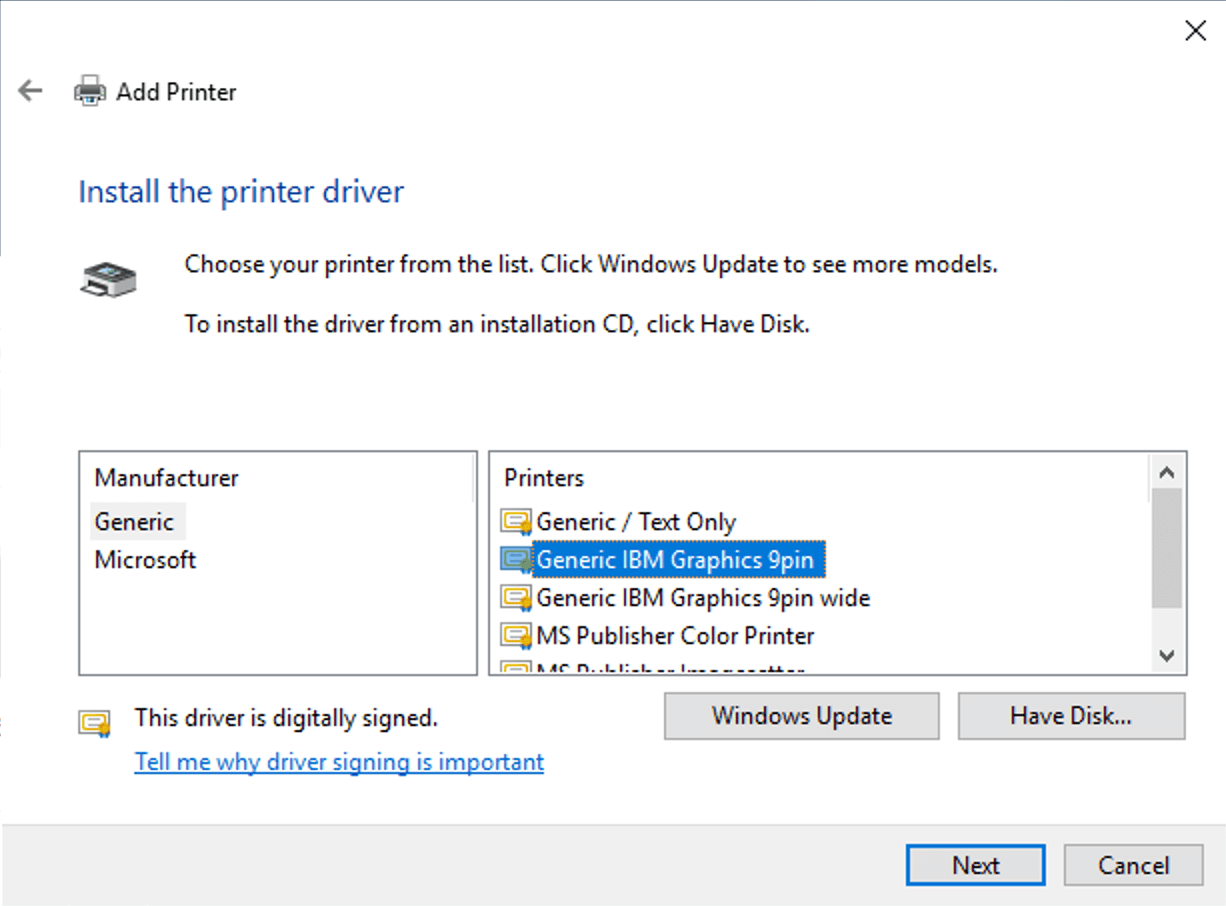
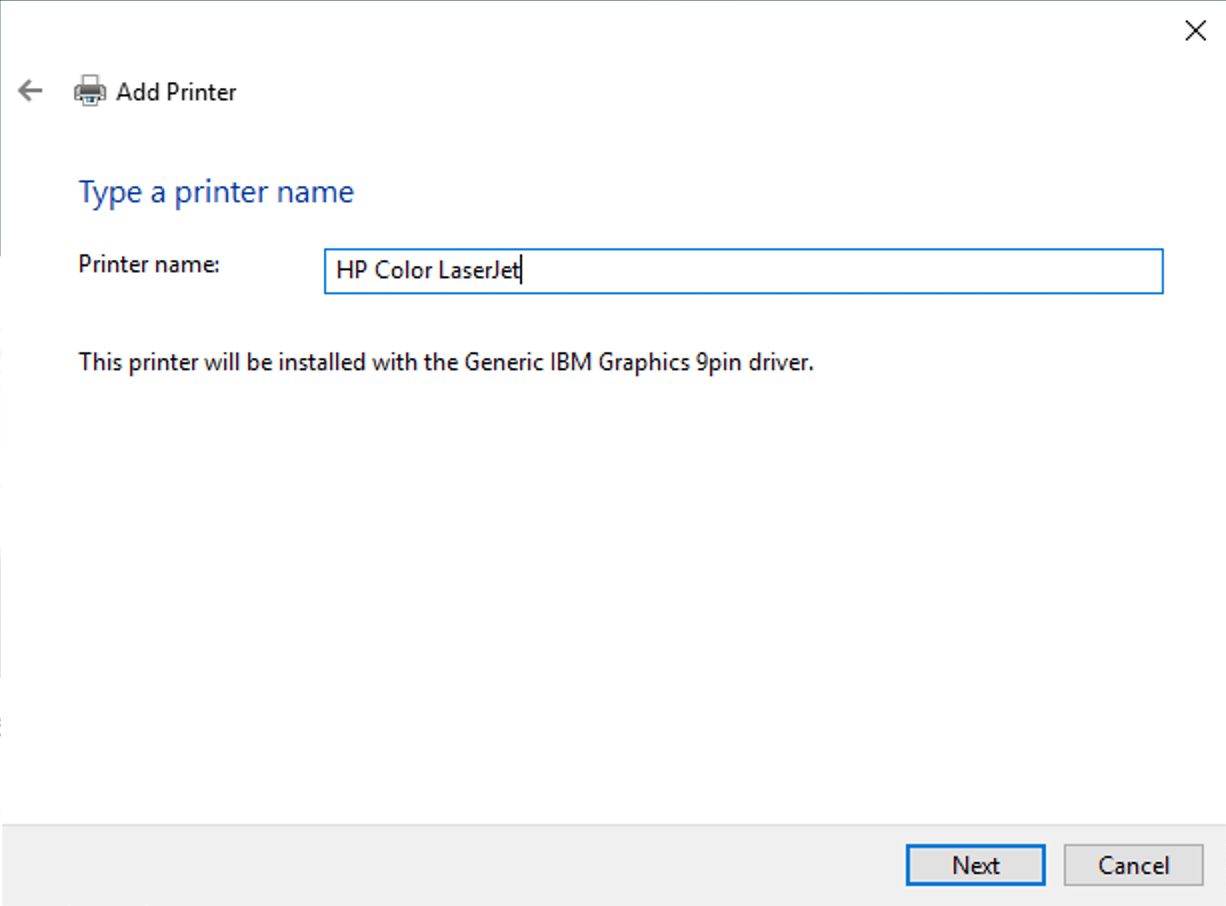
Copy the selected printer name then “Cancel”. You don’t need to actually install it, then you set up this printer driver in gateway.conf.
Please make sure it’s a PostScript or PCL printer. You need to set up the PostScript to PDF converter or PCL to PDF converter accordingly in gateway.conf.
- Download and install your desired printer driver
- Set up the printer driver name in gateway.conf:
printerDriver = HP Universal Printing PS
3.4 – Start a program on connection (as shell)
Set up the following parameters:
startProgram=shell
command=encodeURIComponent(‘C:\\apps\\notepad.exe’)
directory= encodeURIComponent(‘C:\\apps\\’)
Checklist:
- You many need to allow the RDP server to run any application if you are connecting to a Windows server.
3.5 – Start RemoteApp
Add the following parameters if you want to start the RemtoeApp in current browser window:
startProgram=app
exe=||WINWORD
directory= encodeURIComponent(‘C:\\apps\\’)
Start RemtoeApp in a new window:
function startRemoteApp(remoteApp, args, dir, url){
  var r = svManager.getInstance() || new svGlobal.Rdp(url); //reuse existing session if available

  function onSurfaceReady(surface){
    r.addSurface(surface);
    if (r.running()){
      r.startApp(remoteApp, args, dir);
    }else{
      r.run();
    }
  };
  window.svOnSurfaceReady = onSurfaceReady;
  var rail = window.open('rail.html');
  rail.svOnSurfaceReady = onSurfaceReady;
}

window.onload = function() {
  var gateway = 'w-think', //change this to your SparkView address
  server = '192.168.12.132', //change this to your RDP server address
  user = 'vmuser',
  password = 'password',
  remoteApp = '||notepad',
  args = '',
  dir = '',
  url = 'ws://' + gateway + '/RDP?server=' + server + '&startProgram=app' + '&exe=' + encodeURIComponent(remoteApp) + '&user=' + user + '&pwd=' + password;
  startRemoteApp(remoteApp, args, dir, url);
};
Checklist:
- Make sure you use the alias name of the RemoteApp and with “||’ before the name.
- Make sure you publish the RemoteApp on your Windows first.
3.6 – Virtual Channel (VC) and Dynamic Virtual Channel extension
SparkView JavaScript client supports standard RDP virtual channel and dynamical virtual channel extension. You can create multiple virtual channels and dynamic virtual channels on client side using JavaScript (You can only create one VC before 4.0):
var r = new svGlobal.Rdp(protocol + gw + "/RDP?"+ s, w, h, server_bpp);
var vc = new r.VirtualChannel(); //Use r.DynamicChannel to create a dynamic virtual channel
vc.name = "CUST";
vc.process = function(buffer){
  console.log(buffer.getByte());
  console.log(buffer.getLittleEndian16());
};
vc.onopen = function(){
  var data = new Array(7);
  var rb = new RdpBuffer(data, 0, 7);
  rb.setByte(1);
  rb.setLittleEndian16(345);
  rb.setLittleEndian32(567);
  rb.markEnd();
  vc.send(rb);
};
r.addChannel(vc);
Virtual Channel is used to communicate with RDP host. You also need to write a plug-in for the RDP host.
Please check the following for more information:
http://msdn.microsoft.com/en-us/library/aa383546(v=vs.85).aspx
http://www.codeproject.com/Articles/16374/How-to-Write-a-Terminal-Services-Add-in-in-Pure-C
3.7 – Gateway channel
You can create multiple gateway channels to create a communication layer between client browser and the gateway:
var gvc = new r.GatewayChannel();
gvc.name = "gwc";
gvc.process = function(buffer){
  console.log(buffer.getByte());
  console.log(buffer.getLittleEndian16());
};
gvc.onopen = function(){
  var data = new Array(7);
  var rb = new RdpBuffer(data, 0, 7);
  rb.setByte(3);
  rb.setLittleEndian16(45);
  rb.setLittleEndian32(678);
  rb.markEnd();
  gvc.send(rb);
};
r.addGatewayChannel(gvc);
On gateway side, your class must extend com.toremote.gateway.plugin.AbstractGatewayChannel and register it with the same name using HandlerManager.registerChannel(). Please check the plug-in example for more information.
3.8 – Configuration file and others
You can use the appcfg.js file to configure some parameters for the client. For more information, please check the source code of the file:
sparkview_root_directory/html/appcfg.js
3.8.1 – Start up a server or application automatically after login
To start up a server or application automatically after login, you can set the following parameters in the file html/appcfg.js. Please ensure, that your content is placed inside the hi5.appcfg = {} brackets:
hi5.appcfg = {
	startup: {
		server: "", //If server is "" or not found, the first one will be opened instead.
		newWindow: false //Open in new window
	},
}
After editing, save the file and restart SparkView.
4. – Server side integration
4.1 – HTTP API
You can use HTTP request to create a server, symlink dynamically if you don't want to write a plug-in for the gateway.
To use the HTTP server, you’ll need to configure a password in gateway.conf:
Password = yourPassword
Then you can use MD5 hash of this password with the HTTP API.
Create servers on gateway:
http://gatewayAddress/SERVER?id=serverId&displayName=Name&server=hostName&gatewayPwd=passwordInGateway.conf&...
gatewayPwd is hexadecimal MD5 hash of the password which is configured in gateway.conf.
To delete a server add "&action=delete" to the URL; to update a server, add "&action=update" to the URL.
List servers:
http://w-think/SERVER?action=list&gatewayPwd=21232f297a57a5a743894a0e4a801fc3&id=ATPlus
It returns the asked server if id is specified:
{"id":"ATPlus","displayName":"ATPlus","server":"cloud.thinrdp.net","shadowing":false,"protocols":"rdp","icon":"kbd.png","rdp":{"username":"demo","password":"demo"}}
It returns all servers if id is not specified:
{
  "display" : true,
  "type" : "NORMALLIST",
  "cols" : [
    {"name" : "id"},
    {"name" : "displayName"},
    {"name" : "server"},
    {"name" : "remoteProgram"},
    {"name" : "command"}
  ],
  "rows" : [
    ["ATPlus", "ATPlus", "192.168.12.117", "", ""],
    ["WordPad", "WordPad", "192.168.0.118", "", "wordpad.exe"]
  ]
}
Create symlink on gateway:
http://gatewayAddress/SYMLINK?symlink=symlinkId&server=existingServerId&validTime=20m&gatewayPwd=passwordInGateway.conf&...
You can also use "validFrom", "validTo" parameters. Please check http://www.remotespark.com/view/doc/com/toremote/gateway/connection/SymLink.html for more information.
To delete a symlink, add "&action=delete" to the URL; to update a symlink, add "&action=update" to the URL.
List symlinks:
http://w-think/SYMLINK?action=list&gatewayPwd=21232f297a57a5a743894a0e4a801fc3&symlink=212a155ee951-40db-95ea-177183174fa7
It returns the asked symlink if symlink is specified:
{"id":"212a155e-e951-40db-95ea-177183174fa7","resourceId":"169.254.146.243","validFrom":"Aug 26, 2015 12:00:00 AM","parameters":""}
It returns all the symlinks if symlink is not specified:
{
  "cols":[
    {"name":"id"},
    {"name":"resourceId"},
    {"name":"password"},
    {"name":"validFrom"},
    {"name":"validTime"},
    {"name":"validTo"},
    {"name":"parameters"},
    {"name":"comment"}
  ],
  "rows":[
    ["212a155e-e951-40db-95ea-177183174fa7", "169.254.146.243", "", 1440568800000, "", 0, "", ""],
    ["c5c6bc9d-f8a7-42ca-af9c-bd28c86adab4", "169.254.146.243", "", 1452544860000, "", 0, "", ""]
  ]
}
List sessions:
http://w-think/SESSION?action=list&gatewayPwd=21232f297a57a5a743894a0e4a801fc3&id=a29575a9-08c2-4162-9bfb-4876820953db
It returns the single session information if session id is specified:
{"id":"a29575a9-08c2-4162-9bfb4876820953db","server":"192.168.12.118","clientIp":"169.254.84.132","clientAgent":"Mozilla\/5.0 (Windows NT 10.0; WOW64) AppleWebKit\/537.36 (KHTML, like Gecko) Chrome\/47.0.2526.111 Safari\/537.36","thumbnail":"","startTime":"Tue Jan 26 15:38:55 MST 2016","numericId":621779525,"user":"","domain":"","rdpId":1,"startTime2":1453847935826}
It returns all sessions if session id is not specified:
{
  "cols":[
    {"name":"id"},
    {"name":"server"},
    {"name":"clientIp"},
    {"name":"clientAgent"},
    {"name":"startTime"},
    {"name":"numericId"},
    {"name":"user"},
    {"name":"domain"},
    {"name":"join"},
    {"name":"protocol"},
    {"name":"symlink"},
    {"name":"thumbnail"}
  ],
  "size":1,
  "rows":[
    ["a29575a9-08c2-4162-9bfb-4876820953db","192.168.12.118","169.254.84.132","Mozilla\/5.0 (Windows NT 10.0; WOW64) AppleWebKit\/537.36 (KHTML, like Gecko) Chrome\/47.0.2526.111 Safari\/537.36","Tue Jan 26 15:38:55 MST 2016",621779525,"","","","RDP","",""]
  ]
}
It returns multiple session information if ids parameter is used:
http://w-think/SESSION?action=list&gatewayPwd=21232f297a57a5a743894a0e4a801fc3&id=a29575a9-08c2-4162-9bfb-4876820953db&ids=sessinId1,sessionId2
[{session1}, {session2}]
Upload license file:
http://wthink/CONTROL?licenseFile=base64encodedLicenseFile&gatewayPwd=21232f297a57a5a743894a0e4a801fc3
Please make sure you encode the value of licenseFile. For example:
encodeURIComponent(base64encodedLicenseFile)
The new license file information will be returned in JSON format if the license file was uploaded successfully.
To query the current license file information, you can use:
http://w-think/CONTROL?licenseFile=.&gatewayPwd=21232f297a57a5a743894a0e4a801fc3
Get gateway information
http://w-think/CONTROL?target=gateway
{"version":"5.8.0","buildNumber":"941","buildTime":"2020_03_04_10","startTime":1583342850085}
Password is not needed for this gateway information request.
Reset Two Factor Authentication
http://w-think/CONTROL?target=twofa&user=Username&gatewayPwd=21232f297a57a5a743894a0e4a801fc3
curl -k -G --data-urlencode "target=twofa" --data-urlencode "user=svtest\user1" https://127.0.0.1/CONTROL
Error handling:
HTTP request will return HTTP Status code 500 and {"error:": "error information"} in JSON if there is an error. For example, server or symlink with specified id was not found when you try to get a server or symlink.
HTTP request will return status code 200 if operation succeeded.
4.2 – Plug-in
The gateway is a multi-thread application, so make sure your plug-in is:
- Thread safe.
- Spawn a thread if the operation takes more than 5 seconds, otherwise, it could cause a network timeout exception and block the gateway.
- Use Collections.synchronizedList(),Collections.synchronizedMap, ConcurrentHashMap etc.
- Avoid anonymous class which could cause memory leak.
- Make your plug-in stateless if possible.
- Logging could be a bottle neck sometimes.
Please refer to the related links:
- 4.2.1 – Start gateway and the plug-in example project in Eclipse
- 4.2.2 – Handshake plug-in
- 4.2.3 – Deploy your plug-in
4.2.1 – Start gateway and the plug-in example project in Eclipse
Download the plug-in example:
http://remotespark.com/Plugin.zip
Extract the zip to your Eclipse workspace and run the follwing actions:
- File -> Import
- Click "Next"
- "Browse" to your workspace directory
- Select the Plugin project.
- Click "Finish"
- Right click on the Plugin project, "Run As" -> "Java Application"
- Make sure "SparkGateway – com.toremote.gateway" is selected.
- Click "OK"
Now the gateway with the plug-in is running in Eclipse. You can use the "Debug As" -> Java Application to debug your plug-in code.
Checklist:
- The SparkGateway.jar used by the plug-in project may be an old version (Plugin\libs\SparkGateway.jar). Please replace it with the one from your GatewayInstallDir\SparkGateway.jar, otherwise, some new APIs may not be available.
4.2.2 – Handshake plug-in
Handshake plug-in is invoked before establishing a RDP connection. It’s a good place to verify, modify or refuse the connection.
You can put any parameter you want when you create a connection on the client side. For example, you can put user’s session id (session on your portal) into a RDP connection:
var rdp = new svGlobal.Rdp(‘ws://myGateway/RDP?server=myServer&token=mySessionId&…’);
Then in the handshake plug-in, you can get the parameter and verify it through a web server on your portal.
class SimpleHandshakePlugin implements HandshakeInterface{
@Override
public Map<String, String> onHandshake(Map<String, String> parameters) throws ClientException{
  String token = parameters.get("token");
  if (isInvalidSession(token)){
    throw new ClientException("Invalid sessioin");
  }
  return parameters;
}
You can also encrypt the token from your portal (encrypted on server side), then decrypt it in the plug-in:
public Map<String, String> onHandshake(Map<String, String> parameters) throws ClientException{
  String token = decryptToken(token);//throw ClientException if not valid
  Map<String, String> paramsFromToken = parseToken(token);
  parameters.put(RdpParameter.server, paramsFromToken.get("server"));
  parameters.put(RdpParameter.user, paramsFromToken.get("user"));
  parameters.put(RdpParameter.pwd, paramsFromToken.get("pwd"));
  String userIp = parameters.get(RdpParameter.ARG_CLIENT_IP);
  //enable recording
  parameters.put(RdpParameter.sessionRecord, "1"); //enable session recording
  //specify the recording file name (optional)
  parameters.put(RdpParameter.RECRODING_FILE_NAME, "myFileName");
  return parameters;
}
Best practices:
- Make sure your plug-in code is thread-safe.
- Make sure your code can be executed in 3-5 seconds, otherwise, please consider running it in a thread.
- You can also use the HTTP API instead if possible.
- Please check the plug-in example on our web site for more details.
4.2.3 – Deploy your plug-in
Export the jar file:
- Right click on the project, "Export", select "Runable JAR file" under Java.
- Choose "SparkGateway - Plugin" in Launch configuration.
- Choose export destination.
- Click "Finish"
Make sure "Extract required libraries into generated JAR" selected in "Library handling"
It’s better to put your plug-in can be in a separated jar file. In this case, you should set up your plug-in file path in gateway.conf:
pluginFile=theLocationOfYourPlugin.jar
Here is how to export the plug-in into a separated jar file (without the content of SparkGateway.jar):
- Make sure only the “src” directory selected
- Click “Finish” and make sure you configure the pluginFile entry in gateway.conf
4.3 – Downloading files unprompted
Users can download files through custom apps and programs. This can be archived by using the clipboard redirection:
- Make sure clipboard redirection is enabled, and
copyFile=truein gateway.conf. - Set
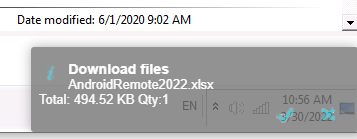
fileUnprompted=xlsx,xls(Excel files in this case, change to your related file types) - In the user's application, you need to provide a button or menu like "Download file", when the user clicks this button, their application needs to copy the file to the clipboard (remote computer's clipboard). Reference:
https://stackoverflow.com/questions/25708895/how-to-copy-files-by-win32-api-functions-and-paste-by-ctrlv-in-my-desktop - The user will then see this message in the browser:

- User clicks once again to download the file.
For this solution:
- No need to install plugins or anything on the RDP server.
- User needs two clicks to download the file. The browser can download the file directly without the extra click, but that usually will be blocked by the browser (popup window blocker).
- The application can also copy multiple files to the clipboard, and gateway will download them as a zip file (which includes all the files)
- No need to enable drive redirection.
Appendices
Appendix A – Integration with symlink use case
Actors:
User, User Portal, Spark Gateway
Preconditions:
User Portal:
- Have user credentials in plain text.
Spark Gateway:
- Configure password in gateway.conf.
- Allow IP addresses of User Portal to access the Spark Gateway API (Optional, Admin Manual 3.25).
- Create RDP servers with config.html or HTTP API (Integration Guide 4.1), and make it as a white list.
- Allow symlink access only by setting symlinkOnly = true in gateway.conf. Server id or address will not be allowed to create a connection.
- Disable VNC access by setting vnc = false in gateway.conf (SSH, Telnet are disabled by default).
Basic flow:
- User login to User Portal.
- (optional) User Portal create a server on Spark Gateway with HTTP API if that server is not created yet:
http://gatewayAddress/SERVER?id=serverId&displayName=Name&server=hostName&gatewayPwd=passwordInGateway.conf&...; Check if server exists: http://wthink/SERVER?action=list&gatewayPwd=21232f297a57a5a743894a0e4a801fc3&id=serverId;
The gateway will return HTTP Status code 500 and {"error:": "not found"} in JSON format. - User Portal create a symlink on Spark Gateway with HTTP API:
'http://gatewayAddress/SYMLINK?symlink=symlinkId&server=existingServerId&validTime=8h&gatewayPwd=passwordInGateway.conf¶meters=' + encodeURIComponent('user=domainUser&pwd=domainPassword&domain=domain'); - User portal construct a connection link and display it to user:
http://gateway/rdpdirect.html?symlink=symlinkId&displayName=nameOnBrowserTitle; or use the Spark View JS library directly to create a connection:var rdp = new svGlobal.Rdp(‘wss://gateway/RDP?symlink=symlinkId&..’, width, height, color); - User click the link and connect.
- User portal delete the symlink when user exist or close the browser:
http://gatewayAddress/SYMLINK?symlink=symlinkId&action=delete
Pros:
- Easy and secure.
- Symlink will be invalid or deleted and it cannot be reused by other.
- No need to send the user credential to the browser side.
Cons:
- User domain credentials need to be sent to the gateway in plain text.
Appendix B – Integration with third party application or HTTP service
Actors:
User Portal, Spark Gateway, Third party application or HTTP server
Preconditions:
User Portal:
- Prepare a token which can be used to verify user.
Spark Gateway:
- Configure authToken.name, authToken.exec, authToken.sucessCode in gateway.conf.
Basic flow:
- User Portal send the token to Spark Gateway along with other parameters.
- Spark Gateway check if the token name is same as the value configured in authToken.name. It’s same, then.
- Spark Gateway execute the application or HTTP Request(GET) configured in authToken.exec, if the return code or HTTP Status code is same as the authToken.sucessCode, gateway will allow the connection, otherwise reject it.
Appendix C – Integration with plugin use case
Actors:
User, User Portal, Spark Gateway
Preconditions:
User Portal:
- Have user credentials in plain text.
- Provide a service to verify the user (optional).
SparkView:
- Write a simple plugin in java for Spark Gateway.
- Disable VNC access by setting vnc = false in gateway.conf (SSH, Telnet are disabled by default).
Basic flow:
- User login to User Portal.
- User Portal encrypt the user credential and other information like User Portal session id as a token string, for example:
'user=domainUser&pwd=domainPassword&domain=domain&session=id’. - User Portal construct a connection link and display it to user:
http://gateway/rdpdirect.html?token=myEcryptedToken&displayName=nameOnBrowserTitle&otherParameters; or use the Spark View JS library directly to create a connection:var rdp = new svGlobal.Rdp(‘wss://gateway/RDP?token=myEycryptedToken&..’, width, height, color); - User click the link and connect.
- SparkView plugin decrypt the token, verify the user session (optional) and put the decrypted RDP parameters back (Please check the plugin example for details: http://www.remotespark.com/Plugin.zip)
Pros:
- User credentials are encrypted.
- Encryption and decryption are done on server side which is pretty safe.
- Plugin can also be used to verify if user is form a valid session, or extend the SparkView functionality.
Cons:
- Need to write some lines of Java code for Spark View gateway.
- You may need to recompile the plugin when upgrading to a new version of Spark Gateway (if the plugin interface changed).
- Encrypted user credentials still need to be sent to the browser.
Both use cases are recommended. You can also consider to use them together (symlink with plugin), so user credentials can be encrypted and don’t need to be sent to the client side.
If User Portal cannot have the user credentials in plain text, you can consider to create a temporary windows user account for every user and remove this account later.
Appendix D – Chromium Embedded Framework (CEF), WebView and Electron
You can use CEF or Electron to make a standalone client, so SparkView client can access local resource directly (clipboard), and override some shortcuts keys reserved by the browser (Ctrl+T/W etc).
- Let Spark View know it can access the clipboard directly by setting
directClipAccess: truein appcfg.js. - For CEF, you need to enable cef_state_t javascript_access_clipboard.
- For WebView, please check: https://stackoverflow.com/questions/4200259/tapping-formfield-in-webview-does-not-show-soft-keyboard
- For Electron, you can also use
mainWindow.webContents.executeJavaScript('hi5.appcfg.directClipAccess=true')to inject the code.
Appendix E – Integration with an external application
In addition to the known and internal verification options, an external application can also be used for verification. This is usually easier than using your own plugin.
To do this, add the following lines to gateway.conf
authToken.name = myToken
authToken.exec = C://MyApps//auth.exe %1
SparkView will replace %1 with the value of the token in the WebSocket URL. The application can then verify or decrypt this value. Additional parameters can also be written back to standard output. These have the following format:
__SG_ARGS=true\tArg1=v1\tArg2=v2
The output must start with __SG_ARGS=true\t, where the different arguments are then separated by the tab character (\t). SparkView will then add these parameters back to the WebSocket URL.