# 3. – Client side (browser) integration
# 3.1 – Use 8 lines of code to start a remote connection from a web page
Save a JavaScript file as tutorial1.page.js with the following content:
```
window.onload = function() {
var gateway = '192.168.12.111', //change this to your Spark gateway address
server = '192.168.12.117', //change this to your RDP server address
url = 'ws://' + gateway + '/RDP?server=' + server + '&user=vmuser&pwd=password';
var r = new svGlobal.Rdp(url);
r.addSurface(new svGlobal.LocalInterface());
r.run();
};
```
Save a web page as tutorial1.html with the following content:
```
Spark View (RDP)
```
Double click on the html file and open it in your browser. You don’t even need a HTTP server for this demo.
**Checklist:**
- to enable HTML5.
- \ to suggest Internet Explorer using the edge web engine.
- Viewport meta tag for touch interface
- “apple-mobile-web-app-capable” meta tag to allow users to create shortcut on home screen (iOS).
- SparkView JavaScript libraries for RDP connection: appcfg.js (configuration), resource.js (language resource), hi5_min.js (common utilities), surface_min.js (UI), rdp_min.js (RDP decoder). Don’t forget hi5.css and rdp.css style sheets.
- A canvas element with id “remotectrl” to display the remote connection. If you are using a different id, you need to specify it when creating the LocalInterface in your JavaScript code: `new svGlobal.LocalInterface(‘MyCanvasId’)`
- Make sure the JavaScript library is loaded before you start a remote connection. A good place is the window.onload event.
- SparkView client will manage the width and height of canvas. Never try to set it up in your code. Never set up the width and height with CSS.
- Make sure you include hi5core_min.js and rdpcore_min.js since 5.0.
- You can set `userWorker: false` in appcfg.js to disable Web Workers (JavaScript threads).
**Troubleshooting:**
- Check the JavaScript console log from your browser (F12 or Developer Tools)
- Check SparkView log (InstallDir/logs/)
- Internet Explorer may still be in legacy mode.
- You may need to configure hi5.libPath if you are using the JS library in your portal. For example, you can configure this in appcfg.js: `hi5.appcfg = {…}; hi5.libPath = ‘pathRelatedToYourWebRoot’;`
- The web worker will load rdpworker_min.js, hi5core_min.js, rdpcore_min.js at runtime. They are supposed to be in the same directory with your web page by default. If not, you can configure hi5.libPath to resolve this issue, but if your gateway is behind VPN and JavaScript rewriter is used by the VPN, this path can be rewritten with a wrong value (VPN JS rewriter bug). In this case, you can leave hi5.libPath as blank and copy those 3 js files to the web page directory as a workaround.
# 3.2 – Using object or cookie for parameters
You can also use objects or cookie for parameters:
**Object parameters with Rdp2:**
```
window.onload = function() {
var parameters = {
gateway: '192.168.12.111',
server: '192.168.12.117',
user: 'vmuser',
pwd: 'password'
};
var r = new svGlobal.Rdp2(parameters);
r.addSurface(new svGlobal.LocalInterface());
r.run();
};
```
**Cookie parameters with Rdp2:**
```
window.onload = function() {
document.cookie = 'gateway=192.168.12.111';
document.cookie = 'server=192.168.12.117';
document.cookie = 'user=vmuser';
document.cookie = 'pwd=password';
var r = new svGlobal.Rdp2();
r.addSurface(new svGlobal.LocalInterface());
r.run();
};
```
You can only set cookies if the web page is from http server.
**HTTP Header parameters:**
Following parameters can also be transferred within HTTP Headers:
```
gw_server, gw_port, gw_symlink, gw_user, gw_pwd
```
**Best practices:**
Don’t mix your web page with JavaScript code. You should always put your JavaScript code into external files because:
- Content-Security-Policy HTTP header can block this kind of mixed content.
- This is blocked by Chrome Web Store App.
- You cannot “pretty print” your code in browser’s Developer Tool, which is helpful when the JavaScript code is minified.
- You cannot dynamically modify your code in the Developer Tool, which is really helpful on debugging and verifying your fix.
- It’s better to put the Canvas element in a DIV.
- You can have multiple Canvas elements in one page (using iframe or DIV) for multiple remote connections.
# 3.3 – Resource redirection and parameters
SparkView has resource redirection (clipboard, drive, audio redirection etc.) disabled by default for safety reasons. You need to implicitly enable them by setting up extra parameters.
Resource redirection can be enabled on both, client side using the JavaScript library and server side using the servers.json.
| Resource redirection | Parameter |
| ----------- | ----------- |
| Clipboard | mapClipboard=on |
| Drive | mapDisk=on
Also need to configure tmpdir in gateway.conf |
| Printer | mapPrinter=on printer=Your Printer Name
You can also configure printerDriver and printer (name) in gateway.conf
You also need to install a PostScript to PDF converter or PCL to PDF converter (depends on your printer driver) on the gateway computer (no need to install it on RDP server) and configure the location and command arguments for the converter in gateway.conf:
soundPref=0: low audio quality, low bandwidth usage. soundPref=1: high audio quality, high bandwidth usage. |
| Audio Input (Microphone) | audioRecord=on |
| Time zone | timezone= encodeURIComponent (‘(GMT-07:00) Mountain Standard Time’) |
Please check the Administrator’s Manual for all parameters you can use.
Example of “enable clipboard redirection”:
```
var r = new svGlobal.Rdp('ws://gatewayAddr/RDP?server=192.168.12.117&mapClipboard=on');
```
**Frequently used parameters:**
| Parameter | Value |
| ----------- | ----------- |
| port | Integer, RDP listening port. Optional, default is 3389 for RDP, 5900 for VNC, 22 for SSH, 23 for Telnet |
| user | String, user name (Windows User). |
| pwd | String, password for user name. |
| domain | String, domain name. |
| keyboard | Integer, keyboard layout, default is 0x409 (US) |
| width | Integer, screen width of RDP session. Default is 800 |
| height | Integer, screen height of RDP session. Default is 600 |
| vmid | Hyper-V VM GUID, For example: B3D5444C-2611-405A-9CA0-7AA8DA94DF0B, it’s for Hyper-V console connection. |
| minWidth | Minimum width, some applications can only work on a minimum resolution |
| minHeight | Minimum height, some applications can only work on a minimum resolution |
**Printer driver issue:**
**(Since version 5.7, Spark View can choose the best available driver automatically. It’s not
recommended to set up the printer driver unless you have special needs. The followings is for
reference only)**
SparkView will use “MS Publisher Imagesetter” as the default printer driver, because all Windows have this driver installed by default. We found some problems with this driver: It woks good if you print only few pages, it’ll generate huge raw printing file (>1GB) if you are printing more than 50 pages. It’s better to change the printer driver in the gateway.conf:
```
printerDriver = HP Color LaserJet 8500 PS
```
You should make sure your RDP server has this printer driver installed. This is how to find a PostScript printer driver:
[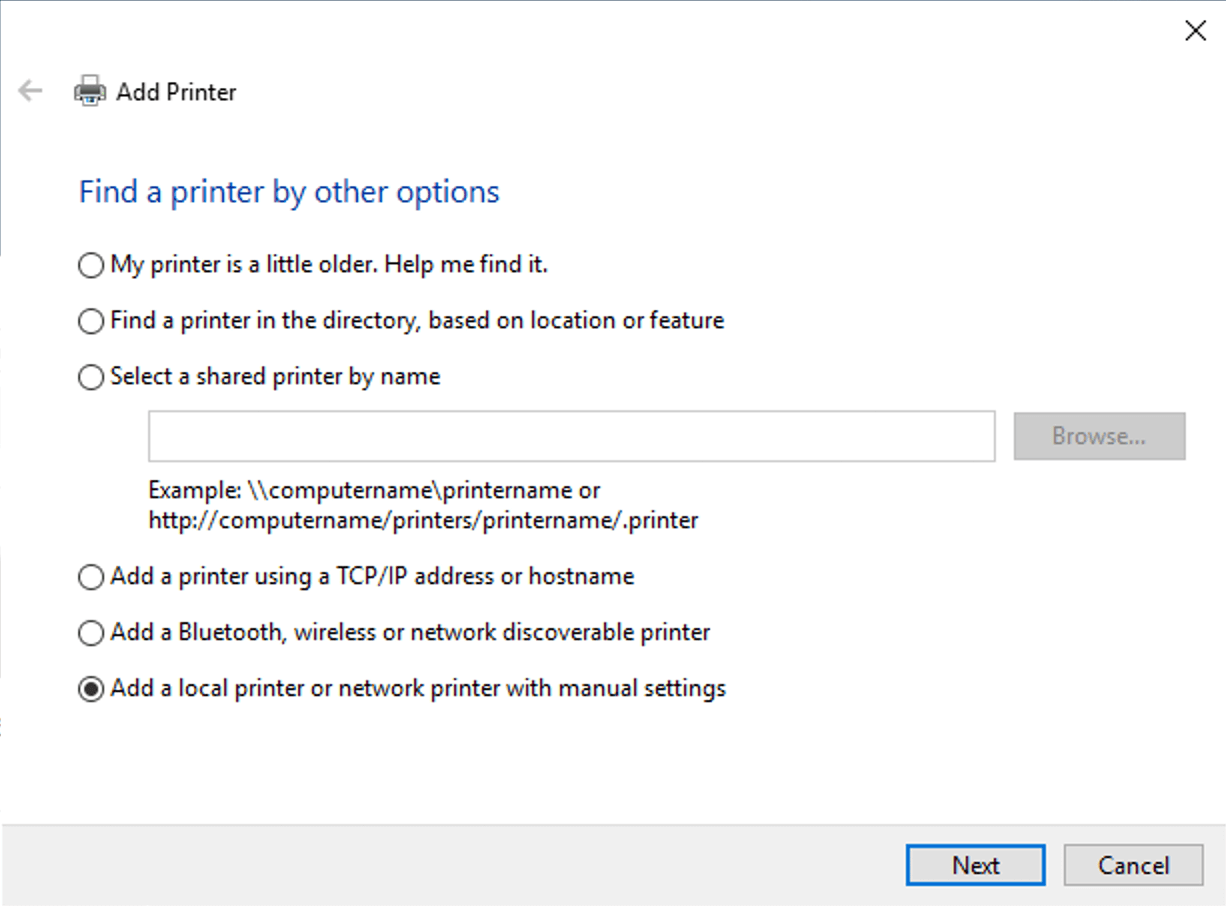](https://docs.sparkview.info/uploads/images/gallery/2022-04/sv-printer-step-1.png)
[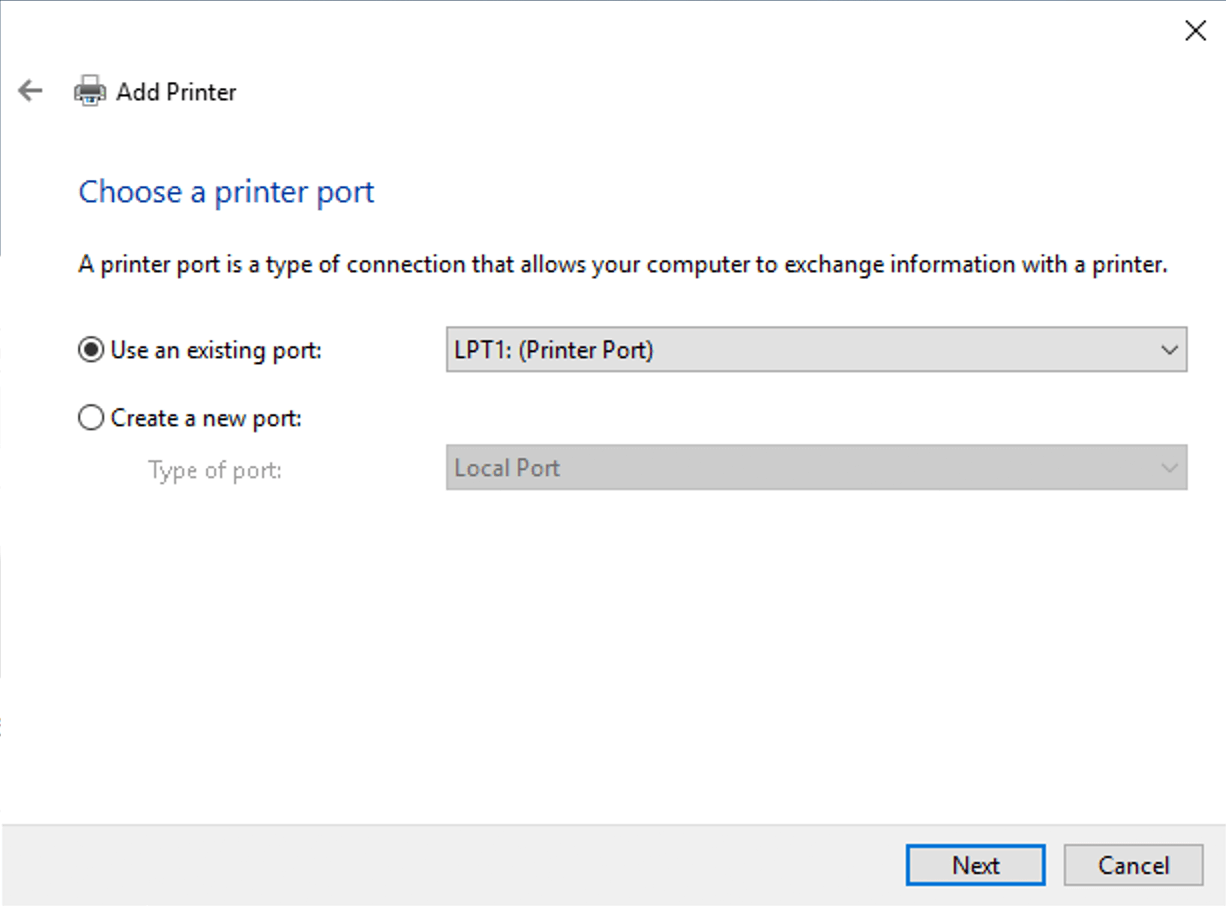](https://docs.sparkview.info/uploads/images/gallery/2022-04/sv-printer-step-2.png)
[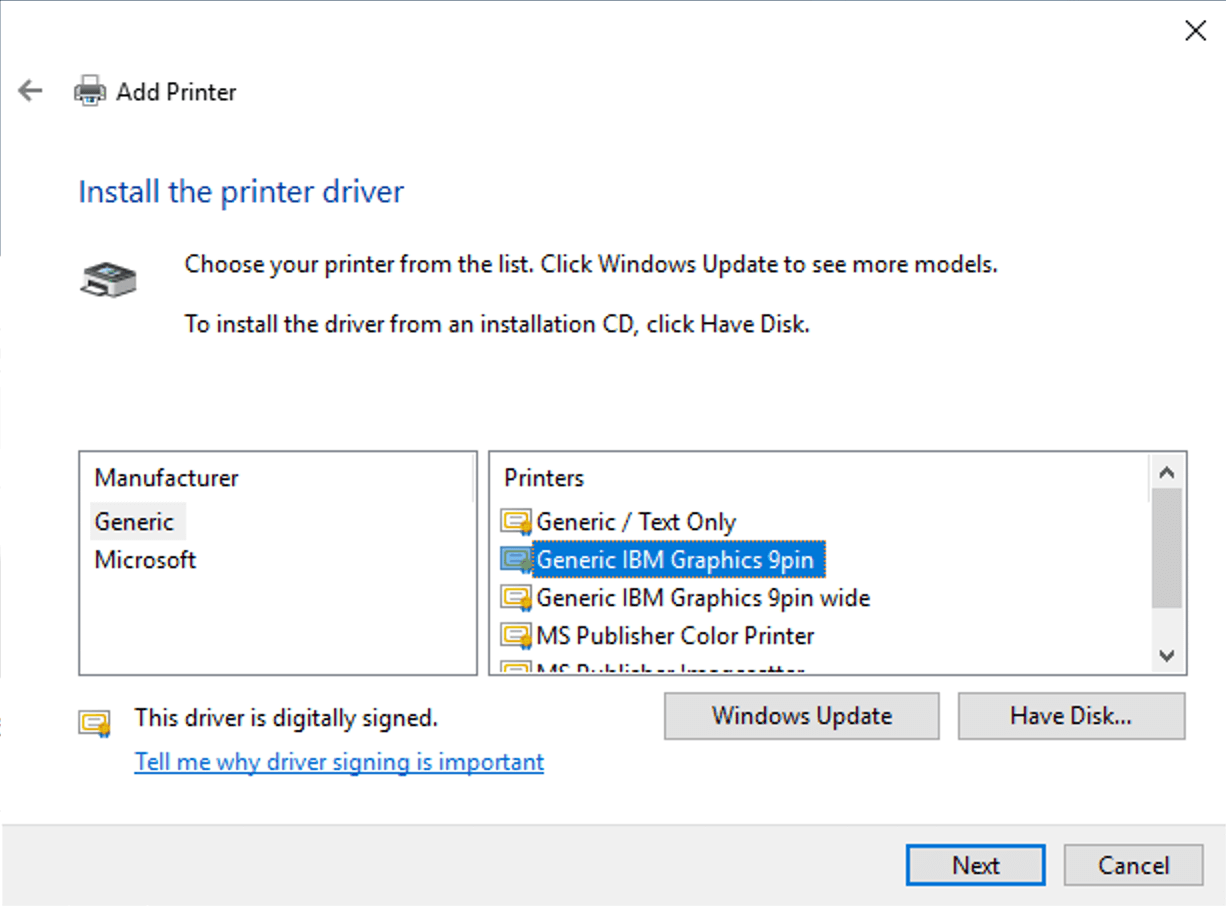](https://docs.sparkview.info/uploads/images/gallery/2022-04/sv-printer-step-3.png)
[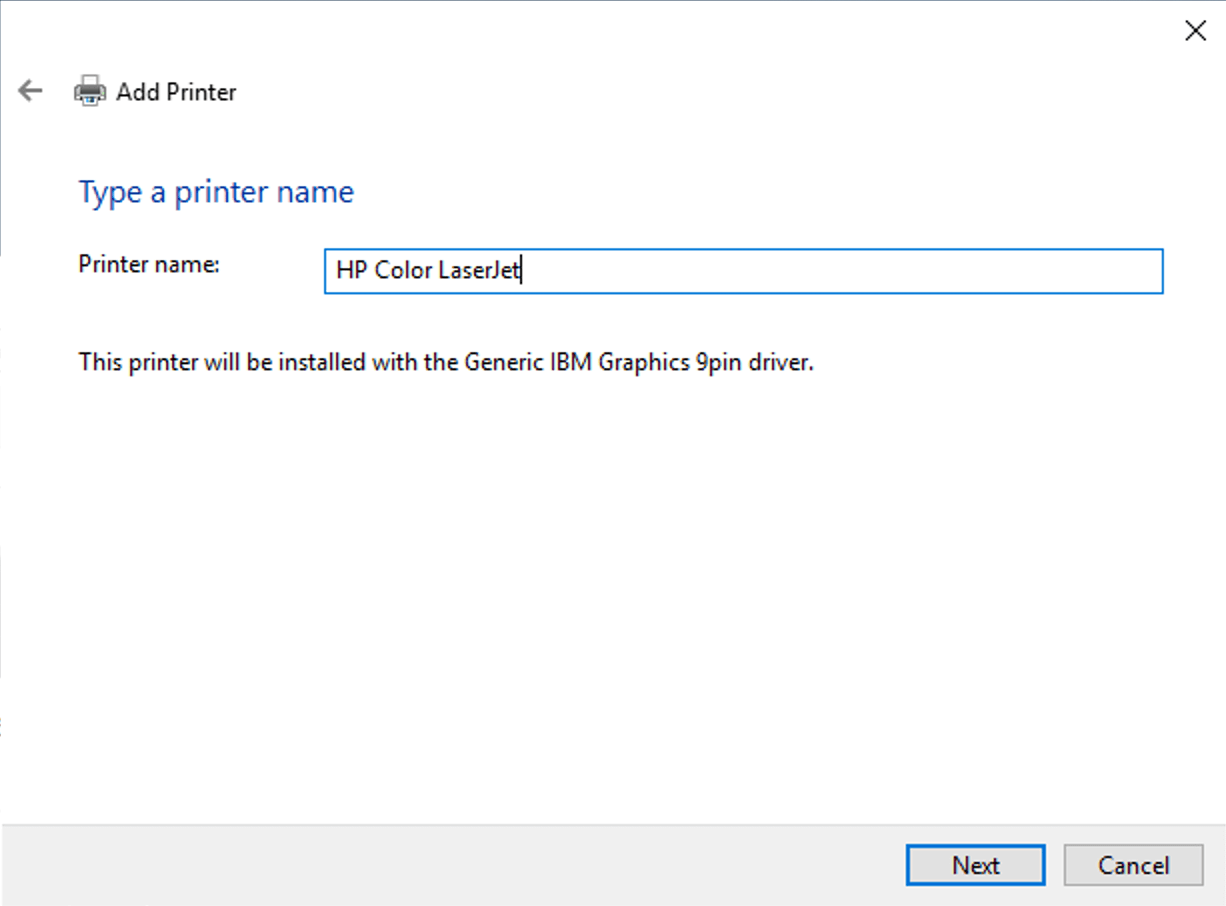](https://docs.sparkview.info/uploads/images/gallery/2022-04/sv-printer-step-4.png)
Copy the selected printer name then “Cancel”. You don’t need to actually install it, then you set up this printer driver in gateway.conf.
Please make sure it’s a PostScript or PCL printer. You need to set up the PostScript to PDF converter or PCL to PDF converter accordingly in gateway.conf.
1. Download and install your desired printer driver
2. Set up the printer driver name in gateway.conf: `printerDriver = HP Universal Printing PS`
# 3.4 – Start a program on connection (as shell)
Set up the following parameters:
```
startProgram=shell
command=encodeURIComponent(‘C:\\apps\\notepad.exe’)
directory= encodeURIComponent(‘C:\\apps\\’)
```
**Checklist:**
- You many need to allow the RDP server to run any application if you are connecting to a Windows server.
# 3.5 – Start RemoteApp
Add the following parameters if you want to start the RemtoeApp in current browser window:
```
startProgram=app
exe=||WINWORD
directory= encodeURIComponent(‘C:\\apps\\’)
```
**Start RemtoeApp in a new window:**
```
function startRemoteApp(remoteApp, args, dir, url){
var r = svManager.getInstance() || new svGlobal.Rdp(url); //reuse existing session if available
function onSurfaceReady(surface){
r.addSurface(surface);
if (r.running()){
r.startApp(remoteApp, args, dir);
}else{
r.run();
}
};
window.svOnSurfaceReady = onSurfaceReady;
var rail = window.open('rail.html');
rail.svOnSurfaceReady = onSurfaceReady;
}
window.onload = function() {
var gateway = 'w-think', //change this to your SparkView address
server = '192.168.12.132', //change this to your RDP server address
user = 'vmuser',
password = 'password',
remoteApp = '||notepad',
args = '',
dir = '',
url = 'ws://' + gateway + '/RDP?server=' + server + '&startProgram=app' + '&exe=' + encodeURIComponent(remoteApp) + '&user=' + user + '&pwd=' + password;
startRemoteApp(remoteApp, args, dir, url);
};
```
**Checklist:**
- Make sure you use the alias name of the RemoteApp and with “||’ before the name.
- Make sure you publish the RemoteApp on your Windows first.
# 3.6 – Virtual Channel (VC) and Dynamic Virtual Channel extension
SparkView JavaScript client supports standard RDP virtual channel and dynamical virtual channel extension. You can create multiple virtual channels and dynamic virtual channels on client side using JavaScript (You can only create one VC before 4.0):
```
var r = new svGlobal.Rdp(protocol + gw + "/RDP?"+ s, w, h, server_bpp);
var vc = new r.VirtualChannel(); //Use r.DynamicChannel to create a dynamic virtual channel
vc.name = "CUST";
vc.process = function(buffer){
console.log(buffer.getByte());
console.log(buffer.getLittleEndian16());
};
vc.onopen = function(){
var data = new Array(7);
var rb = new RdpBuffer(data, 0, 7);
rb.setByte(1);
rb.setLittleEndian16(345);
rb.setLittleEndian32(567);
rb.markEnd();
vc.send(rb);
};
r.addChannel(vc);
```
Virtual Channel is used to communicate with RDP host. You also need to write a plug-in for the RDP host.
Please check the following for more information: [http://msdn.microsoft.com/en-us/library/aa383546(v=vs.85).aspx](http://msdn.microsoft.com/en-us/library/aa383546(v=vs.85).aspx) [http://www.codeproject.com/Articles/16374/How-to-Write-a-Terminal-Services-Add-in-in-Pure-C](http://www.codeproject.com/Articles/16374/How-to-Write-a-Terminal-Services-Add-in-in-Pure-C)
# 3.7 – Gateway channel
You can create multiple gateway channels to create a communication layer between client browser and the gateway:
```
var gvc = new r.GatewayChannel();
gvc.name = "gwc";
gvc.process = function(buffer){
console.log(buffer.getByte());
console.log(buffer.getLittleEndian16());
};
gvc.onopen = function(){
var data = new Array(7);
var rb = new RdpBuffer(data, 0, 7);
rb.setByte(3);
rb.setLittleEndian16(45);
rb.setLittleEndian32(678);
rb.markEnd();
gvc.send(rb);
};
r.addGatewayChannel(gvc);
```
On gateway side, your class must extend com.toremote.gateway.plugin.AbstractGatewayChannel and register it with the same name using HandlerManager.registerChannel(). Please check the plug-in example for more information.
# 3.8 – Configuration file and others
You can use the `appcfg.js` file to configure some parameters for the client. For more information, please check the source code of the file:\
`sparkview_root_directory/html/appcfg.js`
# 3.8.1 – Start up a server or application automatically after login
To start up a server or application automatically after login, you can set the following parameters in the file `html/appcfg.js`. Please ensure, that your content is placed inside the `hi5.appcfg = {}` brackets:
```
hi5.appcfg = {
startup: {
server: "", //If server is "" or not found, the first one will be opened instead.
newWindow: false //Open in new window
},
}
```
After editing, save the file and restart SparkView.