4. – Administration and usage via UI
- 4.1 – config.html
- 4.2 – file.html
- 4.3 – join.html
- 4.4 – login.html
- 4.5 – player.html
- 4.6 – rdp.html
- 4.7 – report.html
- 4.8 – shadow.html
- 4.9 – ssh.html
- 4.10 – telnet.html
- 4.11 – vnc.html
- 4.12 – Further files and views
4.1 – config.html
After opening the /config.html page, you have the possibility to configure all the important settings in SparkView.
Quick overview of the individual topics:
If you access the page from the localhost, no password is required to start the configuration. Outside the localhost, the management password must be entered.
Below you will find a descriptive overview of the different settings areas (tabs here). The name corresponds to the attribute name that can be written directly to the gateway.conf file.
Gateway
| Name in config.html | Attribute in gateway.conf | Type | Default | Description |
|---|---|---|---|---|
| SSL (https and wss) | ssl | boolean | false | Enable/disable HTTPS/WSS. Can be true and false |
| Port (Default is 80 or 443) | port | number | 8080 | Port on which SparkView is running |
| Binding Address | bindAddr | string | "localhost" | Bind SparkView to a fixed IP address |
| Network Level Authentication | credSSP | boolean | false | Enable/disable NLA. Can be true, false or auto |
| Path of License File | license | string | "./license" | Full path to license file, including file name. Only for paid version. |
| Upload License File | Upload a license file | |||
| HTML Root Directory | html | string | "./html/" | HTML root directory. Printed files are stored in the "temp" subdirectory. Please make sure that SparkView has read and write permissions. |
| Default Web Page | directoryIndex | string | "rdp.html;index.html" | Default page (inside the HTML directory) that is displayed after opening SparkView. |
| Path of Log File | logfile | string | "gateway.log" | Full path to log file, including file name. |
| Size of Single Log File (bytes) | maxbytes | number | 30720000 | Maximum size of a log file (please specify in bytes) |
| Maximum number of Log Files | maxfiles | number | 99 | Maximum number of log files. |
| Log HTTP header | logHttpHeader | boolean | true | Log HTTP header. This may contain sensitive information such as passwords. |
| PDF Converter | converter | string | Full path to the Postscript to PDF converter. Ghostscript (https://ghostscript.com/releases) is recommended. | |
| PDF Converter Arguments | arguments | string | "-dBATCH -dNOPAUSE -dPDFSETTINGS=/printer -sDEVICE=pdfwrite -q -sOutputFile=%1 %2" | Arguments for the Postscript to PDF converter. %1 is the name of the output PDF file. %2 is the name of the input PS file. |
| Plugin Class | plugin | string | Class name for a custom plugin. | |
| Administration Password (for reporting API etc) | password | string | "password" | Management password for configuration, reporting and API. |
| Enable Remote Management/Configuration | remoteManage | boolean | false | Enable/disable remote management from outside the localhost. |
| Temporary directory (for downloading/uploading) | tmpdir | string | Parent directory for temporary files. | |
| Days of temporary files are kept | keepDays | number | 1 | How many days temporary files should be kept by the system. |
| RD Web Access Webfeed | webfeed | string | Remote desktop web feed URL, for RD web access integration. | |
| Session Recording | recording | number | Enable/disable session recording. Can be 1 (record graphics only) or 2 (record graphics and sound) | |
| Directory for saving session recordings | recdir | string | Directory for saved session recordings. | |
| Warn user about session recording | recwarning | boolean | true | Warn users about session recording. |
| Access Not-In-List computers after logged in | accessNotInList | boolean | false | Whether users can reach computers and servers that are not shared with them or in the web feed. |
| Name of Redirected Drive | disk | string | Name for the shared disk, used for file upload/download. | |
| Name of Redirected Printer | printer | string | "Remote Printer from Client" | |
| Connections are queued (Backlog) | backlog | number | 50 | How many client connections can be queued. |
| User Definition File | user | string | "./data/users.json" | Full path of the users definition file, including file name. |
| Server Definition File | server | string | "./data/servers.json" | Full path of the servers definition file, including file name. |
| Gateway Web Address | webAddress | string | HTTP address of the web server for OpenID login (redirect). Also in use for client side to get the real gateway address (in case of multiple gateways and load balancing). | |
| Host Name of Client User | clientHost | string | Customize the host name of the client user. For more information and possible parameters see section 3.1, "clientHost". | |
| Rdp Session Performance Flags | performanceflags | number | 111 | RDP performance flags. Please see section 3.4 for more information. |
| RemoteFX | remotefx | boolean | false | Enable/disable RemoteFX. Works only with LAN and 32 bit. |
| DNS Lookups | enableLookups | boolean | false | Enable to make calls perform DNS lookups to get the actual hostname of the remote client. Disable to skip DNS lookups and instead return the IP address in the form of a string (which improves performance). |
| Session cache time (minutes, 0 = disable session cache) | maxCacheTime | number | 0 | How long sessions should be cached on the gateway (in minutes). 0 disables the RDP session cache. |
| Email SMTP Host | mail.smtp.host | string | SMTP host for outgoing emails. You can use java -cp SparkGateway.jar com.toremote.gateway.Mailer title message to send a test email. | |
| Email SMTP Port | mail.smtp.port | number | SMTP port for outgoing emails | |
| Email User | mail.user | string | SMTP user for outgoing emails | |
| Email Password | mail.password | string | SMTP password for outgoing emails | |
| Email From | mail.from | string | Outgoing emails: From | |
| Email to | mail.to | string | Outgoing emails: To | |
| Email SMTP Authentication | mail.smtp.auth | boolean | Server requires authentication | |
| Email TLS | mail.smtp.starttls.enable | boolean | Enable/disable STARTTLS | |
| Symlink | symlink | string | Full path of the symlink definition file, including file name. | |
| License Usage Alert (Email) | licenseAlert | number (float) | Receive an alert by email when the license usage value reaches this value: Value < 1: Usage value as a percentage of the current license. (e.g.: 0.75 = when 75% usage is reached). Value > 1: Value in use as actual concurrent connections (e.g.: 394 = if 394 concurrent connections in use). |
|
| Interval of thumbnail (milliseconds) | thumbnail.interval | number | 0 | Interval for receiving thumbnails of the RDP session (in milliseconds). If 0, the client will not send a thumbnail to the server if there are no changes. |
| Width of thumbnail | thumbnail.width | number | 0 | Thumbnail width (in pixels), must be smaller than 640. 0 = no thumbnail. |
| Copy timeout (milliseconds) | copyTimeout | number | 3000 | Timeout for clipboard redirection (in milliseconds). This value should be increased if you need to copy very large data in your application. |
| Path of Key Store | keyStore | string | Full path of the keystore file, including file name. Set up keystore or certificate name when ssl is true. For example keystore.jks or cert.pfx.If you are using a certificate (i.e. cert.pfx), a password is required (see keyStorePassword).If you are using a Java keystore (i.e. keystore.jks), the password of the keystore must match the one used for the certificate, which is integrated in the keystore. |
|
| Password of Key Store | keyStorePassword | string | Keystore or certificate password. If you are using a Java keystore (i.e. keystore.jks), the password of the keystore must match the one used for the certificate, which is integrated in the keystore. |
|
| Password Encryption | passwordEncrypted | boolean | false | Encrypt the keystore, management and reporting password. Please use following command to get encrypted password:java -cp SparkGateway.jar com.toremote.gateway.Encryption MyPassword |
| Remote Assistance | assistance | boolean | false | Enable/disable remote assistance. |
| SSH | ssh | boolean | false | Enable/disable SSH. |
| TELNET | telnet | boolean | false | Enable/disable Telnet. |
| Disable Burst License | disableBurstLicense | boolean | false | Enable/disable burst license model. |
| License status | Displays the current license status. |
Server
Here you can see a list of all created servers. If you want to add a new server, just click the "Add" button.
To edit an existing server, simply click on the edit icon (1 in the image), to delete a server, click on the delete icon (2 in the image):

After you click the "Add" button to add a new server, you will get a modal window with the following settings options and tabs. The entries can be included directly in the servers.json in addition to the UI version.
| Name in config.html | Attribute in servers.json | Type | Default | Description |
|---|---|---|---|---|
| ID | id | string | ID for the server, must be unique. | |
| Display Name | displayName | string | Display name for the server | |
| Server | server | string | Host name or IP address of the server | |
| Icon | icon | string | Image file for the server, which is displayed as an icon in the SparkView portal. Please specify the full path incl. filename here. | |
| Protocols | protocols | string | "rdp" | Protocols to use for the server. It is recommended to set a new server entry for each protocol. |
RDP
| Name in config.html | Attribute in servers.json | Type | Default | Description |
|---|---|---|---|---|
| Port | port | number | 3389 | RDP port to use |
| User | username | string | User name (optional, since solved via users/users.json) | |
| Password | password | string | Password (optional, since solved via user/users.json) | |
| Domain | domain | string | Domain where the RDP server is located | |
| Console session | console | boolean | false | Establish console session with RDS |
| VirtualBox RDP or xrdp | legacyMode | boolean | false | Use XRDP instead of RDP protocol. Can be used for legacy servers and applications, or Linux distributions. |
| Keyboard Layout | keyboard | number | Keyboard layout to use. See chapter 3.4 for a layout list. | |
| Color Depth | color | number | 16 | Zu verwendende Farbtiefe |
| Minimum Width | minWidth | number | Minimum width of the remote RDP window. Normally, this field should not be filled in, because the dimensions are detected automatically. | |
| Minimum Height | minHeight | number | Minimum height of the remote RDP window. Normally, this field should not be filled in, because the dimensions are detected automatically. | |
| Start Program on Connection | command | string | After the connection is established, directly launch an installed program on the remote desktop/server. | |
| Start in following folder | directory | string | Start the program to be launched in a specified folder. | |
| RemoteApp Exe or file | remoteProgram | string | Start only one application via RemoteApp instead of an entire desktop environment. Please specify the entire path incl. file name. | |
| RemoteApp Arguments | remoteArgs | string | Arguments to be transferred to the starting RemoteApp | |
| Wake On Lan Mac Address | mac | string | Mac address of the allowed Wake On Lan device. Empty/not set = no Wake On Lan. | |
| Wake On Lan Broadcast IP | macIP | string | Broadcast IP address of the allowed Wake On Lan devices | |
| Clipboard Redirection | mapClipboard | boolean | false | Enable/disable clipboard redirection |
| Sound Redirection | playSound | number | 0 | Enable/disable sound playback. 0 = Play sound on this computer; 1 = Do not play sound; 2 = Play sound on the remote computer. |
| Audio Recording | audioRecord | boolean | false | Recording of all audio tracks of the remote computer. |
| RDP 6.1 Decompression | decompressingRDP61 | boolean | false | Enable/disable RDP 6.1 Compression. The RDP 6.1 bulk compression technique produces better compression ratios than the RDP 6.0 bulk compressor, but also consumes significantly more memory, which can affect scalability of multi-user servers. This compressor is only used for server-to-client traffic (it is not used for client-to-server traffic). |
| Printer Redirection | mapPrinter | boolean | false | Activate/deactivate (virtual) printer forwarding. |
| Session Recording | sessionRecord | number | 0 | Enable/disable session recording. 0 = no session recording; 1 = record graphics only; 3 = record graphics and sound. |
| Drive Redirection | mapDisk | boolean | false | Enable/disable disk redirektion. |
| Drive 0 - Dos Name | disks.dosName | string | For the 1st disk: DOS name | |
| Drive 0 - Path | disks.devicePath | string | For the 1st plate: Full path to the plate | |
| Drive 0 - Actions | disks.actions | number | 7 | For the 1st plate: permissions in the octal procedure |
| Drive 1 - Dos Name | disks.dosName | string | For the 2nd disk: DOS name | |
| Drive 1 - Path | disks.devicePath | string | For the 2nd plate: Full path to the plate | |
| Drive 1 - Actions | disks.actions | number | 1 | For the 2nd disk: enable/disable redirect |
| Drive 2 - Dos Name | disks.dosName | string | For the 3rd disk: DOS name | |
| Drive 2 - Path | disks.devicePath | string | For the 3rd plate: Full path to the plate | |
| Drive 2 - Actions | disks.actions | number | 1 | For the 3rd disk: enable/disable redirect |
| Performance Flags | performanceflags | number | 111 | Performance flags for this connection. For more information about the performance flags, see chapter 3.4. |
| Network Level Authentication (credSSP) | credSSP | number | 0 | Enable/disable NLA. 0 = no NLA; 1 = enable NLA; 2 = automatically detect NLA based on server settings. |
| RemoteFX (32 bit color only) | remotefx | boolean | false | Enable/disable RemoteFX. RemoteFX only works with a color depth of 32 bit and under LAN. |
| Smart Card Redirection | smartCard | boolean | false | Enable/disable Smart Card Redirection. |
| Camera Redirection | mapCamera | boolean | false | Enable/disable camera/webcam redirection. |
| USB Redirection | mapUSB | boolean | false | Enable/disable USB Redirection. |
| Load Balance Info | loadBalanceInfo | string | Load balance information for the use of multiple gateways. | |
| Single Sign-on | sso | boolean | true | Use single sign-on for this specific server/connection. |
VNC
| Name in config.html | Attribute in servers.json | Type | Default | Description |
|---|---|---|---|---|
| Port | port | number | 5900 | VNC port to use |
| Password | password | string | Password (optional, since solved via user/users.json) | |
| Encoding | encoding | number | 16 | Coding for the VNC connection. Can be 16 (ZRLE), 7 (Raw) or 0 (Tight). |
| JPEG Quality | quality | number | 5 | Quality of the transferred images (in JPEG format). Significantly affects the performance. |
| ZIP/Tight Compression | compression | number | 6 | Level of compression. Significantly affects the performance. |
| Use CopyRect encoding | UseCopyRect | boolean | true | Enables/disables CopyRect Encoding. The CopyRect encoding is efficient when something is being moved. CopyRect could also be used to efficiently transmit a repeated pattern. |
| Colors | color | number | 32 | Displayed colors during the VNC connection. 256 colors should be used for slow connections with limited bandwidth. |
| Share the server | share | boolean | true | Share the session with other viewers. |
| Clipboard redirection | mapClipboard | boolean | true | Enables/disables clipboard redirection. |
| Session Recording | sessionRecord | number | 0 | Enable/disable session recording. 0 = no session recording; 1 = record graphics only; 3 = record graphics and sound. |
SSH
| Name in config.html | Attribute in servers.json | Type | Default | Description |
|---|---|---|---|---|
| Port | port | number | 22 | SSH port to use |
| User | username | string | User name (optional, since solved via user/users.json) | |
| Password | password | string | Password (optional, since solved via user/users.json) | |
| Font Size | fontSize | number | 13 | Font size used in the displayed terminal. |
| Clipboard | mapClipboard | boolean | true | Enables/disables clipboard redirection. |
| Session Recording | sessionRecord | number | 0 | Enable/disable session recording. 0 = no session recording; 1 = record graphics only; 3 = record graphics and sound. |
| Key File | keyfile | string | Full path to the key file in PEM format incl. file name. For more information on SSH authentication via keys, see chapter 5.7. | |
| Password of Key File | keyfilePwd | string | Key file password | |
| Terminal Type | terminalType | string | "xterm" | Terminal type |
Telnet
| Name in config.html | Attribute in servers.json | Type | Default | Description |
|---|---|---|---|---|
| Port | port | number | 23 | Telnet port to use |
| Font Size | fontSize | number | 13 | Font size used in the displayed terminal. |
| Clipboard | mapClipboard | boolean | true | Enables/disables clipboard redirection. |
| Session Recording | sessionRecord | number | 0 | Enable/disable session recording. 0 = no session recording; 1 = record graphics only; 3 = record graphics and sound. |
HTTP/S
| Name in config.html | Attribute in servers.json | Type | Default | Description |
|---|---|---|---|---|
| Scheme | scheme | string | "https" | Scheme used. Only HTTP and HTTPS are possible here. |
| Port | port | number | 443 | HTTP/S port to use |
| Replace absolute links | replaceAbsoluteLink | boolean | false | |
| Add forward headers | addForwardHeaders | boolean | false | Add X-Forwarded-For and X-Forwarded-Proto HTTP headers to request. |
See chapter 3.30 for more information on the HTTP/S proxy.
User
With SparkView, you basically have several options to integrate users:
- Local user database
- Connection through Azure AD, Active Directory or LDAP
- Connection through RADIUS
You can use config.html to import users from an Active Directory (once) and create users manually from the beginning. Please make connections to Azure AD, Active Directory, LDAP or RADIUS directly in the users.json file. For the sake of simplicity, there is a SparkView Customizer that creates the users configurations for the users.json file.
Click here to get to the customizer →
Import users
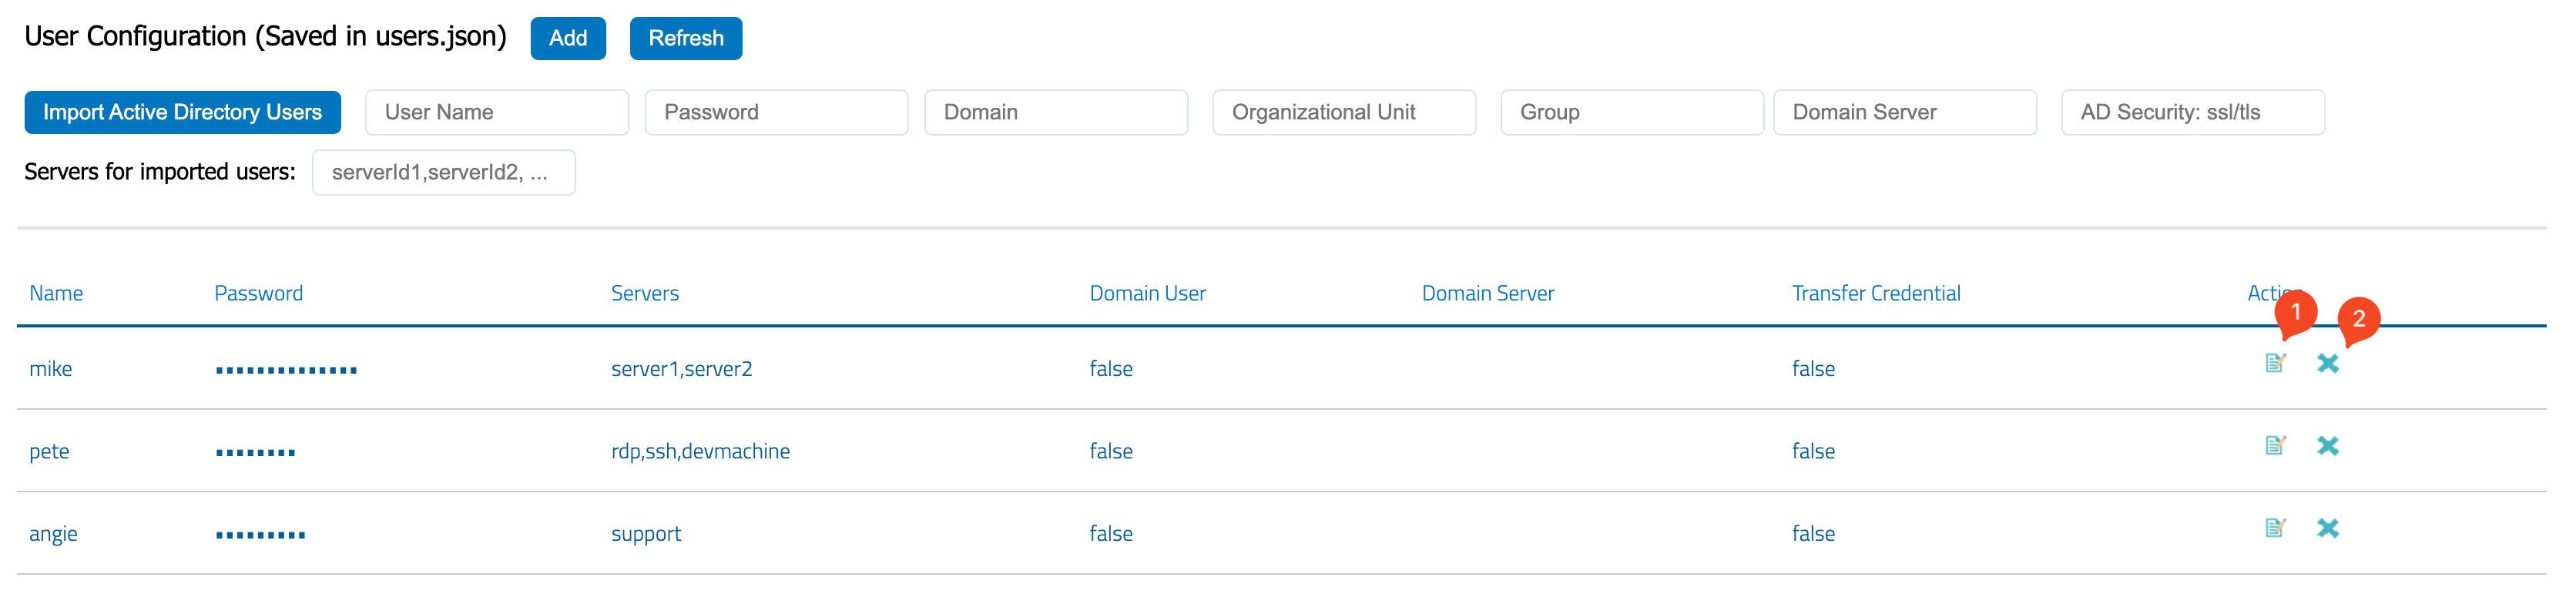
To import users from Active Directory, enter all the details in the fields provided and then click the Import Active Directory Users button. In addition to an organizational unit (OU), you can also define a group (5) from which the users are to be imported. You can also assign servers to the new users during import (8) so that this does not have to be done manually for each user.

Add users manually
To add users manually, click the "Add" button. Then you have the following configuration options. The name corresponds to the attribute name, which can be written directly to the users.json file.
| Name in config.html | Attribute in users.json | Type | Default | Description |
|---|---|---|---|---|
| Name | name | string | Username (recommended without special characters and spaces) | |
| Password | password | string | Password of the user. If it is a domain user, enter *** as the password. |
|
| Servers | servers | array | Shared servers for the user. Enter the server IDs comma-separated and without spaces, or select them from the list. | |
| Domain user | isDomainUser | boolean | false | Specify whether the user is a domain user. |
| Domain Server | domainServer | string | Full address of the domain server | |
| Transfer Credential to Connection | transferCredential | boolean | false | Forward connection data to the connecting targets. For this purpose, the user name and password entered here must match the access data on the target device. |
| Host Name (RDP) | clientHost | string | Displayed name of the client/user for RDP connections. |
Edit/delete users
In the list view, users can be edited via the edit icon (1) and deleted via the delete icon (2).
Symlink
Symlinks can be created and used for direct connection of targets. The symlinks are stored inside SparkView in the /data/symlink.json file. Click the "Add" button to add a new symlink. You will then get a modal window again with the following configuration options:
| Name in config.html | Attribute in symlink.json | Type | Default | Description |
|---|---|---|---|---|
| ID | id | string | Dynamic value | Unique ID of the symlink. This ID is generated automatically and should not be changed. |
| Password | password | string | Password that is given to the symlink as a parameter. | |
| Resource (Server) | resourceId | string | ID of the target system. Can be entered manually or selected from the list. | |
| Valid From | validFrom | string | Validity of the symlink: From when | |
| Valid Time | validTime | string | Validity period of the symlink, e.g. "2d". y = year; M = month; d = day h = hour; m = minute. | |
| or Valid To | validTo | string | Alternatively to the validity period: Until when | |
| Parameters for target | parameters | string | Additional parameters for the symlink. To be entered in URL-encoded form (e.g. user=userName&domain=local). | |
| Comment | comment | string | Comment that is displayed in the edit view. | |
| Access link | Using the Access link, you can call the symlink directly from the form and the symlink does not have to be saved first. |
In the list view, symlinks can be edited via the edit icon (1) and deleted via the delete icon (2).

Session
In SparkView können Sie über den Session-Tab alle aktiven Session beobachten. Außerdem können Sie über eine JavaScript Konsole Nachrichten an einzelne oder alle Session schicken:
sparkConfig.notify('My message');
→ Sendet eine Nachricht an alle aktiven Sessions.
sparkConfig.notify('My message', [123456789, 123456788]);
→ Sendet eine Nachricht an die aktiven Sessions „123456789“ und „123456788“.
Server Group
Individual servers can be grouped into server groups for better and easier organization. The created server groups are stored in SparkView in the /data/servergroups.json file.
To add a new server group, click the "Add" button. You will then get a modal window again with the following configuration options:
| Name in config.html | Attribute in servergroups.json | Type | Default | Description |
|---|---|---|---|---|
| Name | name | string | Name of the server group | |
| Servers | servers | array | Servers to be entered into the server group. The server IDs are entered comma-separated, or selected with the help of the list. |
In the list view, server groups can be edited via the edit icon (1) and deleted via the delete icon (2).

User Group
Individual users can be grouped into user groups for better and easier organization. User groups can be given access to server groups. The created user groups are stored in SparkView in the /data/usergroups.json file.
To add a new user group, click the "Add" button. You will then get a modal window again with the following configuration options:
| Name in config.html | Attribute in usergroups.json | Type | Default | Description |
|---|---|---|---|---|
| Name | name | string | User group name | |
| Users | users | array | Users to be entered into the user group. The user IDs are entered comma-separated, or selected with the help of the list. | |
| Server Groups | servers | array | Server groups to which the user group should have access. The server group IDs are entered comma-separated, or selected with the help of the list. |
In the list view, user groups can be edited via the edit icon (1) and deleted via the delete icon (2).

4.2 – file.html
You can use the /file.html page to establish a secure connection to an SMB2 or SFTP destination. All file operations can then be performed through the currently used browser, you do not need a separate client.
After you open the page, you have the following configuration options:
- File server (Host name or IP address)
- Server type (SMB2 or SFTP)
- Port
- Username
- Password
- Domain
- SMB share
- Directory on the target server
4.3 – join.html
You can join an existing session as a support or spectator via the /join.html page. You will receive the join ID from the session owner. The session owner can view the session information via the small "i" icon at the top of the screen:


The session owner can also specify whether you can control the session or not.
4.4 – login.html
You can log in to SparkView via the /login.html page.
Logging in can be done via various services:
- Local user database (config.html → Users)
- Active Directory, Azure AD, LDAP or RADIUS
- OAuth 2.0/Okta
🎨 Customization desired?
You want to have your login screen customized to your company/brand? No problem, just contact us by creating a ticket.
4.5 – player.html
You can use the /player.html page to play previously recorded session recordings from localhost. For security reasons, access to this page is limited to the localhost. If you want to play recordings from outside the localhost, please use the /playeremote.html page.
4.6 – rdp.html
The /rdp.html page is the heart of the SparkView installation and can be used to connect to a remote RDP server. The connection runs entirely within the browser used, thanks to SparkView.
⚠️ Important!
Normally, the connection to RDP servers and applications is controlled via the portal. The direct call of the /rdp.html should only be used if a target is to be addressed once or temporarily and not saved.
After you open the page, you have the following options to configure the connection to the desired destination:
Tab „General“:
- Ability to upload an .rdp file to establish the connection
- Computer (IP address or host name of the target system)
- Port
- Username
- Password
- Domain
- Keyboard layout
- Connect to a console session
Tab „Display“:
- Width of the remote desktop (= displayed size in the browser on the current screen)
- Height of the remote desktop (= displayed size in the browser on the current screen)
- Color depth
- Disable remote cursor
Tab „Local“:
- Timezone
- Remote audio playback
- Remote audio recording
- Enable/disable clipboard rediretion
- Enable/disable printer rediretion
- Enable/disable drive rediretion
- Shared drive name
- Enable/disable camera rediretion
- Enable/disable USB rediretion
- Enable/disable smart card rediretion
- Enable/disable scanner rediretion
Tab „Programs“:
Optionally, a program or a dedicated RemoteApp of the RDP server can be opened directly after the connection is established. This can prevent access to the "normal desktop", for example.
- Start program on connection
- Program path and file name
- Startfolder
- RemoteApp
- Exe or file
- Arguments
Tab „Advanced“:
- Show desktop background
- Enable/disable font smoothing
- Enable/disable desktop composition
- Show window contents while dragging
- Enable/disable menu and window animation
- Enable/disable visual styles
- Enable/disable persistent bitmap caching
- Enable/disable RemoteFX (32 bit color and LAN only)
- Enable/disable session recording
- Enable/disable RDP 6.1 decompression
- Load balancing information
- Hyper-V VM ID (you can connect to a Hyper-V console. The default listening port of Hyper-V console is 2179)
- Connected computer name
Tab „Multi-Monitor“:
To use the multi-monitor feature of SparkView, please follow these steps:
- Open a new window for each monitor. Please use the "Open" button in the multi-monitor tab.
- Set all windows to be used to full screen
- Enter your connection data and click on "Connect".
4.7 – report.html
On the /report.html page you have the opportunity to get important and up-to-date information about the usage and license of the current SparkView server.
Enter the management password under the gateway address and click the desired button to get the corresponding result/statistic:
Get Report
Get the current number of (concurrent) sessions on the SparkView server.
Get License
Get information about the currently imported license:
- Maximum number of concurrent connections
- Expiration date
- Licensor
- Licensee
- Aktuelle Gateway-Version (Hauptversionen)
4.8 – shadow.html
By calling the /shadow.html page, you can join an existing RDP session and view it, or even control it.
Please note the requirements that must prevail on the RDP server for session shadowing to work:
- Start
gpedit.mscand call the following directory:
Computer Configuration / Administrative Templates / Windows Components / Remote Desktop Services / Remote Desktop Session Host / Connections - Activate the policy "Rules for remote control of Remote Desktop Services user sessions"
- Enable file and printer sharing
After opening the page, you have the following options:
- RDP server (IP address or host name of the RDP server)
- Username
- Password
- Domain
- Enable control over the session
- Enable silent mode. This will not notify the main user of the session that shadowing is taking place.
4.9 – ssh.html
The direct call to ssh.html can be used to quickly establish direct SSH connections to remote destinations via SparkView. Please note that a responsive SSH server must be running on the target system.
SparkView supports authentication via username/password or via public key. To enable public key authentication, please follow the instructions in 5.7 - SSH authentication with keys.
After opening the page, you have the following options:
Tab "General":
- Computer (IP address or host name of the target system)
- Port
- Username
- Password
Tab "Advanced":
- Clipboard redirection
- Font size
- Terminal type
- Session recording
- SFTP activation
- Certificate file
- Certificate passphrase
- Allowed commands
4.10 – telnet.html
The direct call to telnet.html can be used to quickly establish direct telnet connections to remote destinations via SparkView. Please note that a responsive telnet server must be running on the target system.
After opening the page, you have the following setting options:
Tab "General":
- Computer (IP-Adresse oder Hostname des Zielsystems)
- Port
Tab "Advanced":
- Clipboard redirection
- Font size
- Session recording
4.11 – vnc.html
The direct call to vnc.html can be used to quickly establish direct VNC connections to remote targets via SparkView. Please note that a responsive VNC server must be running on the target system.
After opening the page, you have the following settings options:
Tab "General":
- Computer (IP address, hostname or websocket address of the target system)
- Port
- Username
- Password
Tab "Advanced":
- Encoding
- Color settings
- Server sharing
- Clipboard redirection
- Session recording
For connections through the VMware HTML Console, please use the yoursparkview.com/vmware.html page. For more information, see 4.13 - vmware.html.
4.12 – Further files and views
assist.html
Join an existing session for support via this file. Please note that the partner will provide you with the file, as well as the username and password. The invitation file is created by the help seeker via the file msra.exe and should be in the format .msrcIncident.
cname.html
Works with the gateway.conf parameter asHost. If this parameter is set to on, the value of the HTTP header host is set as the server. For example, if you call https://server1/cname.html, an RDP connection to server1 is automatically established. This can be useful when multiple virtual hosts are in use.
faq.html
Learn more about errors that can occur during installation, configuration, and ongoing operation. The notes shown here largely apply to older and legacy versions of SparkView.
joinssh.html
Join an existing SSH session as an outsider using the session ID and a freely assignable name. You receive the session ID from the host of the session to be joined. The host can also choose whether you have read-only or control rights.
jointelnet.html
Join an existing Telnet session as an outsider using the session ID and a freely assignable name. You receive the session ID from the host of the session to be joined. The host can also choose whether you have read-only or control rights.
joinvnc.html
Join an existing VNC session as an outsider using the session ID and a freely assignable name. You receive the session ID from the host of the session to be joined. The host can also choose whether you have read-only or control rights.
keyboard.html
Test the keyboard layout that is currently being used for input here. This allows you to match country and keyboard settings with servers and remote hosts for smooth operation.
monitor.html
This page works analogously to the multi-monitor function of the /rdp.html page and should not be called manually. Please always make multi-monitor connections via the portal or the /rdp.html.
monitordashboard.html
🚧 Experimental feature
This feature is still under development and therefore still in productive mode. Please use with caution!
The monitoring dashboard can be used to view and analyze past actions of the following areas:
- Recordings and playbacks
- Keyboard inputs
- applications
- File transfers
- prints
- User events
- Attack events
- License events
The views of the scopes can be filtered by user, start time, end time and hostname if required.
new.html
View version changes and release notes for major versions of SparkView here. Similarly, you can find a granular changelog at /release.txt.
playeremote.html
View previously recorded footage here, even from outside your network. The normal player.html works only from localhost for security reasons, the playeremote.html from anywhere.
rail.html
Open a RemoteApp within another RemoteApp in the same session.
sessiondashboard.html
View all active sessions of the current gateway here. You can filter and sort the sessions.
sshdirect.html
Connect directly to an SSH server here without going through the SparkView dashboard.
sso.html deprecated
Used in older versions to verify credentials via SSO and then forward traffic. These features are now integrated in the login.html and rdpdirect.html files/views, making the sso.html obsolete and should no longer be used.
vmware.html
Provides the ability to establish a direct (VNC) connection to a VMware HTML Console via SparkView. Please note that the callback is done via the /vnc.html file.