3. – Server configuration
- 3.1 – Gateway
- 3.2 – HTTPS and WSS (WebSocket secure connection)
- 3.3 – Remote Desktop Web Access Portal Integration
- 3.4 – Servers & RDP options
- 3.5 – Users
- 3.6 – Easy printing
- 3.7 – RemoteApp and start a program instead of the whole desktop
- 3.8 – Clipboard redirection and shared clipboard
- 3.9 – Bidirectional audio redirection (RDP)
- 3.10 – File share (uploading and downloading)
- 3.11 – Session Recording and Playback
- 3.12 – Session Shadowing (join or share an active session on gateway)
- 3.13 – Native RDP shadowing (join any active RDP sessions)
- 3.14 – Touch interface (iOS, Android etc)
- 3.15 – Touch remoting
- 3.16 – Hyper-V Console and Enhanced Session Mode
- 3.17 – RDP connection cache/pool
- 3.18 – Symlink (access link)
- 3.19 – Macro recording
- 3.20 - Remote assistance
- 3.21 – RFB (VNC) protocol support
- 3.22 – SSH and Telnet
- 3.23 – Smart Card Redirection
- 3.24 – Scanner redirection
- 3.25 – USB redirection
- 3.26 – OAuth 2.0/Okta integration
- 3.27 – Active Directory, Azure AD, LDAP, RADIUS integration
- 3.28 – Using Java parameters
- 3.29 – Send logs to syslog
- 3.30 — Add HTTP/S proxy entry
- 3.31 – Hardware video acceleration
3.1 – Gateway
The gateway can be configured through the gateway.conf file. By default, this is located in the root installation directory of SparkView. All parameters and options are listed below.
The default gateway.conf file as shipped is shown at the bottom of the page.
| Key | Value |
|---|---|
| bindAddr | Binding address, if you have multiple IP addresses and want to bind on one of them. If you have IIS running on same machine, you must ensure that it is not bound to the IP address & Port you want to use for the SparkGateway. You must set the bindings in the IIS Manager. However, it may also be necessary to change the HTTP service which by default listens on port 80 for all IP addresses. To do this you can use “netsh http add iplisten ipaddress=xxx.xxx.xxx.xxx” to instruct the HTTP service to listen on IP addresses not used by the SparkGateway. Then you can use port 80 on the unused IP Addresses with the SparkGateway. |
| port | Listening port, default is 80. You can let Gateway listen on 2 ports at the same time, e.g. port = 80, 443 |
| ssl | Use HTTPS and WSS (WebSocket Secure Connection), default is false. If gateway is listening on 2 port, the parameter can be configured as: ssl = false, true |
| credSSP | Network Level Authentication, Value can be "true", "false" or "auto". Default is false. “true” will slow down the connection speed a little bit . It’s not necessary to use NLA if the gateway is connecting to internal RDP hosts only. It’s better to enable credSSP if you are using Microsoft RD Broker for load balancing. "auto" will connect without credSSP at the first time, reconnect with credSSP if the connection failed. |
| backlog | How many connections can be queued, default is 50. |
| user | Path of user configuration file (JSON format). |
| server | Path of RDP hosts configuration file (JSON format). |
| html | HTML root directory. |
| directoryIndex | Default page for html directory, default is "rdp.html;index.html". |
| license | Path of the license file. If you copy the license file named "license" (note that there is no file extension) to the SparkView root directory, it is automatically detected. If it is located elsewhere, please specify the full path of the license file including the file name, e.g. license=C:\\Program Files\\Remote Spark\\SparkGateway\\licensefolder\\license.txt. |
| logfile | Path of log file. |
| maxbytes | Limit the maximum number of bytes to write to any one log file, default is 30M. |
| maxfiles | Log file rotation, the number of log files to use, default is 99. |
| logHttpHeader | If log http header, which may contains sensitive information. Default is true. |
| converter | Postscript to PDF converter, used for printing. Ghostscript is recommended: http://www.ghostscript.com/download/ Example: C:\\Program Files\\gs\\gs9.04\\bin\\gswin64c.exe |
| arguments | Arguments for converter. %1 is output pdf file name. %2 is input ps file name, they'll be replaced by program. Example: -dBATCH -dNOPAUSE -dUseCIEColor -dPDFSETTINGS=/printer -sDEVICE=pdfwrite -q -sOutputFile=%1 %2 |
| plugin | Class name for your plug-in |
| pluginFile | The full path of your plug-in jar file |
| password | Password for reporting and management API |
| remoteManage | Make configuration accessible from everywhere. Default is false. |
| mime | Add extra mime types for web server: rdp:application/rdp;conf:text/plain |
| stderrLog | Set false to disable logging to stdout/stderr |
| keepDays | How many days the temporary files generated by system be kept, default is 1 day |
| disk | The name for the shared disk, used for file uploading/downloading |
| webfeed | RD Web Feed URL, for RD web access integration |
| recording | Session recording, 0: no recording; 1: recording graphic only. 3: recording graphic and audio. |
| recdir | Parent directory for session recording files. |
| recwarning | Warn user about the recording, default is true |
| accessNotInList | if logged in user can access computers which is not in their list (servers.json) or webfeed, default is false |
| printer | Printer name, default is “Remote Printer from Client”. You can specify multiple printer names by using “;” as separator, e.g. “Printer1;Printer2”. The first one will always be the default printer. |
| printerDriver | Printer driver name |
| shadowing | Shadowing switch (if allow joining a session), default is true. |
| resetOnJoin | Don't use seamless session shadowing. |
| nativeShadowing | Allow native RDP session shadowing, default is false. |
| cipherSuites | The cipher suites can be used by SSL encryption. You may want to use some good cipher suites only, for example: SSL_RSA_WITH_RC4_128_MD5, SSL_RSA_WITH_RC4_128_SHA, SSL_RSA_WITH_3DES_EDE_CBC_SHA, SSL_DHE_DSS_WITH_3DES_EDE_CBC_SHA, SSL_DHE_RSA_WITH_3DES_EDE_CBC_SHA, TLS_DHE_RSA_WITH_AES_128_CBC_SHA, TLS_DHE_DSS_WITH_AES_128_CBC_SHA, TLS_RSA_WITH_AES_128_CBC_SHA, TLS_DHE_RSA_WITH_AES_256_CBC_SHA, TLS_DHE_DSS_WITH_AES_256_CBC_SHA, TLS_RSA_WITH_AES_256_CBC_SHA You need to install Java Cryptography Extension (JCE) Unlimited Strength Jurisdiction Policy Files for AES 256 cipher suites. http://www.oracle.com/technetwork/java/javase/downloads/jce-6-download-429243.html |
| webAddress | HTTP server web address, used for OpenID login (redirection back). It’s also used on client side for getting real gateway address (client side may not know that if you are using multiple gateways for load balancing). |
| clientHost | Customize the host name of the client user. Default is the host name or ip address. You can use following variables in the string: ${hostName}: Host name of the gateway machine. ${hostAddress}: Host address of the gateway machine. ${sequence}: a sequence number ${__ip}: client host name or IP. ${_PARAM_SESSION_ID}: Session GUID. ${_PARAM_NUMERIC_ID}: Session 9 digit number ID. ${any parameter transferred from client side} e.g. clientHost = RS-${__ip}-${sequence} , the result will be RSClientHostName-0, RS-ClientHostName-1, … |
| performanceflags | Please check 3.4 RDP Host for more information. You may need this if you are connecting to a Terminal Server/Remote Desktop Session Host. |
| remotefx | Enable RemoteFX video acceleration, default is false. RemoteFX is LAN and 32 bit only |
| gfx | If enable GFX, default is false. |
| enableLookups | Set to true if you want calls to perform DNS lookups in order to return the actual host name of the remote client. Set to false to skip the DNS lookup and return the IP address in String form instead (thereby improving performance). By default, DNS lookups are disabled. |
| maxCacheTime | How long (minutes) the session can be cached on gateway, default is 0 (RDP session cache on gateway is disabled by default). |
| idleUserSession | User session idle timeout, in milliseconds |
| mail.smtp.host mail.smtp.port mail.user mail.password mail.from mail.to mail.smtp.auth mail.smtp.starttls.enable |
Email notification when license expire etc, following is for gamil: smtp.gmail.com 587 support@toremote.com xxxx support@toremotec.om xxx@toremote.com true true You can use java -cp SparkGateway.jar com.toremote.gateway.Mailer title message to send a test email. |
| licenseAlert | Float value, Email alert when license usage reached this number. If value < 1, it means percentage of your license number; If value > = 1, it means the actual concurrent license number. |
| thumbnail.interval | Interval for obtaining thumbnails of RDP session, milliseconds, default is 0 (no thumbnail). Client will not send thumbnail to server if screen is not changed. |
| thumbnail.width | Thumbnail width, it must be smaller than 640, default is 0 (no thumbnail) |
| copyTimeout | Timeout for clipboard copy operation, milliseconds, default is 3000. You may need to increase this value if your application need to copy very big data. |
| savedSessionTimeout | This is the maximum value (milliseconds) for saved session, default is 0, means user cannot save session on gateway. |
| confirmJoin | Confirmation needed when a user try to join a session, default is false |
| keyStore | Set up keystore or certificate name when ssl is true. For example keystore.jks or cert.pfx.If you are using a certificate (i.e. cert.pfx), a password is required (see keyStorePassword).If you are using a Java keystore (i.e. keystore.jks), the password of the keystore must match the one used for the certificate, which is integrated in the keystore. |
| keyStorePassword | Keystore or certificate password. If you are using a Java keystore (i.e. keystore.jks), the password of the keystore must match the one used for the certificate, which is integrated in the keystore. |
| passwordEncrypted | Encrypt the keystore password and the reporting password, default is false. Please use following command to get encrypted password:java -cp SparkGateway.jar com.toremote.gateway.Encryption MyPassword |
| assistance | Enable Remote Assistance, default is false. |
| ssh | Enable SSH, default is false. |
| ssh.cache | Enable/disable SSH history cache for joined sessions, default is true. |
| telnet | Enable TELNET, default is false. |
| gatewayId | Used for email notification etc. |
| oauth2 | Path of oauth2 providers file (JSON format) |
| disabledKeys | Keys (scancode) will not be sent to server, e.g. 219,220 (left and right Windows key); 29+56+211,56+1 will disable Ctrl+Alt+Del and Alt+Esc |
| dataEncrypted | If enable encryption on data files: servers.json, users.json, symlink.json. |
| webfeedCache | If enable webfeed cache. false to disable it. Default is true. You'll need to restart the gateway after your webfeed content changed if it's true. |
| redirectToHttps | Redirect http tranfic to https. Make sure gateway listen on both http and https |
| log.level | The value can be an integer or SEVERE, WARNING, INFO, CONFIG, FINE, FINER, FINEST. Check https://docs.oracle.com/javase/8/docs/api/java/util/logging/Level.html for more details |
| connectif | Create a new connection if you are joining symlink which doesn’t connect to any hosts. |
| randomIp | Use a random ip if your host name has multiple ip address, default is false |
| authorization | “Basic”: enable HTTP Basic Authentication, default is null. |
| headers | Extra headers for HTTP response, For example: headers = Strict-TransportSecurity: max-age=31536000\r\nContent-Security-Policy: script-src 'self'\r\nXXSS-Protection: 1; mode=block\r\nX-Frame-Options: SAMEORIGIN\r\nX-ContentType-Options: nosniff\r\n |
| recFileSize | Limit the size (in bytes) of recording file (auto rotation) |
| file.filter | String. File type filter for the upload. Notation: ? excludes a file type, * allows all file types. Example: Allow all files except .exe and .com: file.filter=?exe,?com,*SparkView recognizes the matches from the beginning, so * must be the last instance for the filter to work. |
| file.maxSize | Integer in Bytes. Specify the maximum file size to be uploaded. Example:file.maxSize=1000000 |
| file.filter.download | String. Specify which file formats may be downloaded. Example:file.filter.download=pdf,doc,docx |
| file.maxSize.download | Integer in Bytes. Specify the maximum file size to be downloaded. Example:file.maxSize.download=1000000 |
| keepPrinting | Keep the printing results (PDF) on gateway, default is false. |
| timeoutWoL | Time out (milliseconds) of Wake on LAN. This will enable WoL if the value is great that 0. |
| symlinkOnly | Gateway will only accept aymlink connection if symlinkOnly is true |
| symlink | Full path of the symlink definition file, including file name, e.g. C:\\Users\\foobar\\workspace\\data\\symlink.json |
| simpleFormatter | Let gateway use SimpleFormatter which is slower but allow you to configure log format. |
| pingClient | Ping client interval (ms). CND or proxy may not close the websocket correctly and leave session alive forever on the gateway. You can enable this to fix this kind of issue. This is enabled by default since 5.6. |
| sessionRecordParam | You can enable session recording from the browser side (sessionRecord=on) if this is true. Default value is false. |
| userGroup | Path of user group configuration file in JSON format. |
| serverGroup | Path of server group configuration file in JSON format. |
| organization | Customize the connection name for the 2FA app on the mobile device. |
| maxRequestBytes | Determines the upper limit for the total size of the request line and the headers. Its default setting is 8KB |
| maxPrintTime | Printing conversion timeout, default is 1200000 milliseconds (20 minutes) |
| httpCookie | Use HTTP Cookie for file uploading to make it more secure. Default is true. |
| fileUnprompted | Files can be download directly without asking user to confirm when user copy a file in RDP server. For example, if the value is “pdf,zip”, when user copy a PDF file, the gateway will prepare the downloading directly without ask use to confirm. Depends on copyFile = true. |
| deployment | Enable deployment service. User can deploy, test applications with the deploy agent via SSH, SFTP. |
| Prefer keyboard-interactive method on SSH. Default is true. Deprecated, please use ssh.preferInteractive instead. |
|
| ssh.preferInteractive | Prefer keyboard-interactive method on SSH. Default is true. |
| fileService | Enable SMB2, SFTP file proxy, so user can use file.html to upload/download files from SMB2 share or SFTP server. Disabled by default. |
| delSymlinkServer | The related server definition will be deleted too if a symlink is deleted or expired. Default is false. |
| trustStore | Trusted certificates for RDP or VNC server (when TLS encrypt is used, credSSP = true in gateway.conf). |
| trustStorePassword | Password for trustStore |
| fileBlockSize | File transferring block size, default is 524288 bytes(5M). Reduce this value can reduce the bandwidth usage but increase uploading time |
| keyDelay | Delay between keys (milliseconds). Default is 0. |
| authToken.name | The parameter name in the websocket URL. |
| authToken.exec | A path of executable or URL. If gateway found the authToken.name parameter in the websocket url, it’ll execute the exe or HTTP Request. The connection can be only allow if the exe or HTTP Request Status Code is authToken.sucessCode. |
| authToken.sucessCode | Integer. |
| twoFA | 1: Enable two-factor authentication; 0: Disable (default); 2: Enforce |
| twoFAStore | Two-factor authentication storage path. Default is installDir\data\store.data. Make sure you back up this file. It’s encrypted by default. |
| rec.timestampSubDir | Enable/disable timestamp sub directory for recdir. Default is true. |
| rec.begin.exec | Run an executable before the session is recorded. Arguments: fileName, server, user, sessionId. |
| rec.end.exec | Run an executable after the session was recorded. Arguments: fileName, server, user, sessionId. |
| file.post | Run an executable after a file was uploaded. For example: file.post = C:\apps\scan.exe %1 %1 will be replaced by the file path of the uploaded file. |
| csv.file | Log session information to CSV file. Columns: Id, Server, Client, IP, Browser, Time ,NumericId, User, Domain, Join, Protocol, Symlink, Port, Action (CONNECT/DISCONNECT/LOGIN). |
| csv.size | Limit the maximum number of bytes to write the log file, default is 2G. |
| vnc.transferCredential, ssh.transferCredential, telnet.transferCredential |
False by default, which disable SSO on VNC, SSH, TELNET connection when SSO is enabled in users.json (transferCredential = true). |
| app.id | String, UUID is recommended. Can be used for load balancing. This unique id will be automatically generated if it's not set. |
| file.viewable | Boolean, the "View" button on File Manager UI will be removed if it's false. Users then can only see the "Download" button. |
| license.limit | Integer, restricts the concurrent session number for testing etc. This value must be smaller than the license number. |
| kerberos.realm | String, enables authentication via Kerberos if set. Can be, for example, the DNS domain name in capital letters of an Active Directory. |
| http.proxy.enable | Boolean, enable/disable connections through the HTTP proxy. |
| readOnly | Boolean. Determines whether the configuration file (gateway.conf) can be changed via API or web config (config.html). Manual changes to the file itself are always possible. Default is false. |
*Please always use absolute file path if you are running Gateway as a service.
Default gateway.conf file:
# Binding address, if you have multiple IP addresses and want bind to one of them, uncomment and change this line
#bindAddr = 192.168.8.4

# Listening port, default is 80 for http and 443 for https (ssl = true)
port = 8080

# Use https and wss (WebSocket Secure connection), better to use 443 as listening port when ssl is true
#ssl = true

# Network Level Authentication (CredSSP), "false" is default, always false in free version
credSSP = auto

# How many client connections can be queued, default is 50
#backlog = 50

# User definition file, default is ./data/users.json. Uncomment this line and add users in this file if you want user log in first before using any rdp host.
#user = C:\\Program Files\\Remote Spark\\SparkGateway\\data\\users.json

# Server definition file, default is ./data/servers.json. Uncomment this line and add RDP hosts here.
#server = C:\\Program Files\\Remote Spark\\SparkGateway\\data\\servers.json

# HTML root directory, default is ./html/. Printed file will be save in sub directory "temp", make sure application have access right on "temp" directory.
html = C:\\Program Files\\Remote Spark\\SparkGateway\\html\\

# Default page for html directory, default is "rdp.html;index.html";
#directoryIndex = rdp.html;index.html

# License file, default is ./license, it's only for paid version
#license = C:\\Program Files\\Remote Spark\\SparkGateway\\license

# Log file, default gateway.log
logfile = C:\\Program Files\\Remote Spark\\SparkGateway\\logs\\gateway.log

# Limit the maximum number of bytes to write to any one log file, default 30M
#maxbytes = 30720000

# Log file rotation, the number of log files to use, default 99
#maxfiles = 99

# Log http header, that may contains sensitive information like password. default is true.
#logHttpHeader = false

# Show warning and error messages to clients. Default is true
#showMessage = false

# Postscript to PDF converter, Ghostscript is recommended: http://www.ghostscript.com/download/
converter = C:\\Program Files\\gs\\gs9.14\\bin\\gswin64c.exe

# Arguments for converter. %1 is output pdf file name. %2 is input ps file name, they'll be replace by program
arguments = -dBATCH -dNOPAUSE -dPDFSETTINGS=/printer -sDEVICE=pdfwrite -q -sOutputFile=%1 %2

# Plugin = com.toremote.gateway.plugin.SimpleManager
#pluginFile = C:\\Program Files\\Remote Spark\\SparkGateway\\plugin.jar

# Password for configuration, reporting and management API.
#password = yourpassword

# Parent directory for temporary files: downloading/uploading etc
#tmpdir = C:\\apps\\share

# Session recording, 1: recording graphic only, 2 recording graphic and sound
#recording = 1

# Directory for session recording
#recdir = C:\\apps\\share

# Warn user about the recordig, default is true
recwarning = true

# RD Web Feed URL, for RD web access integration
#webfeed = https://192.168.0.50/RDWeb/feed/webfeed.aspx

# If logged in user can access computers which is not in their list (severs.json) or webfeed
accessNotInList = true

# CipherSuites. You may want to only use some strong cipher suites for SSL. You may need to install Java Cryptography Extension (JCE) Unlimited Strength Jurisdiction Policy Files (http://www.oracle.com/technetwork/java/javase/downloads/jce-6-download-429243.html)
#cipherSuites = SSL_RSA_WITH_RC4_128_MD5, SSL_RSA_WITH_RC4_128_SHA, SSL_RSA_WITH_3DES_EDE_CBC_SHA, SSL_DHE_DSS_WITH_3DES_EDE_CBC_SHA, SSL_DHE_RSA_WITH_3DES_EDE_CBC_SHA, TLS_DHE_RSA_WITH_AES_128_CBC_SHA, TLS_DHE_DSS_WITH_AES_128_CBC_SHA, TLS_RSA_WITH_AES_128_CBC_SHA, TLS_DHE_RSA_WITH_AES_256_CBC_SHA, TLS_DHE_DSS_WITH_AES_256_CBC_SHA, TLS_RSA_WITH_AES_256_CBC_SHA

# Printer driver you want to use
#printerDriver = HP LaserJet 4100 Series PCL

# HTTP server web address, used for OpenID login(redirection back). Also used on client side for getting real gateway address (client side may not know that if you are using multiple gateways for load balancing)
#webAddress = http://w-think

# Shadowing switch, default is true, if allow user join sessions
#shadowing = false

# Customize the host name of the client user
#clientHost = RS-${__ip}-${sequence}

# Performance flags for RD Web Access Portal integration only.
#performanceflags = 111

#remotefx = true

# Set to true if you want calls to perform DNS lookups in order to return the actual host name of the remote client. Set to false to skip the DNS lookup and return the IP address in String form instead (thereby improving performance). By default, DNS lookups are disabled.
#enableLookups = true

# How long (minutes) the session can be cached on gateway, default is 0 (RDP session cache on gateway is disabled by default).
#maxCacheTime = 10

# User session idle time out, in milliseconds
#idleUserSession = 3600000

# Email configuration. Test email with java -cp ..\SparkGateway.jar com.toremote.gateway.Mailer
#mail.smtp.host = smtp.gmail.com
#mail.smtp.port = 587
#mail.user = support@xxx.com
#mail.password = xxxx
#mail.from = support@yyy.om
#mail.to = xxx@xxx.com
#mail.smtp.auth = true
#mail.smtp.starttls.enable = true

#confirmJoin = true
#assistance = true
#ssh = true
#telnet = true

# Certificate for SSL, pfx (PKCS12) format is recommended, use keystore.jks if you prefer Java KeyStore
#keyStore=cert.pfx
#keyStore=keystore.jks
#keyStorePassword = password
#passwordEncrypted = true
#keyStorePassword = OOLZ+pOdZAa3QXanDDksAmMR4pdpVVD2SblIuXe2ztg=

#oauth2 = C:\\Program Files\\Remote Spark\\SparkGateway\\data\\oauth2.json

# Scancodes for disabling keys (219 left windows key, 220 right windows key)
#disabledKeys = 219,220

# Enabling copy files
copyFile = true
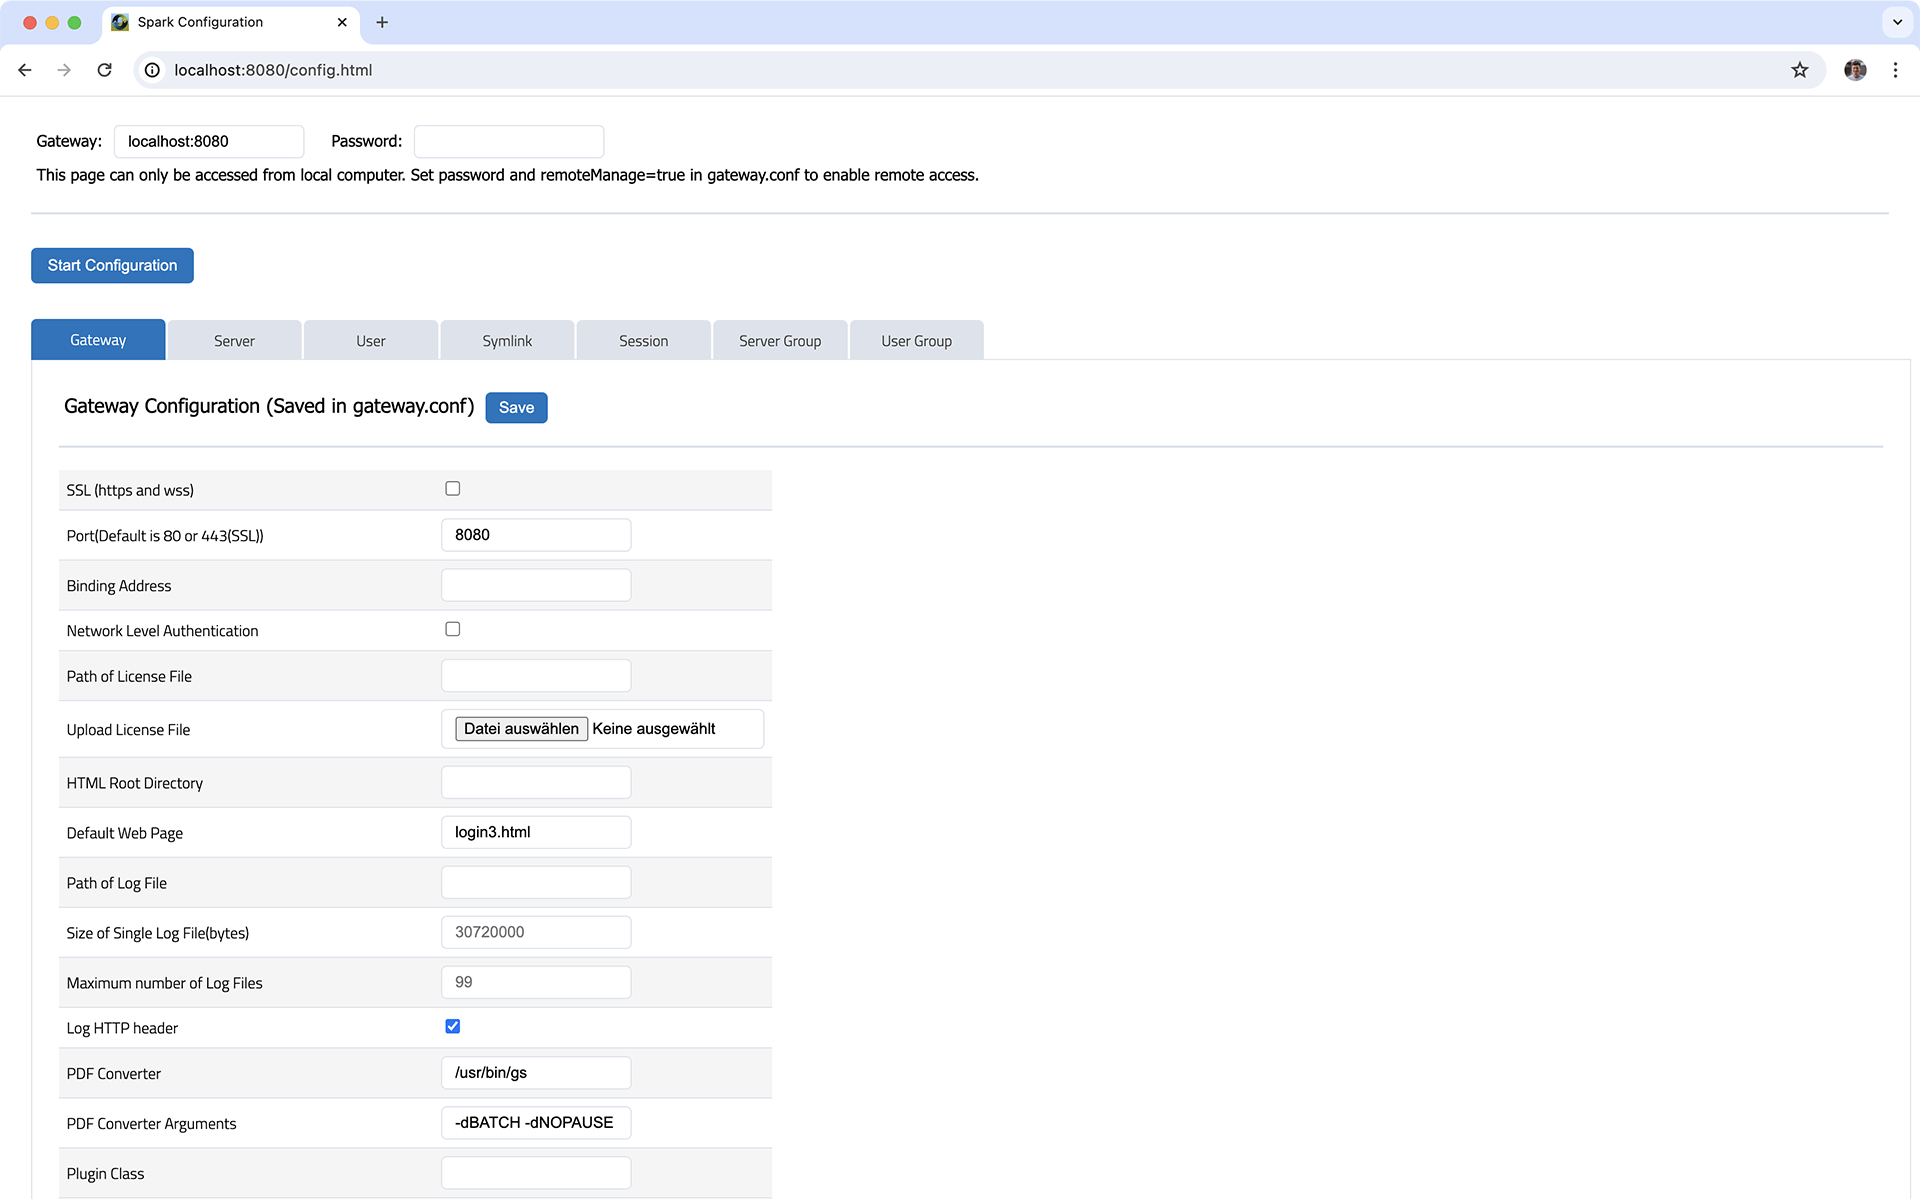
You can also use config.html to configure gateway.conf. Use your browser navigate to: http://localhost/config.html.
For security reason, this page can be only accessed from localhost.
3.2 – HTTPS and WSS (WebSocket secure connection)
Recommended to enable HTTPS and WSS. There is a self-signed certificate (keystore.jks) in the installation directory.
- Set
ssl=truein gatway.conf file. - Set your port to your desired SSL port, like 443:
port=443 - Import your SSL certificate to a Java keystore, please check with your certificate issue and see how to buy and import certificate for Java application server.
- Set up keyStore and keyStorePassword in gateway.conf:
keyStore=D:\\test\\SV\\spark.p12 keyStorePassword=yourPassword - Java 1.8 recommended which supports more and better cipher suites.
- Java 1.8 supports PKCS12 key store, it’s better to use PKCS12 format directly.
- Self-signed certificate may not work in some cases.
- You can have multiple certificates in the Java key store, but Java will always use the first one by default.
- Disable SSLV3, set sslProtocols = SSLv2Hello,TLSv1 in gateway.conf and restart. You can also add TLSv1.1, TLSv1.2 into it for Java 8.
- You can expand the DK key size to 2048 in Java 8 by adding this Java option:
-Djdk.tls.ephemeralDHKeySize=2048 - You can choose the cipher suites you want to use by setting cipherSuites in gateway.conf. You'll need to install Java Cryptography Extension (JCE) to support all the cipher suites:
http://www.oracle.com/technetwork/java/javase/downloads/jce8-download-2133166.html
http://www.oracle.com/technetwork/java/javase/downloads/jce-6-download-429243.html
Recommended cipher suites for Java 11:
cipherSuites =
TLS_ECDHE_ECDSA_WITH_AES_128_GCM_SHA256,TLS_ECDHE_ECDSA_WITH_AES_256_GCM_SHA384,TLS_ECDHE_ECDSA_WITH_AES_128_CBC_SHA,TLS_ECDHE_ECDSA_WITH_AES_128_CBC_SHA256,TLS_ECDHE_ECDSA_WITH_AES_256_CBC_SHA384,TLS_ECDHE_RSA_WITH_AES_128_GCM_SHA256,TLS_ECDHE_RSA_WITH_AES_256_GCM_SHA384,TLS_ECDHE_RSA_WITH_AES_128_CBC_SHA,TLS_ECDHE_RSA_WITH_AES_256_CBC_SHA,TLS_ECDHE_RSA_WITH_AES_128_CBC_SHA256,TLS_ECDHE_RSA_WITH_AES_256_CBC_SHA384,TLS_ECDHE_ECDSA_WITH_AES_256_CBC_SHA,TLS_DHE_RSA_WITH_AES_128_GCM_SHA256,TLS_DHE_RSA_WITH_AES_256_GCM_SHA384,TLS_DHE_RSA_WITH_AES_128_CBC_SHA,TLS_DHE_RSA_WITH_AES_256_CBC_SHA,TLS_DHE_RSA_WITH_AES_128_CBC_SHA256,TLS_DHE_RSA_WITH_AES_256_CBC_SHA256
Recommended cipher suites for Java 8:
cipherSuites =
TLS_ECDHE_RSA_WITH_AES_128_GCM_SHA256,TLS_ECDHE_ECDSA_WITH_AES_256_GCM_SHA384,TLS_ECDHE_ECDSA_WITH_AES_128_GCM_SHA256,TLS_RSA_WITH_AES_256_GCM_SHA384,TLS_ECDHE_RSA_WITH_AES_256_CBC_SHA384,TLS_ECDHE_RSA_WITH_AES_128_CBC_SHA256,TLS_ECDHE_ECDSA_WITH_AES_256_CBC_SHA384,TLS_ECDHE_ECDSA_WITH_AES_128_CBC_SHA256,TLS_ECDHE_ECDSA_WITH_AES_128_CBC_SHA,TLS_ECDHE_RSA_WITH_AES_256_CBC_SHA,TLS_ECDHE_RSA_WITH_AES_128_CBC_SHA,TLS_ECDHE_RSA_WITH_3DES_EDE_CBC_SHA,TLS_ECDHE_ECDSA_WITH_3DES_EDE_CBC_SHA,TLS_RSA_WITH_AES_256_CBC_SHA256,TLS_RSA_WITH_AES_256_CBC_SHA,TLS_RSA_WITH_AES_128_CBC_SHA
Set up Let’s Encrypt (letsencrypt.org) certificate:
- Apply for the certificate from letsencrypt.org and you’ll get the certificate files: cert.perm, privkey.perm, chain.pem etc in /etc/letsencrypt/live/yourDomain/.
-
openssl pkcs12 -export -in cert.pem -inkey privkey.pem -out cert_and_key.p12 -name spark -CAfile chain.pem -caname anyFriendlyName - Add following entries in gateway.conf:
keyStore=/etc/letsencrypt/live/domain/cert_and_key.p12 keyStorePassword = yourExportPasswordInStep3 ssl = true port = 443 - Restart the gateway.
Renew and update the certificate automatically:
Create a cron job to update check the certificate every day at 2:30AM (crontab -e):
30 2 * * * certbot renew --post-hook "sh /etc/letsencrypt/live/startme.biz/update.sh"
update.sh:
#!/bin/bash
cd /etc/letsencrypt/live/domain/
openssl pkcs12 -export -in cert.pem -inkey privkey.pem -out cert_and_key.p12 -name spark -CAfile chain.pem -caname startme -passout pass:mypassword
systemctl stop SparkGateway
systemctl start SparkGateway
exit 0
3.3 – Remote Desktop Web Access Portal Integration
A user can log in with his domain user name and password and get the RemtoeApps or desktops published on the web access portal with the integration.
What you need:
- RemoteApp is published and Web Access is enabled.
- Web Access portal must be in domain.
What you should do:
- Set up the web feed URL of you web access portal in gateway.conf. This URL is your address of your portal + /RDWeb/feed/webfeed.aspx, for example: webfeed = https://sparkview.beyondssl.com/RDWeb/feed/webfeed.aspx
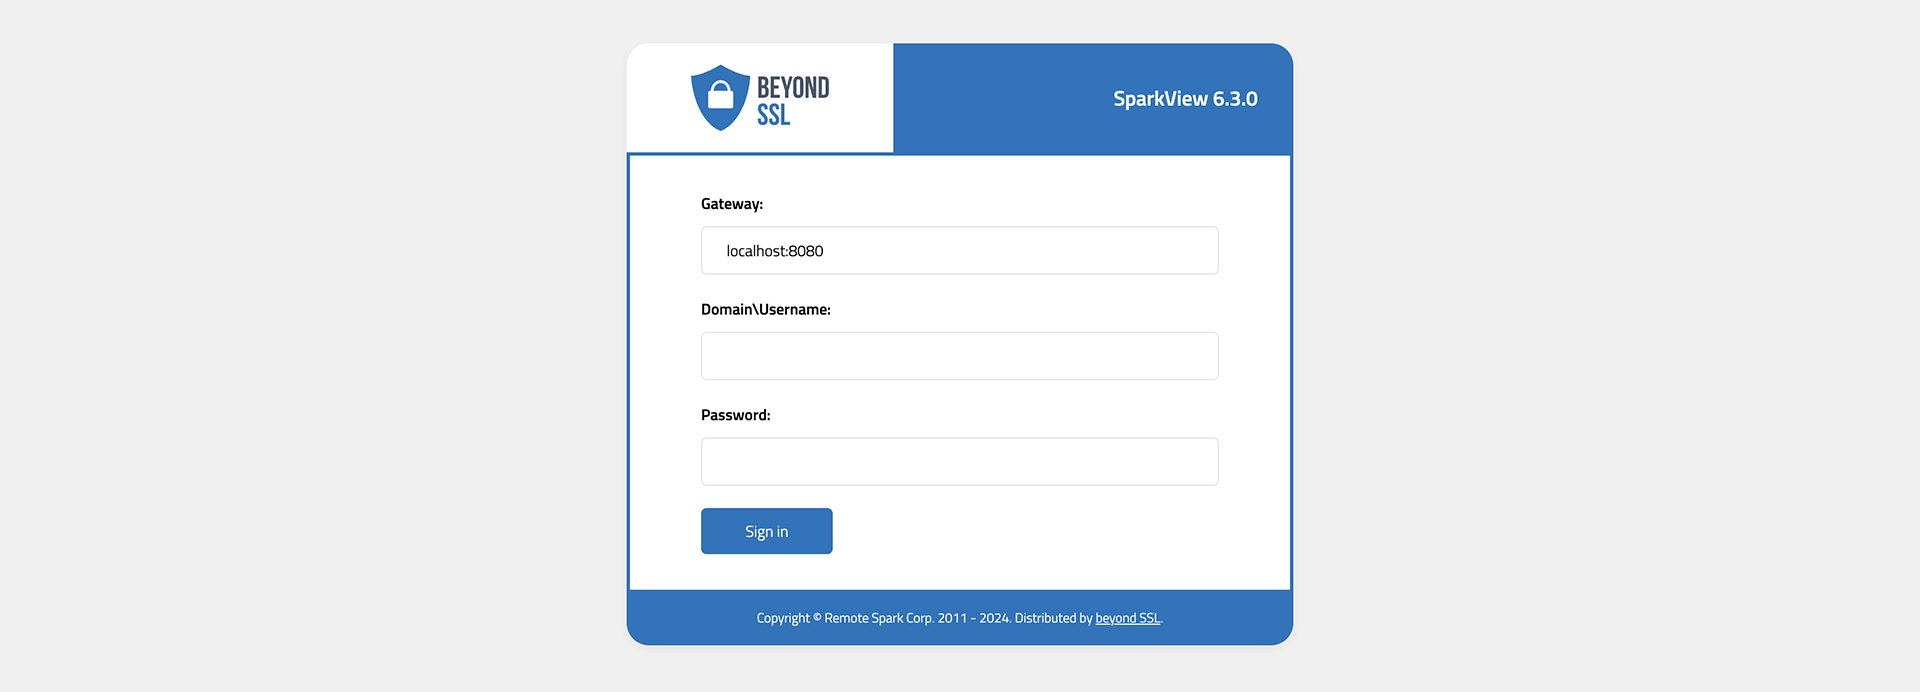
- Use login.html as the start page, set directoryIndex = login.html;rdp.html;index.html in gateway.conf.
- Make sure html directory is configured in gateway.conf. Gateway will save application icons under this directory (in RDWeb subdirectory).
You don’t need to set up RDP hosts or users in servers.json and users.json anymore.

3.4 – Servers & RDP options
Contents:
General information
You can use the servers.json file to define RDP, SSH, VNC, Telnet and HTTP destinations that should be accessible. The options for the individual destinations can also be specified here.
In addition to manual configuration via the servers.json file, you can also use this via the web UI. To do this, navigate with the browser to https://localhost/config.html. For security reasons, this page can only be accessed from the localhost by default.
You can also organize servers in server groups, which are saved in the serverGroups.json file.
Here is an example of a servers.json file:
{
  "type": "NORMALLIST",
  "display": true,
  "connections": [
    {
      "id": "Word",
      "displayName": "RemoteApp MS Word",
      "server": "213.180.85.124",
      "icon": "kbd.png",
      "protocols": "rdp",
      "rdp": {
        "username": "demo",
        "password": "m9ff.QWE",
        "domain": "SERVERSKY",
        "remoteProgram": "||WINWORD",
        "mapClipboard": true,
        "mapDisk": true,
        "playSound": 0,
        "mapPrinter": true
      }
    }
  ]
}
This file is in JSON format, {} means an object, [] means an array.
For a complete list of RDP options, please go to chapter 4.1.
Performance flags
Default value of the performance flags parameter is 111.
| ID | Property | Description |
|---|---|---|
| 0x00000000 | TS_PERF_DISABLE_NOTHING | No features are disabled. |
| 0x00000001 | TS_PERF_DISABLE_WALLPAPER | Wallpaper on the desktop is not displayed. |
| 0x00000002 | TS_PERF_DISABLE_FULLWINDOWDRAG | Full-window drag is disabled; only the window outline is displayed when the window is moved. |
| 0x00000004 | TS_PERF_DISABLE_MENUANIMATIONS | Menu animations are disabled. |
| 0x00000008 | TS_PERF_DISABLE_THEMING | Themes are disabled. |
| 0x00000010 | TS_PERF_ENABLE_ENHANCED_GRAPHICS | Enable enhanced graphics. |
| 0x00000020 | TS_PERF_DISABLE_CURSOR_SHADOW | No shadow is displayed for the cursor. |
| 0x00000040 | TS_PERF_DISABLE_CURSORSETTINGS | Cursor blinking is disabled. |
| 0x00000080 | TS_PERF_ENABLE_FONT_SMOOTHING | Enable font smoothing. |
| 0x00000100 | TS_PERF_ENABLE_DESKTOP_COMPOSITION | Enable desktop composition. |
| 0x40000000 | TS_PERF_DEFAULT_NONPERFCLIENT_SETTING | Set internally for clients not aware of this setting. |
| 0x80000000 | TS_PERF_RESERVED1 | Reserved and used internally by the client. |
Example:
111 = PERF_DISABLE_CURSOR_SHADOW | PERF_DISABLE_CURSORSETTINGS | PERF_DISABLE_FULLWINDOWDRAG | PERF_DISABLE_MENUANIMATIONS | PERF_DISABLE_THEMING | PERF_DISABLE_WALLPAPER;
IP ranges
You can also define IP ranges in servers.json, for example:
{
  "id": "range1",
  "ipRanges": [
    {"from": "192.168.0.0", "to": "192.168.0.250"},
    {"from": "192.168.56.0", "to": "192.168.56.250"}
  ]
},
Keyboard layouts
| Id | Name |
|---|---|
| 0x00000401 | Arabic (101) |
| 0x00000402 | Bulgarian |
| 0x00000404 | Chinese (Traditional) - US Keyboard |
| 0x00000405 | Czech |
| 0x00000406 | Danish |
| 0x00000407 | German |
| 0x00000408 | Greek |
| 0x00000409 | US |
| 0x0000040A | Spanish |
| 0x0000040B | Finnish |
| 0x0000040C | French |
| 0x0000040D | Hebrew |
| 0x0000040E | Hungarian |
| 0x0000040F | Icelandic |
| 0x00000410 | Italian |
| 0x00000411 | Japanese |
| 0x00000412 | Korean |
| 0x00000413 | Dutch |
| 0x00000414 | Norwegian |
| 0x00000415 | Polish (Programmers) |
| 0x00000416 | Portuguese (Brazilian ABNT) |
| 0x00000418 | Romanian |
| 0x00000419 | Russian |
| 0x0000041A | Croatian |
| 0x0000041B | Slovak |
| 0x0000041C | Albanian |
| 0x0000041D | Swedish |
| 0x0000041E | Thai Kedmanee |
| 0x0000041F | Turkish Q |
| 0x00000420 | Urdu |
| 0x00000422 | Ukrainian |
| 0x00000423 | Belarusian |
| 0x00000424 | Slovenian |
| 0x00000425 | Estonian |
| 0x00000426 | Latvian |
| 0x00000427 | Lithuanian IBM |
| 0x00000429 | Farsi |
| 0x0000042A | Vietnamese |
| 0x0000042B | Armenian Eastern |
| 0x0000042C | Azeri Latin |
| 0x0000042F | FYRO Macedonian |
| 0x00000437 | Georgian |
| 0x00000438 | Faeroese |
| 0x00000439 | Devanagari - INSCRIPT |
| 0x0000043A | Maltese 47-key |
| 0x0000043B | Norwegian with Sami |
| 0x0000043F | Kazakh |
| 0x00000440 | Kyrgyz Cyrillic |
| 0x00000444 | Tatar |
| 0x00000445 | Bengali |
| 0x00000446 | Punjabi |
| 0x00000447 | Gujarati |
| 0x00000449 | Tamil |
| 0x0000044A | Telugu |
| 0x0000044B | Kannada |
| 0x0000044C | Malayalam |
| 0x0000044E | Marathi |
| 0x00000450 | Mongolian Cyrillic |
| 0x00000452 | United Kingdom Extended |
| 0x0000045A | Syriac |
| 0x00000461 | Nepali |
| 0x00000463 | Pashto |
| 0x00000465 | Divehi Phonetic |
| 0x0000046E | Luxembourgish |
| 0x00000481 | Maori |
| 0x00000804 | Chinese (Simplified) - US Keyboard |
| 0x00000807 | Swiss German |
| 0x00000809 | United Kingdom |
| 0x0000080A | Latin American |
| 0x0000080C | Belgian French |
| 0x00000813 | Belgian (Period) |
| 0x00000816 | Portuguese |
| 0x0000081A | Serbian (Latin) |
| 0x0000082C | Azeri Cyrillic |
| 0x0000083B | Swedish with Sami |
| 0x00000843 | Uzbek Cyrillic |
| 0x0000085D | Inuktitut Latin |
| 0x00000C0C | Canadian French (legacy) |
| 0x00000C1A | Serbian (Cyrillic) |
| 0x00001009 | Canadian French |
| 0x0000100C | Swiss French |
| 0x0000141A | Bosnian |
| 0x00001809 | Irish |
| 0x0000201A | Bosnian Cyrillic |
Keyboard layout variants
| Id | Name |
|---|---|
| 0x00010401 | Arabic (102) |
| 0x00010402 | Bulgarian (Latin) |
| 0x00010405 | Czech (QWERTY) |
| 0x00010407 | German (IBM) |
| 0x00010408 | Greek (220) |
| 0x00010409 | United States-Dvorak |
| 0x0001040A | Spanish Variation |
| 0x0001040E | Hungarian 101-key |
| 0x00010410 | Italian (142) |
| 0x00010415 | Polish (214) |
| 0x00010416 | Portuguese (Brazilian ABNT2) |
| 0x00010419 | Russian (Typewriter) |
| 0x0001041B | Slovak (QWERTY) |
| 0x0001041E | Thai Pattachote |
| 0x0001041F | Turkish F |
| 0x00010426 | Latvian (QWERTY) |
| 0x00010427 | Lithuanian |
| 0x0001042B | Armenian Western |
| 0x00010439 | Hindi Traditional |
| 0x0001043A | Maltese 48-key |
| 0x0001043B | Sami Extended Norway |
| 0x00010445 | Bengali (Inscript) |
| 0x0001045A | Syriac Phonetic |
| 0x00010465 | Divehi Typewriter |
| 0x0001080C | Belgian (Comma) |
| 0x0001083B | Finnish with Sami |
| 0x00011009 | Canadian Multilingual Standard |
| 0x00011809 | Gaelic |
| 0x00020401 | Arabic (102) AZERTY |
| 0x00020405 | Czech Programmers |
| 0x00020408 | Greek (319) |
| 0x00020409 | United States-International |
| 0x0002041E | Thai Kedmanee (non-ShiftLock) |
| 0x0002083B | Sami Extended Finland-Sweden |
| 0x00030408 | Greek (220) Latin |
| 0x00030409 | United States-Dvorak for left hand |
| 0x0003041E | Thai Pattachote (non-ShiftLock) |
| 0x00040408 | Greek (319) Latin |
| 0x00040409 | United States-Dvorak for right hand |
| 0x00050408 | Greek Latin |
| 0x00050409 | US English Table for IBM Arabic 238_L |
| 0x00060408 | Greek Polytonic |
| 0xB0000407 | German Neo |
Keyboard Input Method Editors (IMEs)
| Id | Name |
|---|---|
| 0xE0010404 | Chinese (Traditional) - Phonetic |
| 0xE0010411 | Japanese Input System (MS-IME2002) |
| 0xE0010412 | Korean Input System (IME 2000) |
| 0xE0010804 | Chinese (Simplified) - QuanPin |
| 0xE0020404 | Chinese (Traditional) - ChangJie |
| 0xE0020804 | Chinese (Simplified) - ShuangPin |
| 0xE0030404 | Chinese (Traditional) - Quick |
| 0xE0030804 | Chinese (Simplified) - ZhengMa |
| 0xE0040404 | Chinese (Traditional) - Big5 Code |
| 0xE0050404 | Chinese (Traditional) - Array |
| 0xE0050804 | Chinese (Simplified) - NeiMa |
| 0xE0060404 | Chinese (Traditional) - DaYi |
| 0xE0070404 | Chinese (Traditional) - Unicode |
| 0xE0080404 | Chinese (Traditional) - New Phonetic |
| 0xE0090404 | Chinese (Traditional) - New ChangJie |
| 0xE00E0804 | Chinese (Traditional) - Microsoft Pinyin IME 3.0 |
| 0xE00F0404 | Chinese (Traditional) - Alphanumeric |
3.5 – Users
Contents:
- General
- User creation
- Activate two-factor authentication (2FA)
- Reset second factor (2FA) for individual users
General
By default, users.json in the data directory is used to authenticate users and use the local user database (see below for user creation). Users must then log in to SparkView once this file exists and is in use.
After successful login, the destinations and hosts that the user can reach using different protocols (RDP, SSH, VNC, HTTP/S, etc.) are displayed:

User creation
Local user database
You can use config.html to configure users.json. Use your browser and navigate to: http://localhost/config.html. For security reason, this page can be only accessed from localhost. The user name should be your email if you are using OpenID integration (log in with Google Account etc).
The following parameters can be stored when creating a user:
- Name
- Password
- Server, which the user is allowed to access
- Domain user (yes/no)
- Domain server and port
- LDAP security
- Forward Credentials to Connection (SSO)
- Host name (for RDP connections)
- Key file (for SSH connections)
- Password of key file
Integrate Active Directory/LDAP/RADIUS
To connect to Active Directory, LDAP, or RADIUS, use the specific instructions in Chapter 3.27.
Import from Active Directory
In addition to the normal Active Directory connection, users can also be imported and written to the users.json file. This allows you to transfer user management from Active Directory to SparkView.
To start an import, open the Users tab on the config.html page and enter the required details in the fields listed above:

Explanation of the fields:
- Username = AD user who is allowed to perform an import (e.g. the administrator)
- Password = Password of the AD user
- Domain = Domain where the users for the import are located
- OU/CN/DC = Structure where the users are located within the AD forest. If the users are located in the default user directory, the structure is as follows
CN=Users,DC=domain,DC=com. To find out in which structure a user is located, the following Powershell command can be usedGet-ADuser -Identity "username". - Group = The group in which the users you want to import are located.
- Domain Server = The URL/IP address of the Active Directory server.
- AD-Security = What encryption will be used for the connection? (e.g. SSL, TLS)
In addition, the last field can be used to assign servers to the imported users. Enter the server IDs from the Servers tab, separated by commas.
OAuth 2.0
You can also log in with Google, Yahoo etc with OAuth 2.0 integration. For OAuth 2.0 integration
- You don’t need to enter user name and password in the login.html.
- Make sure the user name in users.json is your email address (Gmail address if you are using Google account).
- The password in users.json will be ignored, so you can give any passwords to user
If you don’t need this OAuth 2.0 integration, you can remove the following part from login.html:<a href="/OPENID?id=Google"><img src="google.png" title="Sign in with Google account"/></a>
Please check Chapter 3.22 for more information about OAuth 2.0.
Activate two-factor authentication (2FA)
An authenticator app (e.g. Google Authenticator) is required for use.
- Set
twoFA=1to activate ortwoFA=2to force in gateway.conf - The user logs in to SparkView, a QR code appears

- Scan the QR code with the Authenticator app and enter the 6-digit code
Reset second factor (2FA) for individual users
There are 3 ways to reset the second factor for individual users:
Java-Command
⚠️ Attention: To reset the second factor via Java, the SparkView service must first be stopped.
Use the following command in the SparkView root directory:
sudo java -cp SparkGateway.jar com.toremote.gateway.tool.TwoFactor username
For AD users with domain, please use the following command:
sudo java -cp SparkGateway.jar com.toremote.gateway.tool.TwoFactor "domain\user.name"
For Windows users:
java -cp SparkGateway.jar com.toremote.gateway.tool.TwoFactor username

#For AD users:
java -cp SparkGateway.jar com.toremote.gateway.tool.TwoFactor "domain\user.name"
cURL-Request
⚠️ Attention: The SparkView service must be running for this.
Please use the following command:
curl -k -G --data-urlencode "target=twofa" --data-urlencode "user=username" http://sparkview-server.com/CONTROL

#For AD users:
curl -k -G --data-urlencode "target=twofa" --data-urlencode "user=domain\user.name" http://sparkview-server.com/CONTROL
HTTP request (API)
⚠️ Attention: The SparkView service must be running for this.
Please call up the following URL:
http://sparkview-server.com/CONTROL?target=twofa&user=username&gatewayPwd=21232f297a57a5a743894a0e4a801fc3
3.6 – Easy printing
In a traditional RDP environment, you may have to install drivers for client side printers to make printer redirection work. Compared with other solutions, Spark Easy Printing has following benefits:
- Don’t need to install any drivers on RDP host.
- Don’t need to install anything on client side (MS Easy printing needs install .NET Framework 3.5).
- RDP hosts can be any versions of Windows (MS Easy printing need to be Windows 7 and above).
- Using separate channel (via http or https) for printing which will not affect your RDP experience.
- Support all printers, support both PostScript, PCL, PDF and text only (Receipts, Label printer) printers, and printers can have any names. Some application can only work on PCL printers or printers with specific names.
- Support all devices, you can print on Mac, Android, iOS too (MS and Citrix printing can be only used on PC).
- Fewer bandwidth usages.
How Spark View Easy printing works:
- Gateway attaches a universal PostScript printer to RDP host automatically.
- Gateway converts the printing (for PostScript and PCL printers) to PDF file when user print.
- Gateway then sends the PDF file or text (for text only printer) to user.
- User views or prints the PDF/text file in local.
To make printing works, you need to install a PostScript to PDF converter along with Gateway. Ghostscript is recommended and it works on different platforms.
Please also make sure printer redirection is enabled in RDP host.
Install a PostScript Printer (Recommended):
- Set a PostScript to PDF converter in gateway.conf (we use Ghostscript http://www.ghostscript.com/download/ here):
converter = C:\\Program Files\\gs\\gs9.05\\bin\\gswin64c.exe - Set the arguments for converter in gateway.conf:
arguments = -dBATCH -dNOPAUSE -dUseCIEColor -dPDFSETTINGS=/printer -sDEVICE=pdfwrite -q -sOutputFile=%1 %2 - Set a PostScript printer driver in gateway.conf (optional):
printerDriver = HP Color LaserJet 8500 PS - Set a name for the printer in gateway.conf (optional):
printer = My Printer Name
Since version 5.7, the gateway will automatically choose the best available driver. It’s not recommended to set up the printerDriver unless you have special needs.
Install a PCL printer (some applications only work on PCL printer):
- Set a PCL to PDF converter in gateway.conf (we use ghostPCL http://www.ghostscript.com/GhostPCL.html here):
converter = C:\\apps\\ghostpcl-9.05-win32\\pcl6-9.05-win32.exe - Set the arguments for converter in gateway.conf:
arguments = -dNOPAUSE -sDEVICE=pdfwrite -sOutputFile=%1 %2 - Set a PCL printer driver in gateway.conf:
printerDriver = HP LaserJet 4100 Series PCL - Set a name for the printer in gateway.conf (optional)
printer = My Printer Name
For receipts and label (text only) printers, please add “&textPrinter=on” into the websocket url.
If you got “Unsupported driver Installation” warning on Windows 2003, please change following setting:
Control Panel -> System Properties -> Hardware -> Driver Signing Options -> "Ignore" + "Make this action the system default"
Enable silent printing:
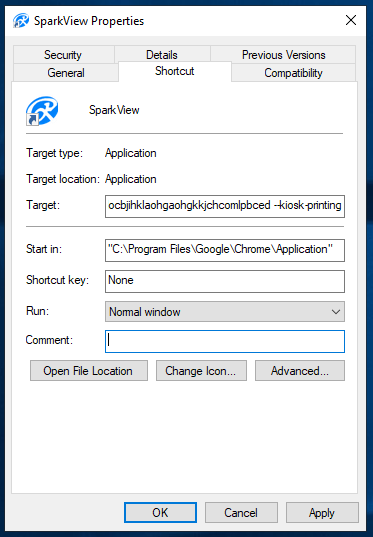
Chrome: "More tools" ->"Create application shortcuts", then edit the just created shortcut, add " -- kiosk-printing" into the target:
Firefox: Type about:config at Firefox. Right click at anywhere on the page and select New > Boolean. Enter the preference name as print.always_print_silent, click OK and select "true" as the value. Restart Firefox.
3.7 – RemoteApp and start a program instead of the whole desktop
There are two ways to start a program:
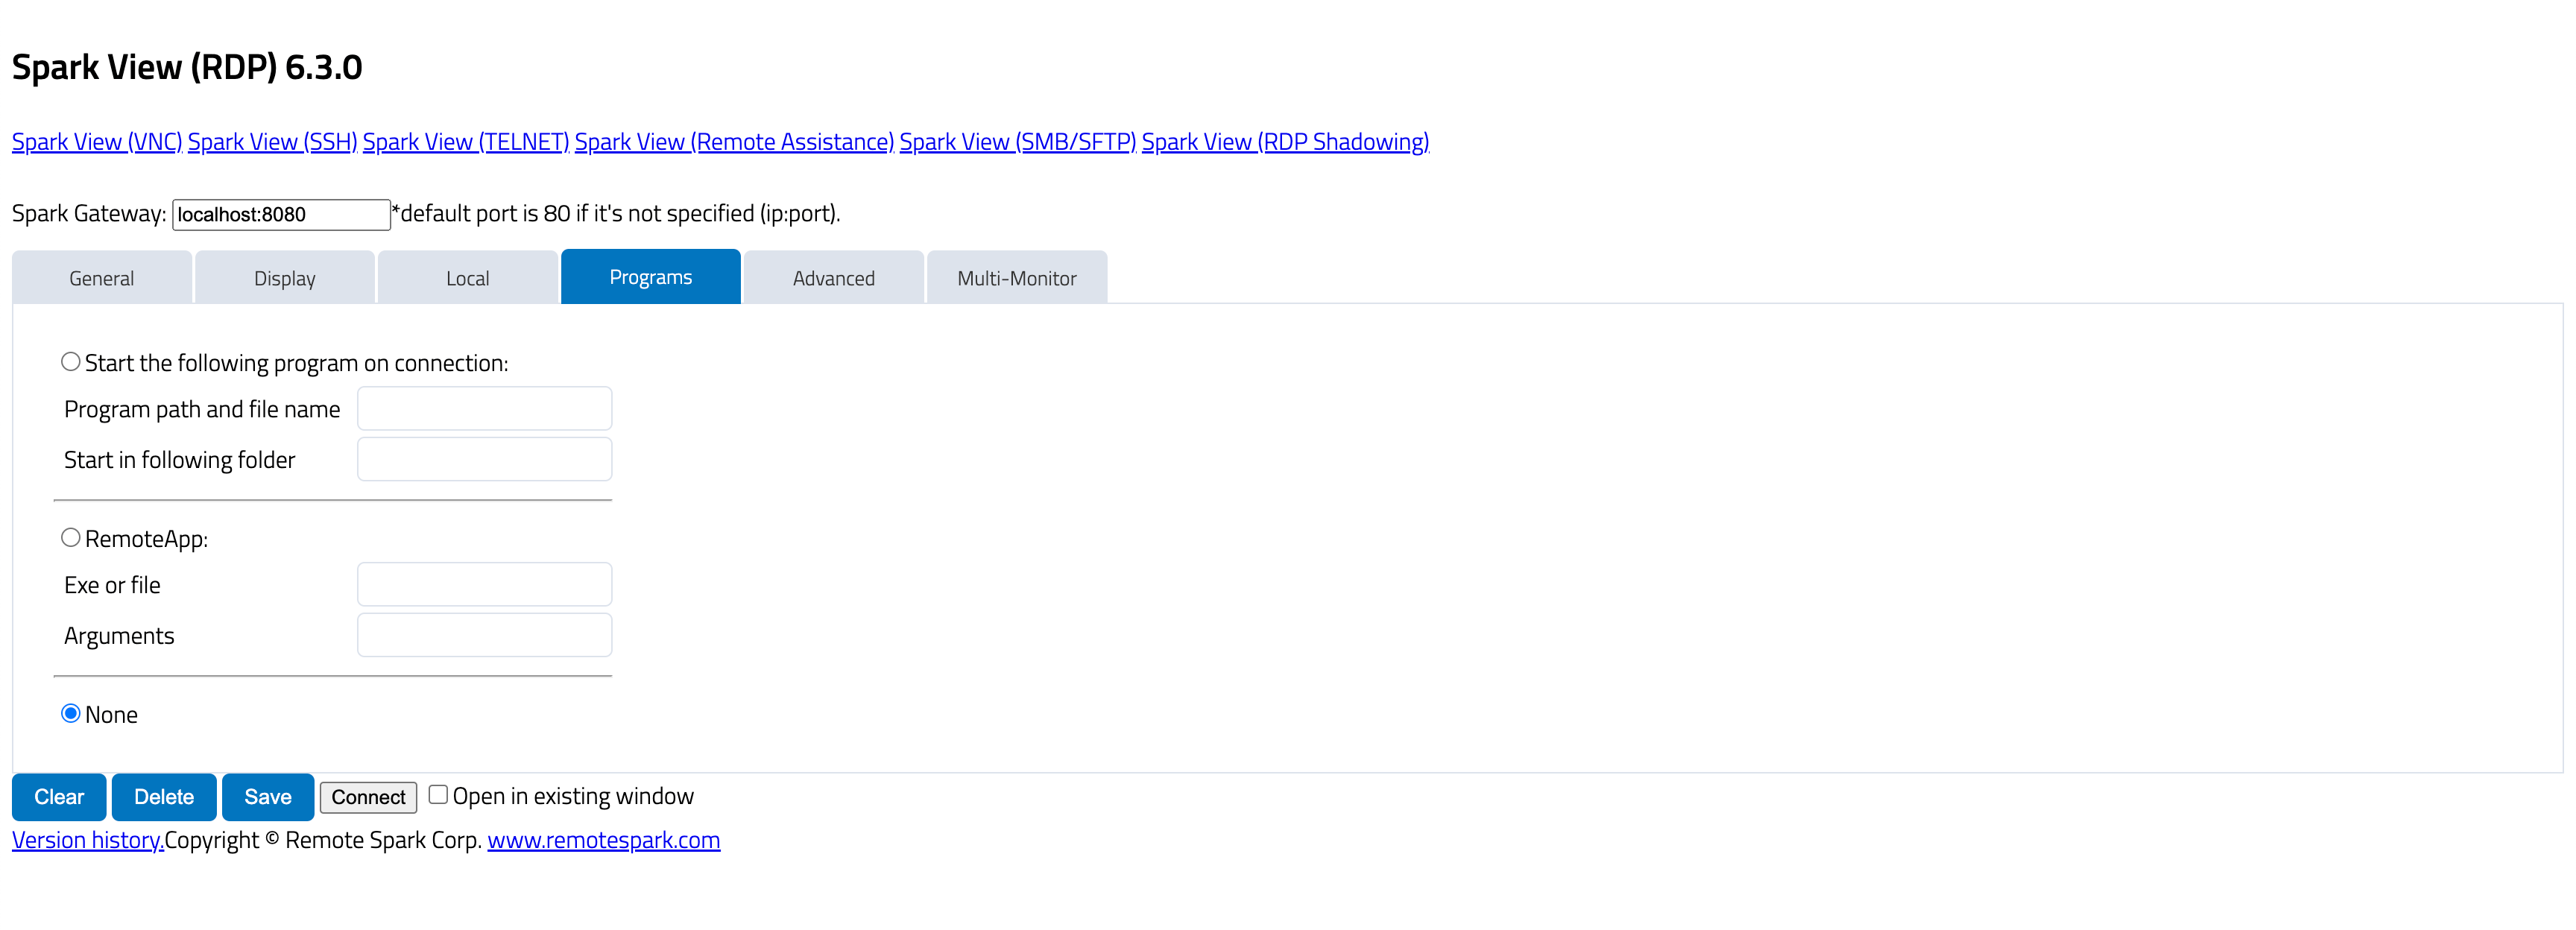
Start a program on connection use a program as shell of Windows. That means you can only use one program in this session. You’ll need to create 2 sessions to start 2 programs (this user will use two SparkView licenses then). To configure “Start a program on connection” in servers.json file, you need to specify “command” and “directory” options. Please make sure you allow users to start unlisted programs on Windows 2008:
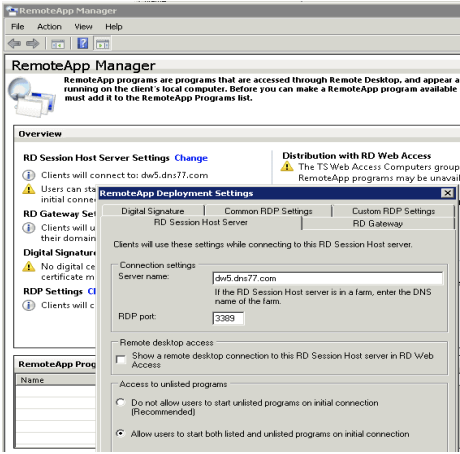
If you are using Windows Server 2012 R2 you can configure this in the Collection properties sheet by using Server Manager. By default, only programs in the RemoteApp Programs list can be started when a user starts a Remote Desktop Services session. You can also use following policy or registry to do the same:
- Policy path:
Windows Components\Remote Desktop Services\Remote Desktop Session Host\Connections - Scope: Machine Supported on: At least Windows Server 2008
- Registry settings:
HKLM\SOFTWARE\Policies\Microsoft\Windows NT\TerminalServices!fAllowUnlistedRemotePrograms
RemoteApp was introduced in RDP 6.1. All RemtoeApps running on client side can share only one session, even you are running thousands of RemoteApps. To configure RemoteApps in servers.json, you need to specify “remoteProgram”, “remoteWorkDir”, and “remoteArgs” options.
RemoteApp window will be automatically resized (no reconnection needed) when you resize the browser window. Here is a example for setting up RemoteApp in servers.json:
{
  "id": "RemoteAppWord",
  "displayName": "RemoteApp WORD",
  "server": "192.168.8.119",
  "icon": "kbd.png",
  "protocols": "rdp",
  "rdp": {
    "username": "Administrator",
    "mapClipboard": true,
    "password": "password",
    "remoteProgram": "||WINWORD"
  }
},
If you are using alias name of the RemoteApp, please make sure there are || before it.
For a good user experience, it’s better to start program without splash screen, also set time limit for disconnected session on RDSH:
- Log on to the terminal server as an administrator.
- Start the Local Group Policy Editor. To do this, click Start, click Run, type gpedit.msc, and then click OK.
- Locate the following node:
Computer Configuration\Administrative Templates\Windows Components\Terminal Services\Terminal Server\Session Time Limits
Note: The policy settings are also located under User Configuration\Administrative Templates\Windows Components\Terminal Services\Terminal Server\Session Time Limits
Please check following links for more information:
- http://en.wikipedia.org/wiki/Remote_Desktop_Services#RemoteApp
- http://technet.microsoft.com/en-us/library/cc753112(v=ws.10).aspx
- http://technet.microsoft.com/en-us/library/cc730673(WS.10).aspx
Configure RemoteApp RDP settings:
http://technet.microsoft.com/en-us/library/cc733144.aspx
For better performance, you may want to
add following lines in the “Custom RDP settings” page:
disable full window drag:i:1
disable menu anims:i:1
disable themes:i:1
disable wallpaper:i:1
Please be aware not all applications can run on RemoteApp and Terminal Server/RDSH environment. You may want to choose a Virtual Machine solution instead or connecting to Hyper-V console. All applications are guaranteed to work with Hyper-V console connection, but it doesn’t audio, video etc advanced RDP features.
3.8 – Clipboard redirection and shared clipboard
You can only copy text, image and html between local and remote because of the browser's restriction, but you can copy anything, including files, between any connected sessions (shared clipboard on gateway).
Spark View can tell you are copying from local or another session and enable shared clipboard automatically.
- Some browsers can only access local clipboard when you are doing copy/paste, so you'll have to use keyboard (Ctrl+C/V) instead of Copy/paste menu. Right click (context menu) copy is only supported on Chrome and IE. Right click paste is only supported on IE.
- You'll see a copy dialog to ask you copy the content again on browsers which doesn't support right click copy/paste.
- On Mac, you'll need to use Command key instead of Ctrl key.
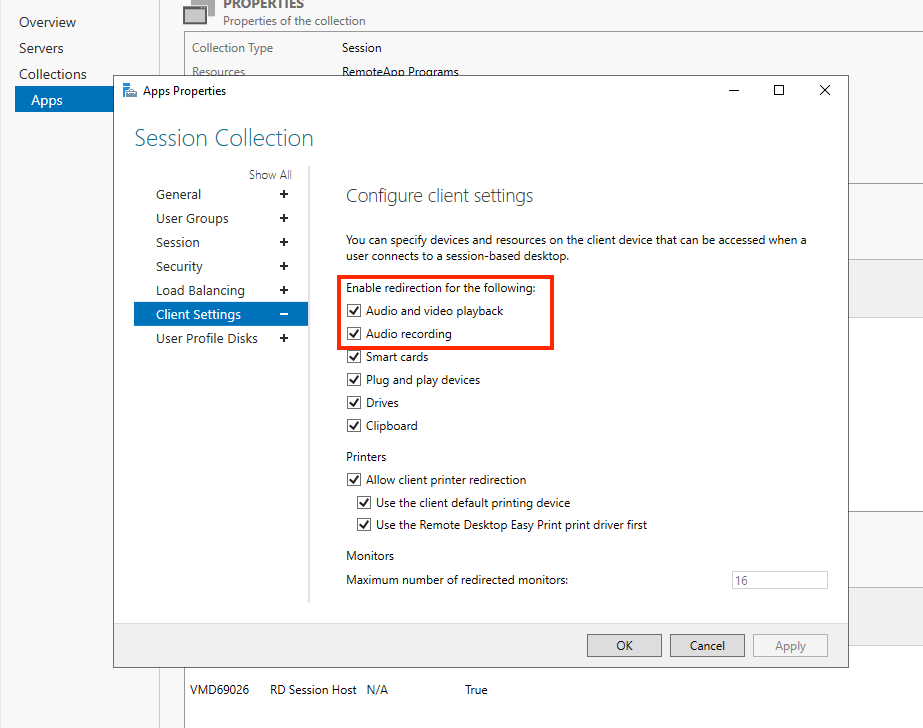
3.9 – Bidirectional audio redirection (RDP)
Audio redirection must be enabled in the RDP server first.
For microphone redirection, Chrome 53, Edge 12, Firefox 36, Safari 11 and secure context (HTTPS) are required.
playSound=0 to bring remote sound to local.audioRecord=on to enable microphone redirection.
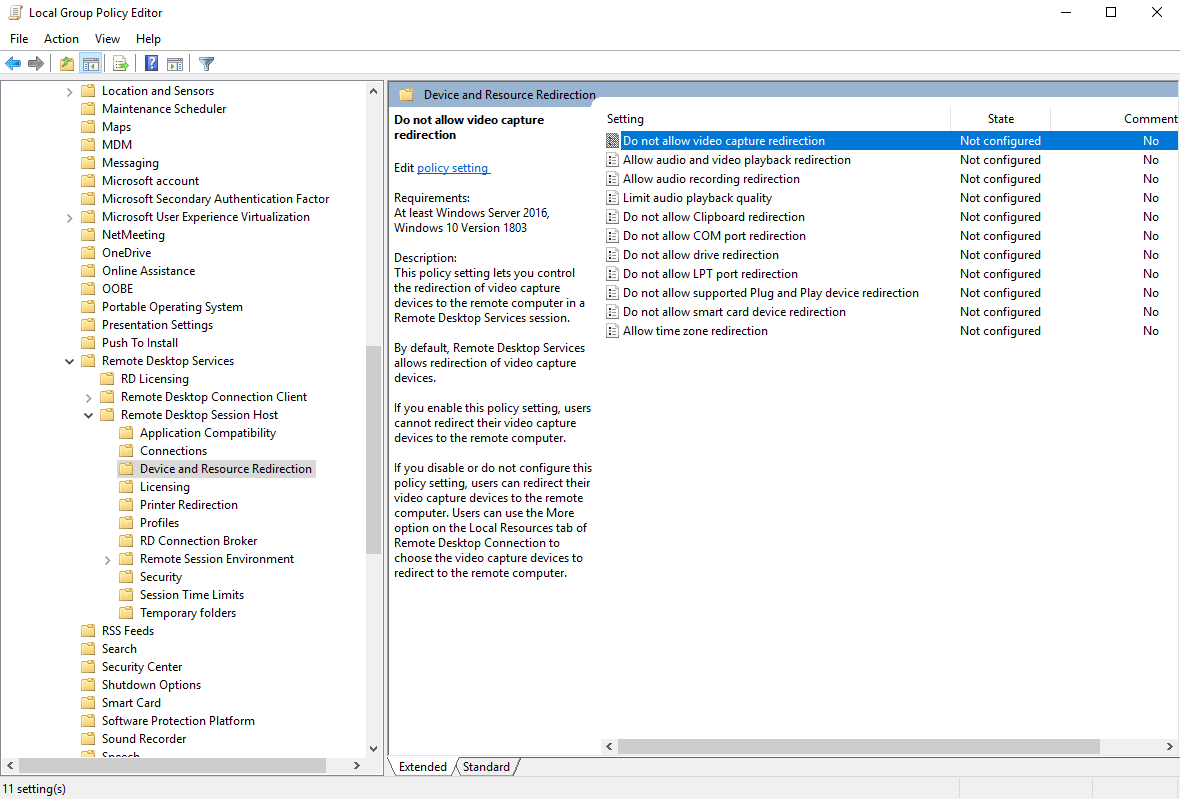
Settings for microphone in RDSH:
Group policy:
The path to the group policy is the following:
Computer Configuration / Administrative Templates / Windows Components / Remote Desktop Services / Remote Desktop Sesssion Host / Device and Resource Redirection
Please also make sure you “Allow apps to access your microphone” if you are connecting to Windows 10 or 2019:
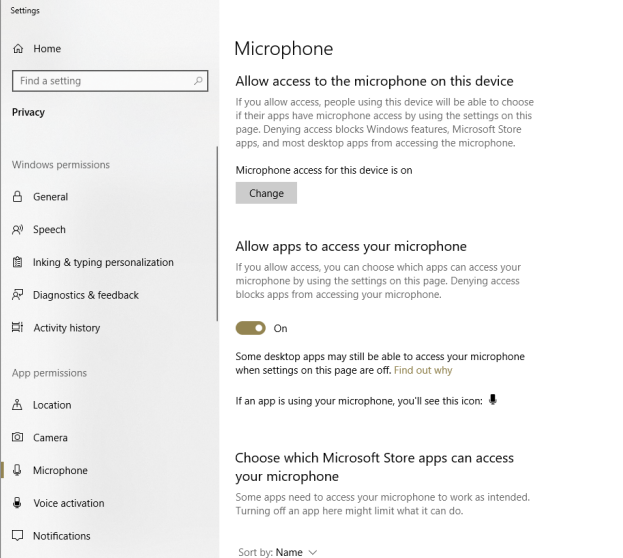
GPO Path:
Computer Configuration\Policies\Administrative Templates\Windows Components\App Privacy
GPO:
Let Windows apps access the microphone
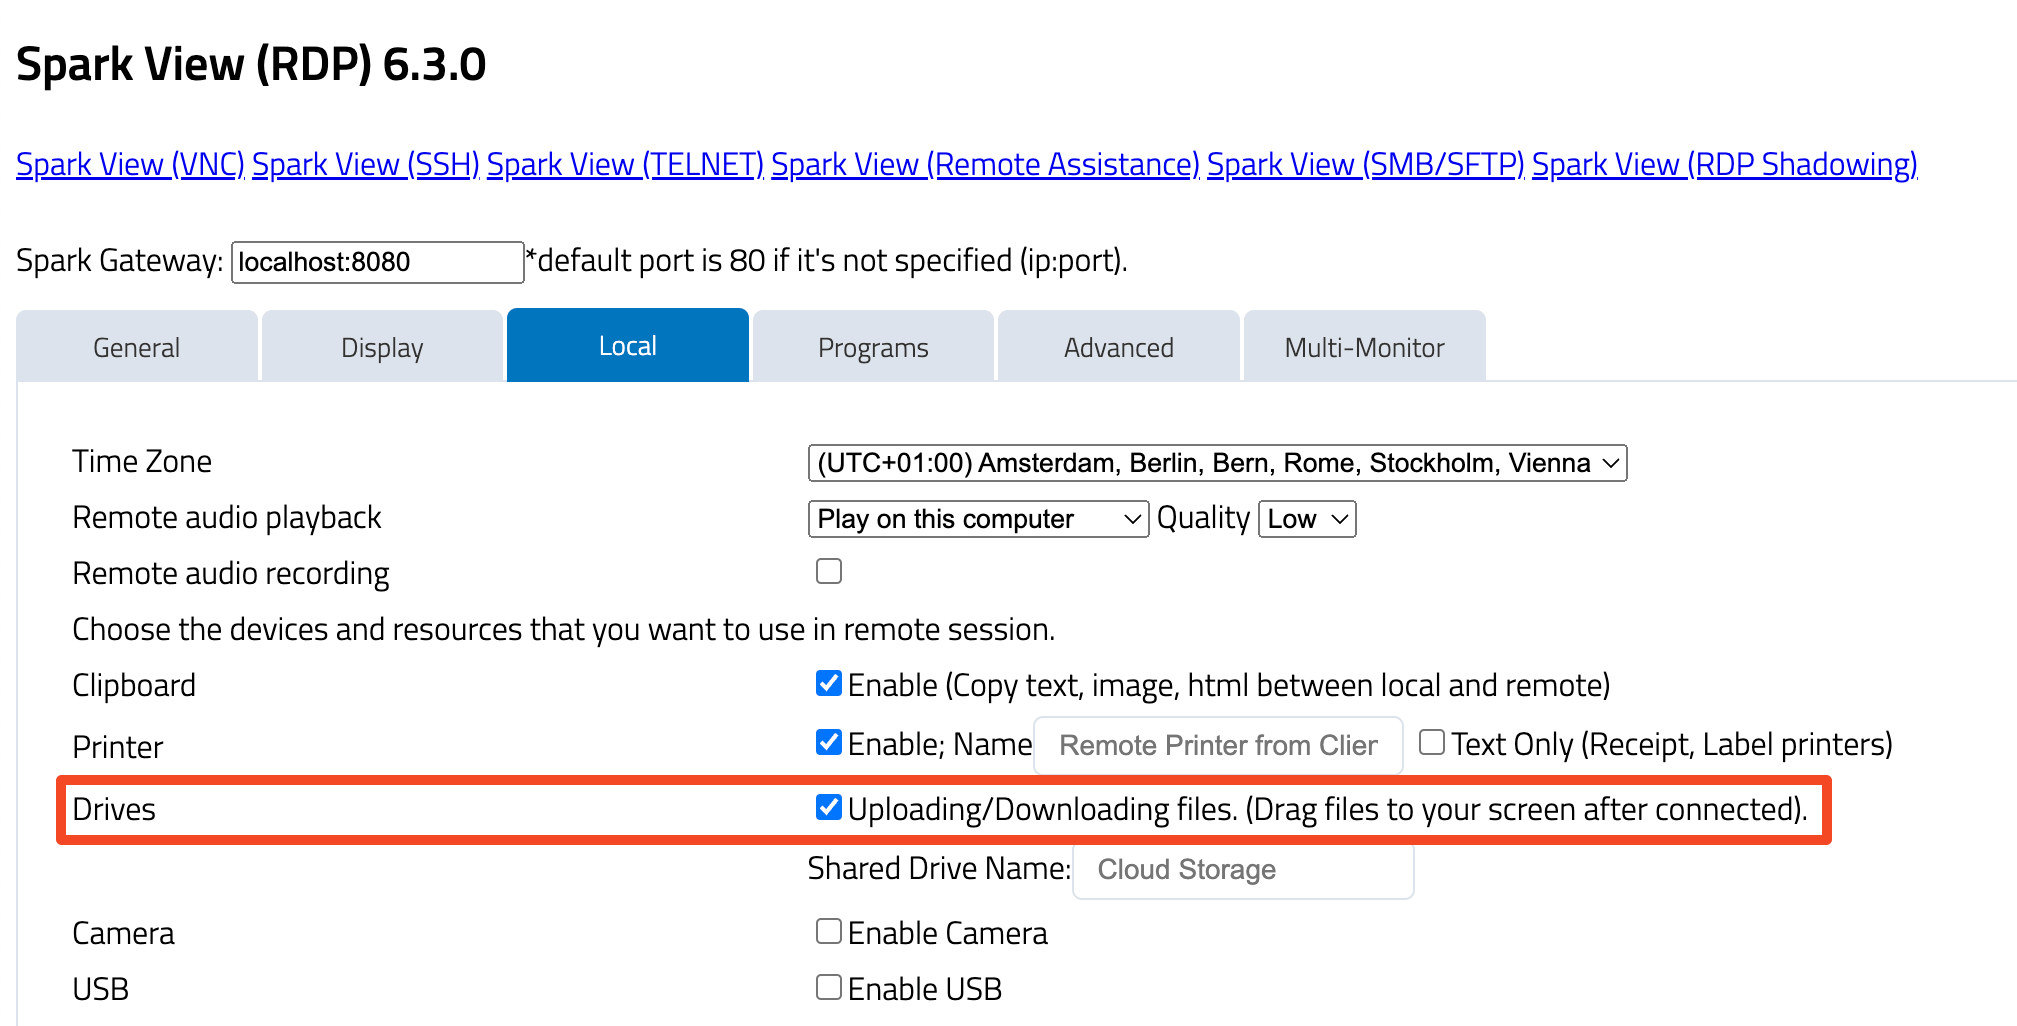
3.10 – File share (uploading and downloading)
There are two ways to implement file downloading/uploading. One is using temporary directory for every user. The temporary directory will be deleted after user session was terminated. Another is using permanent directory for each RDP host.
Temporary directory
- Configure a parent directory in gateway.conf:
tmpdir = C:\\apps\\share. You can use${user}and${domain}variables in tmpdir since 5.0. This user directory will not be removed automatically if variables are used in tmpdir. - Make sure “Uploading/Downloading files” is selected on client side.

Permanent directory
- Configure disk mapping in servers.json:
You can use ${user} and ${domain} variables in devicePath since 5.0."mapDisk": true, "disks": [ { "dosName": "Storage", "longName": "Long Display Name", "devicePath": "/apps/test/" } ], - Make sure “Uploading/Downloading files” is selected on client side.
Uploading files
Choose files or drag files to your remote desktop (anywhere except the cloud icon) after logged in. Click the cloud icon on the top middle of you screen to check the uploading process.
The cloud icon will disappear if you have no operation for a while, click anywhere on the screen to bring it back again.
Downloading files
Click the cloud icon, a file browser dialog will be displayed. You can enter a folder or select a file to download. You can also drag a file to your desktop directly if you are using Chrome.
For best result, please make sure share directory is in another disk or file system.
The file which is uploading has ".uploading" filename extension. You can delete it or resume the uploading later. Uploading will be cancelled if there is no enough free space on the drive.
Drag & Drop
You can drag a local file to remote computer if the current application supports file copy and paste, e.g. File Explorer, Desktop etc. you need to set copyFile = true in gateway.conf to enable this feature. Spark View will ask you to download the files or directories when you copy files or directories in remote computer.
3.11 – Session Recording and Playback
Spark View can record your session in RDP stream format (.rdpv) and play it anywhere. This format has smallest size and best quality in the world.
You need to configure following 3 properties in gateway.conf:
#session recording, 1 means recording graphic only, no sound. 3 means recording graphic and sound.
recording = 1

#parent directory for session recording
recdir = C:\\apps\\share

#warn user about recording
recwarning = true;
Recording, playback is also supported in VNC, SSH, TELNET sessions.
You can also record session on client side (use recording=on parameter).
Since 4.8.8, Spark View supports seamless session shadowing: no need to reconnect (to rest the client status) when user is joining. The seamless joining may take more time if network is slow. You can go back to the old way by setting resetOnJoin=true in gateway.conf
The player.html can play local recording, and playeremote.html can play a file on the gateway (server side).
Converting recording to MP4:
Download the tool:
http://www.remotespark.com/view/converter.jar
Convert a recording file to mp4 in command line:
java -jar converter.jar -s record.rdpv //convert record.rdpv to record.mp4
java -jar converter.jar -s record.rdpv -d new.mp4 //convert record.rdpv to new.mp4
java -jar converter.jar -h //help
Use the jar file as a library:
import com.toremote.record.converter.VedioConverter;

/**
* @param sourcePath source path of a .rdpv type video file
* @param destinationPath OPTIONAL destination path of the converted .mp4 format video file
* @param acceleration OPTIONAL integer bwtween 0 and 10. The acceleration of the speed up effect
* @param fps OPTIONAL frames per second, default is 25.
* @param imgInterval OPTIONAL the interval in seconds of persisting snapshot pictures, default is 10 seconds.
* @param convertType convert type, 0: default, convert to .mp4 video only; 1: convert to png image files only; 2: convert to both png image files and .mp4 video.
*/

VideoConverter converter = new VideoConverter(srcPath, destPath, speed, timeRational,
imgInterval, convertType);

converter.convert();
3.12 – Session Shadowing (join or share an active session on gateway)
Unlimited users can join/share one existed session via one click if you know the session id:
http://www.remotespark.com/join?id=123456789&name=Admin
The input can be controlled by all users or only one of them. User can require control form other user, or give control to other user.
Spark session shadowing has following advantages compared other solutions:
- Fully based on RDP protocol (no VNC involved), has better performance and using fewer bandwidth.
- Every joined user can see other user’s mouse movements.
- Two join mode: Every one can control or only one can control at a time.
- Even sessions on Windows XP, Windows 7, xrdp can be joined too.
- Unlimited user can join one session, depends on the ability of you gateway.
RemoteApp session shadowing is also supported since 3.4.
Make sure you have following parts in your web page to make the shadowing work if you are using yourselves customized web page:
var info = $id("joinSelect");
if (info) {
	info.onchange = function(e){
		svManager.getInstance().setJoinMode(e.target.value);
	};
}

var control = $id("requestControl");
if (control) {
	control.onclick = function(e){
		svManager.getInstance().requestControl();
    };
}

<div id="appinfo" class="appdlg">
	<img alt="" src="info.png" style="float:left">
	<table>
		<tr>
        	<td align="right"><b>Connected to:</b></td>
            <td><span id="connectingTo"></span><br></td>
		</tr>
		<tr>
        	<td align="right"><b>Session id:</b></td>
	        <td><span id="numericId"></span><br></td>
        </tr>
		<tr>
        	<td align="right"><b>Join mode:</b></td>
            <td>
				<select id="joinSelect">
					<option value="0">Every one can control</option>
					<option value="1">Only one can control</option>
				</select><br>
			</td>
		</tr>
		<tr>
        	<td colspan="2"><b>Join this session with following link:</b><br><aid="joinLink"target="_blank"></a></td>
		</tr>
		<tr>
        	<td></td>
            <td align="right"><input type="button"id="requestControl"value="Request Control" disabled="disabled"/></td>
		</tr>
	</table>
</div>
To disable session shadowing, you can:
- Set shadowing = false in gateway.conf
- Remove following part from the web page (optional):
<table>
	<tr>
       	<td align="right"><b>Connected to:</b></td>
        <td><span id="connectingTo"></span><br></td>
	</tr>
	<tr>
       	<td align="right"><b>Session id:</b></td>
	    <td><span id="numericId"></span><br></td>
    </tr>
	<tr>
       	<td align="right"><b>Join mode:</b></td>
        <td>
			<select id="joinSelect">
				<option value="0">Every one can control</option>
				<option value="1">Only one can control</option>
			</select><br>
		</td>
	</tr>
	<tr>
       	<td colspan="2"><b>Join this session with following link:</b><br><aid="joinLink"target="_blank"></a></td>
	</tr>
	<tr>
       	<td></td>
        <td align="right"><input type="button"id="requestControl"value="Request Control" disabled="disabled"/></td>
	</tr>
</table>
You can also join a symlink if you only know the symlink id, for example:
http://localhost:8080/join.html?symlink=212a155e-e951-40db-95ea-177183174fa7&gateway=wthink&connectif=true
If connectif=true, it will start a new connection if there is no existing connection with the symlink. This only works on symlink joining and you have to enable it by adding following entry in gateway.conf:
connectif = true
If name parameter was given, the name will be displayed under the cursor:
There are two colors under the name: the first is calculated by the name, the second is calculated by the session id which makes sure every user has a unique color combination.
Using session shadowing
As an user, click the "i" symbol on your desktop:
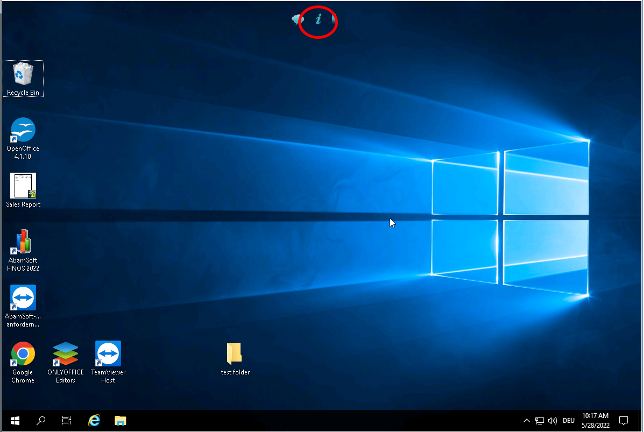
You will see an info window with a session ID, a join mode and a session link:
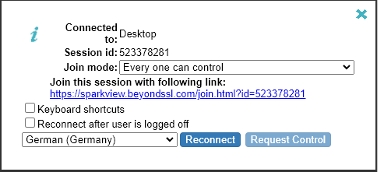
Send this link or the session ID to your Administrator who will join your session for help by using this ID:

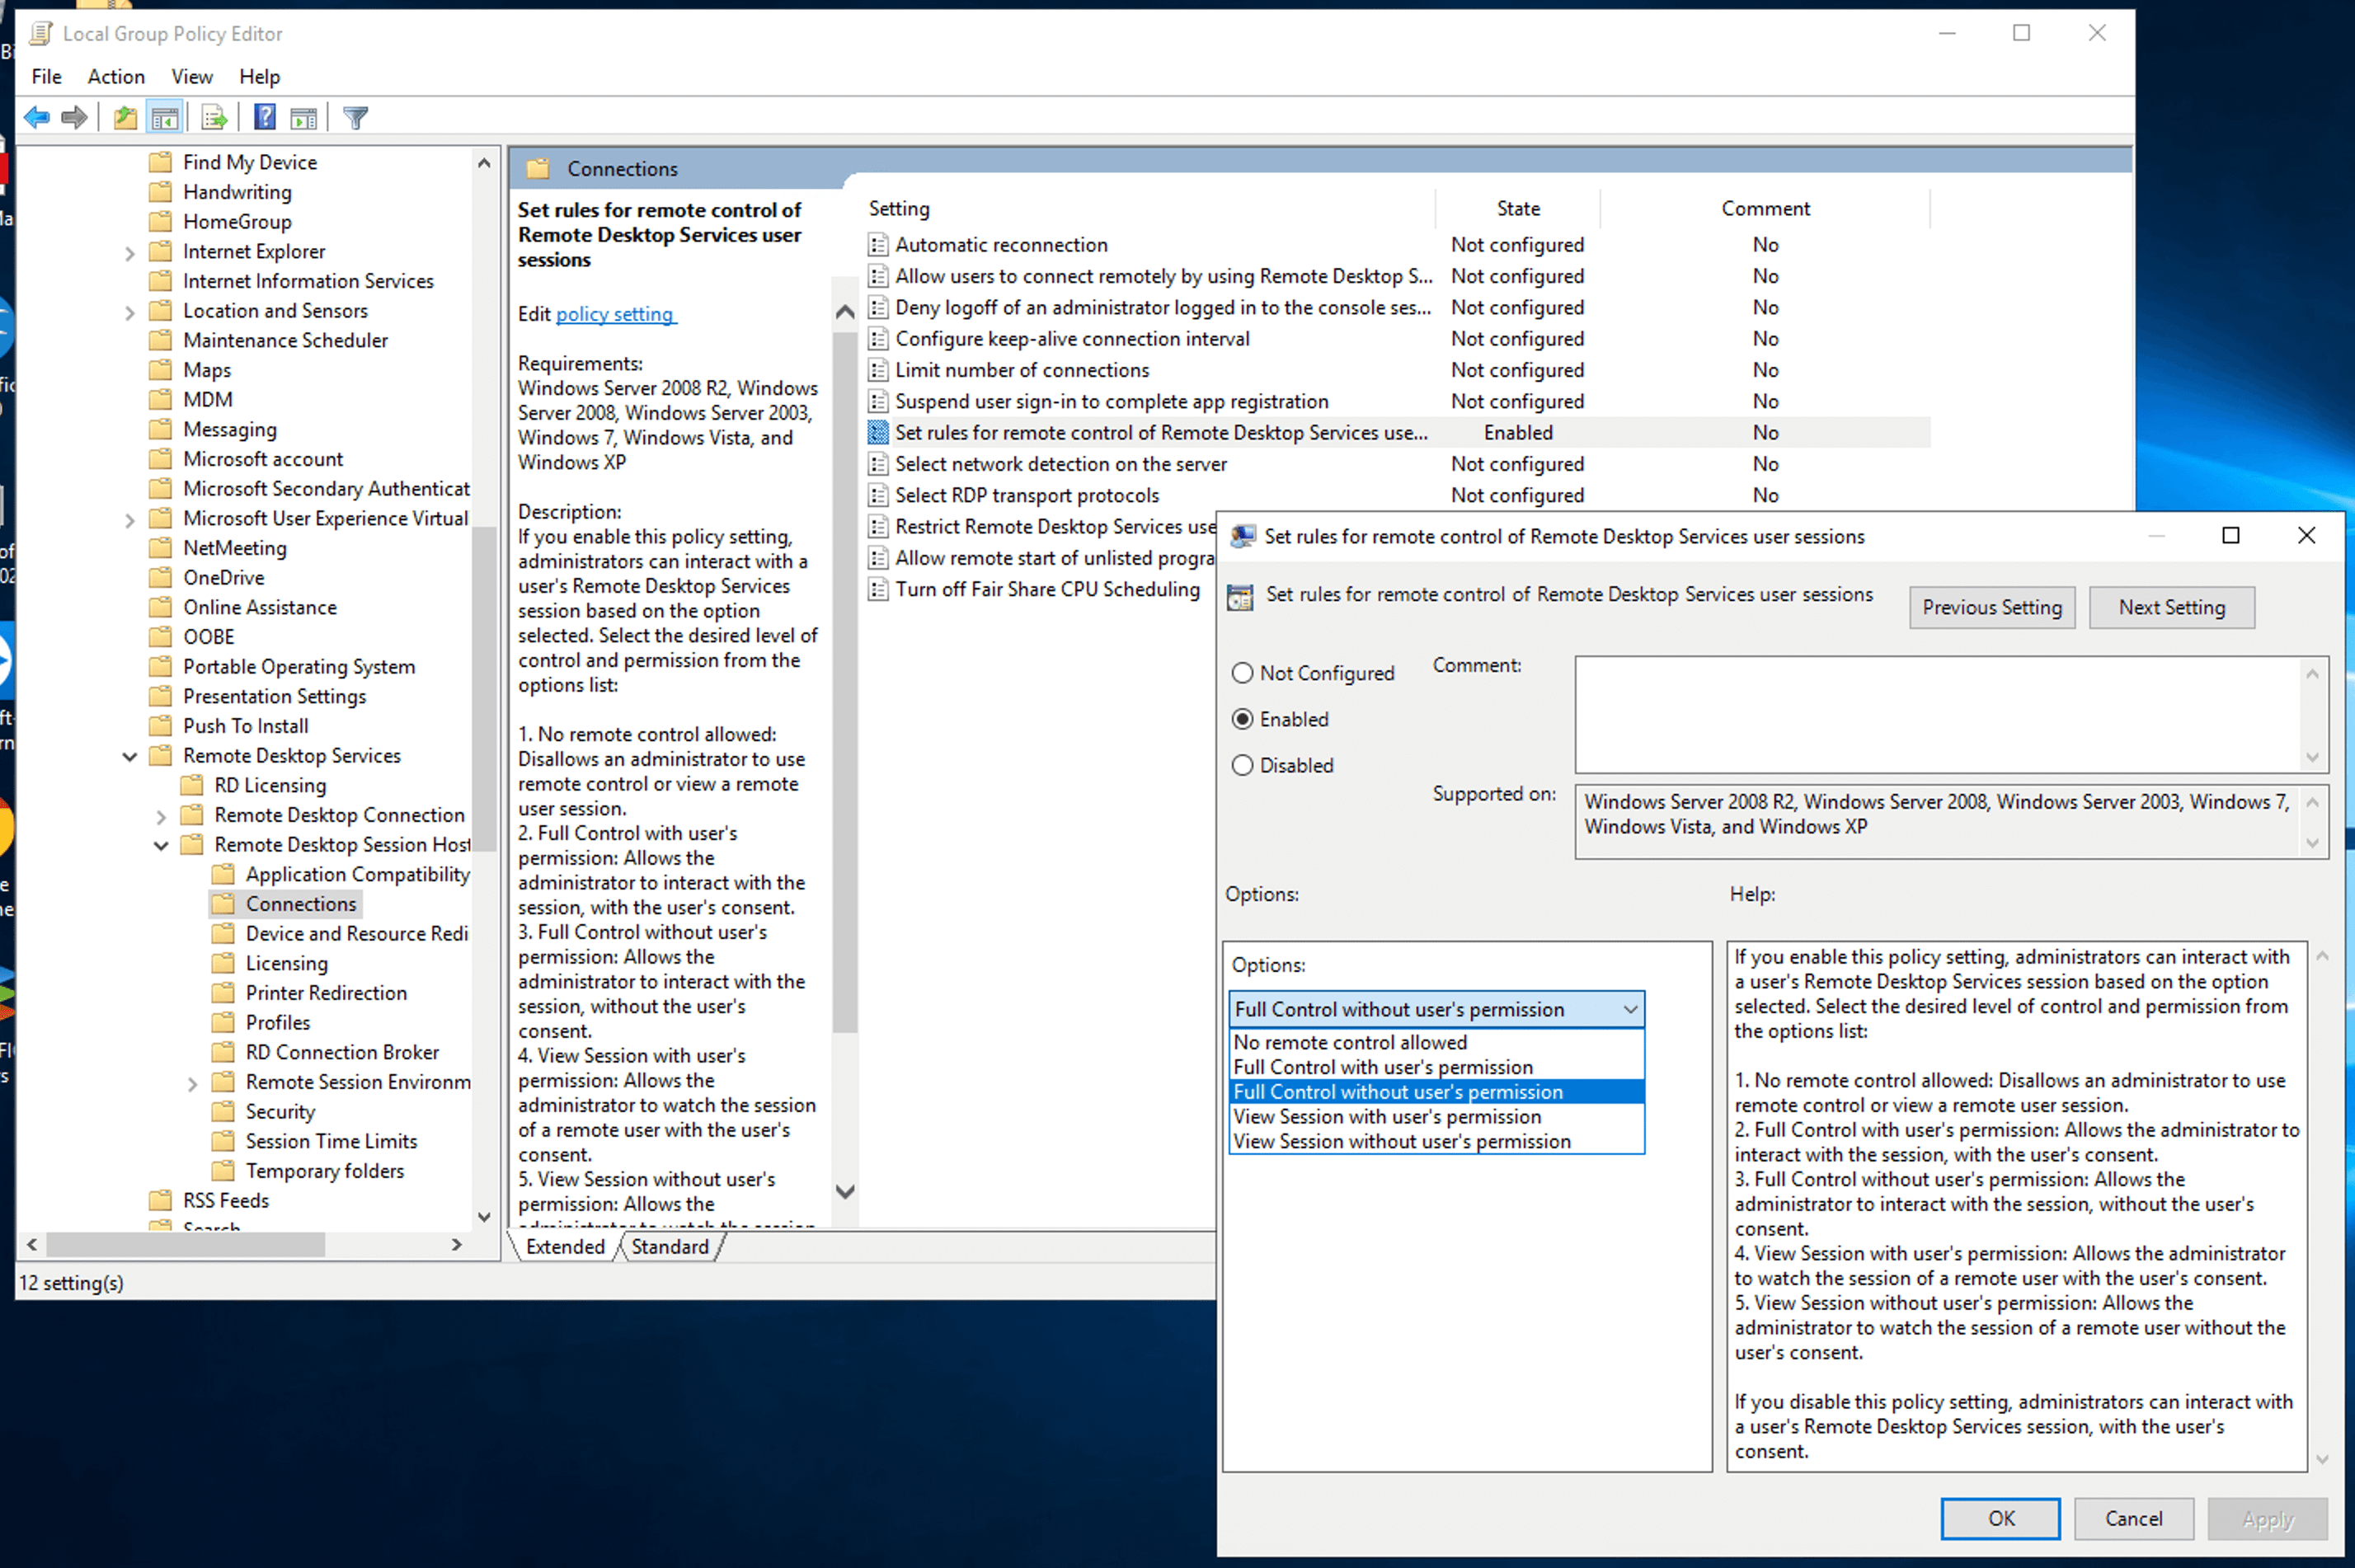
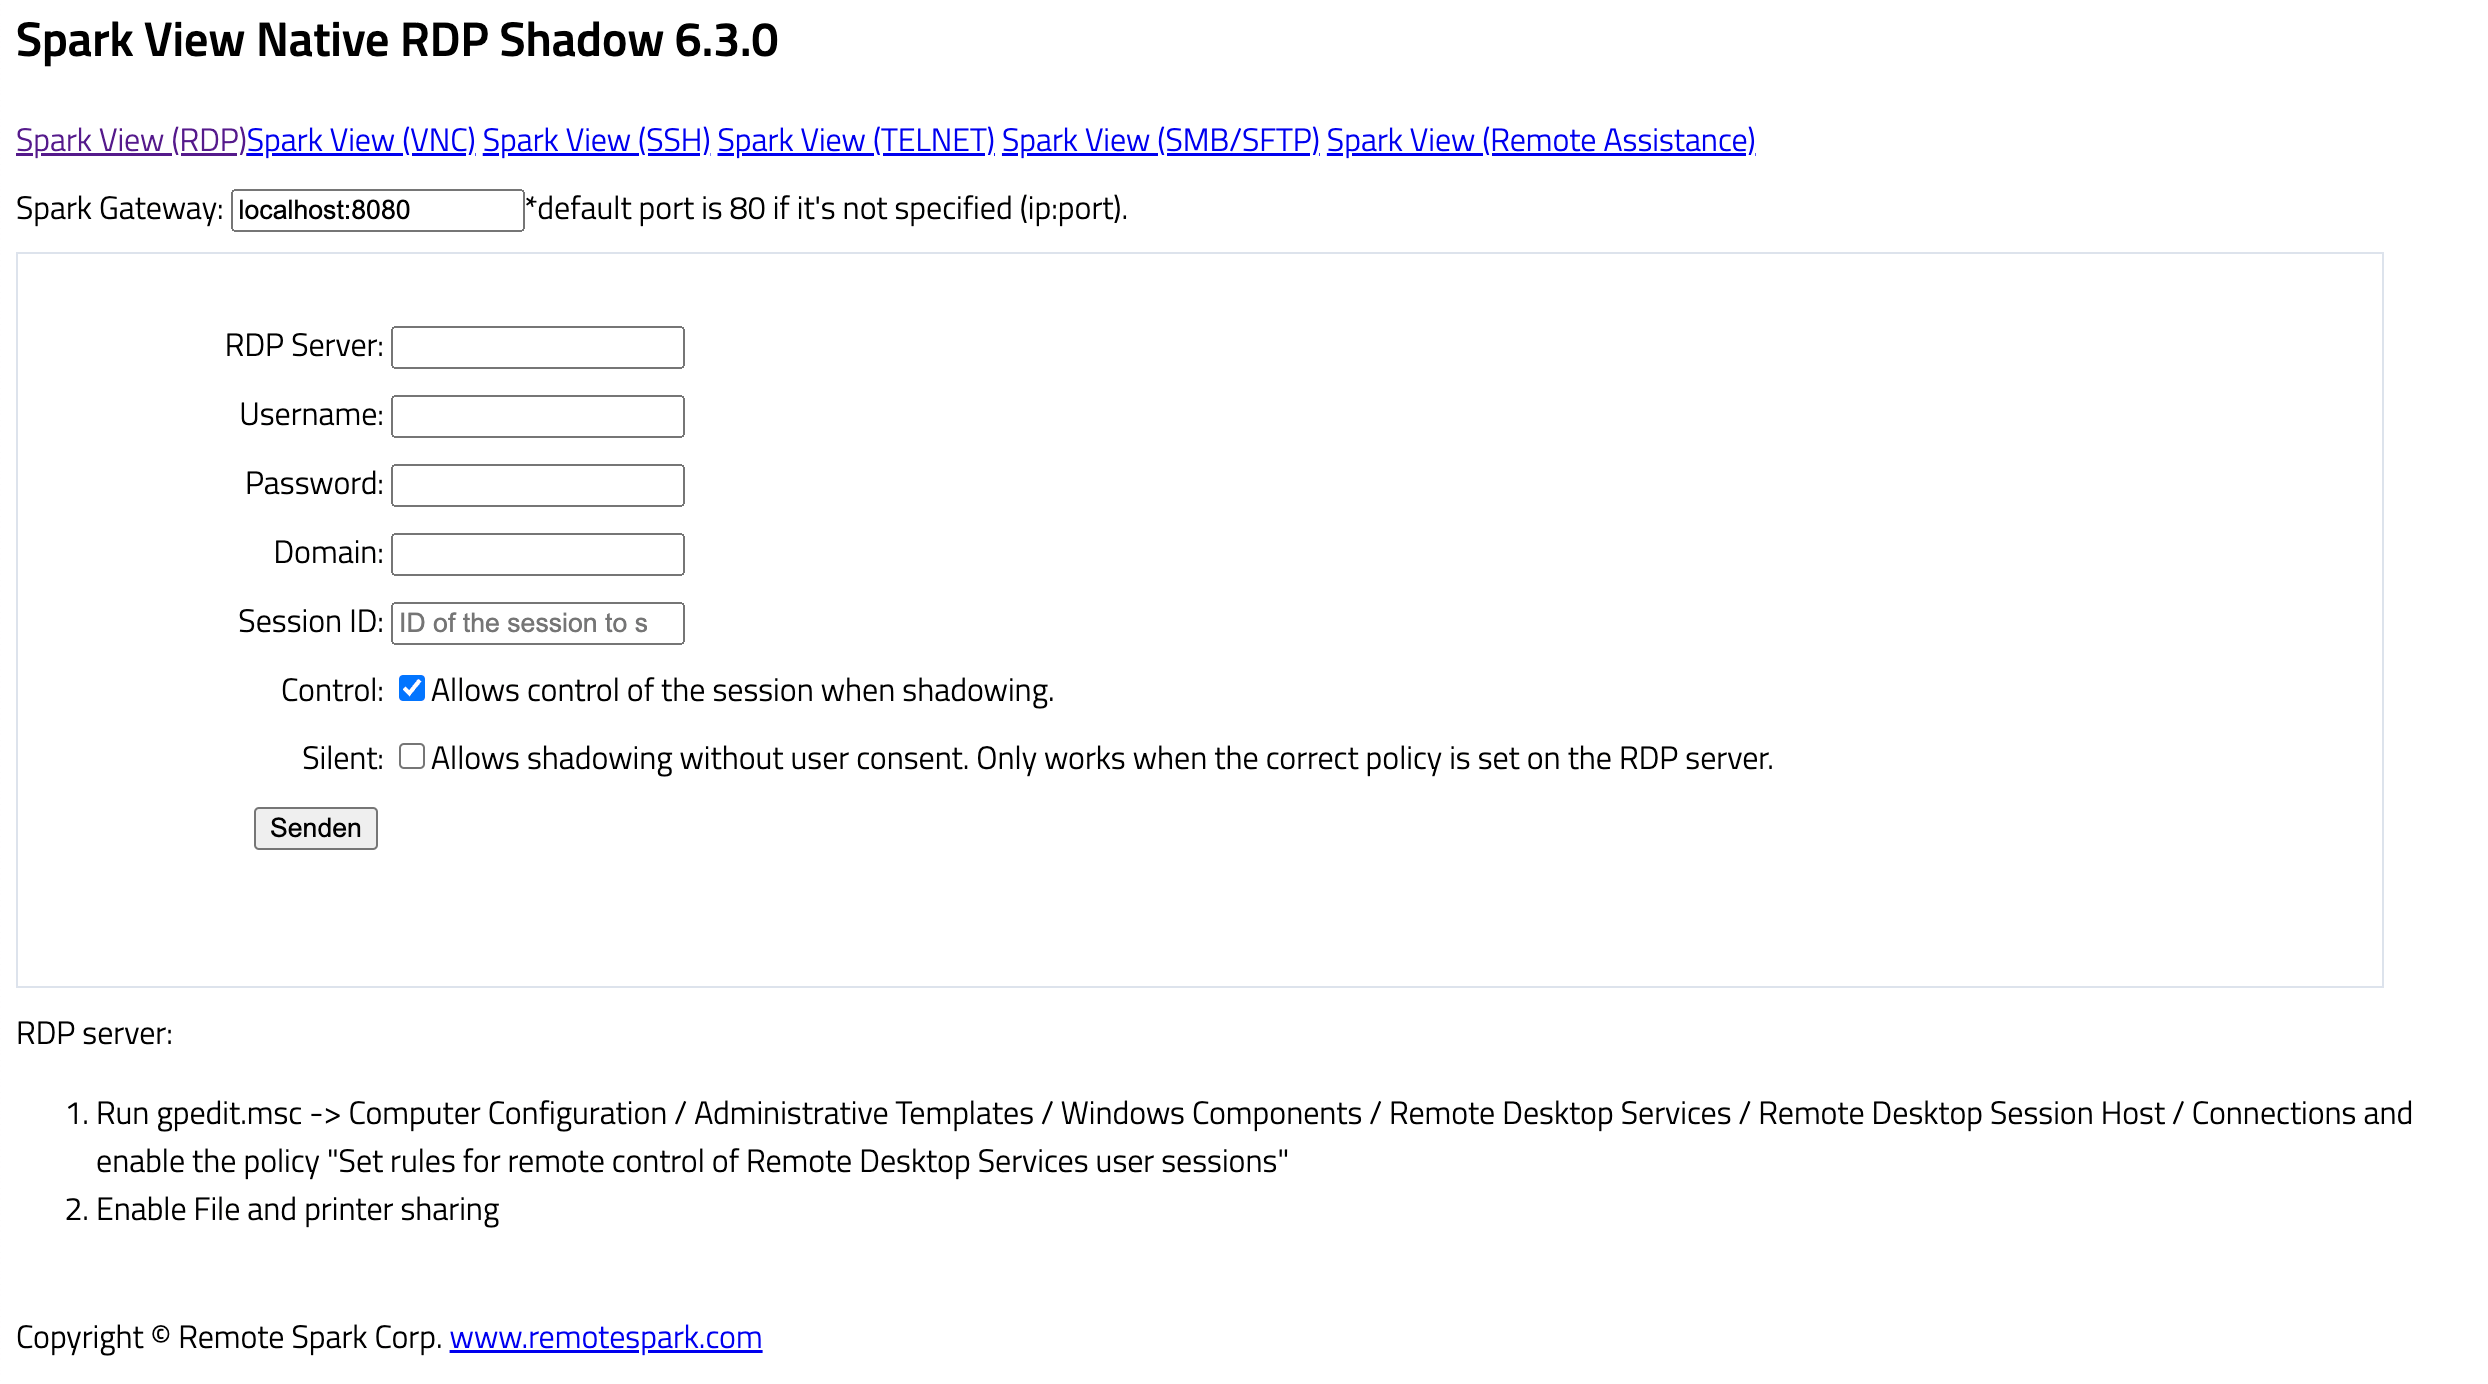
3.13 – Native RDP shadowing (join any active RDP sessions)
Since 6.0, Spark View can use shadow.html to shadow any active RDP sessions on the RDP server, even they are connected from another RDP client, which is same as the mstsc.exe /v:server /shadow:x /control.
Remote shadowing setting is configured using a Group Policy or by registry modification. You can configure whether you need to request the user confirmation to connect, and whether view or control is allowed in the shadow session.
Target RDP server requirements:
- Enable remote control: Run gpedit.msc -> Computer Configuration / Administrative Templates / Windows Components / Remote Desktop Services / Remote Desktop Session Host / Connections and enable the policy "Set rules for remote control of Remote Desktop Services user sessions"

Instead of enabling the policy, you can set the necessary value in the DWORD registry parameter Shadow in the HKLM\SOFTWARE\Policies\Microsoft\Windows NT\Terminal Services registry key. The allowed values are:
0 – disable remote control;
1 — full control with user’s permission;
2 — full control without user’s permission;
3 — view session with user’s permission;
4 — view session without user’s permission.
By default, this registry parameter is not set and the shadow connection is performed in full control mode with user permissions. - Enable file and printer sharing
- Enable native RDP session shadowing ("nativeShadowing = true" in gateway.conf)
- Make sure that SMB port 445 is open in the firewall and the RDP server
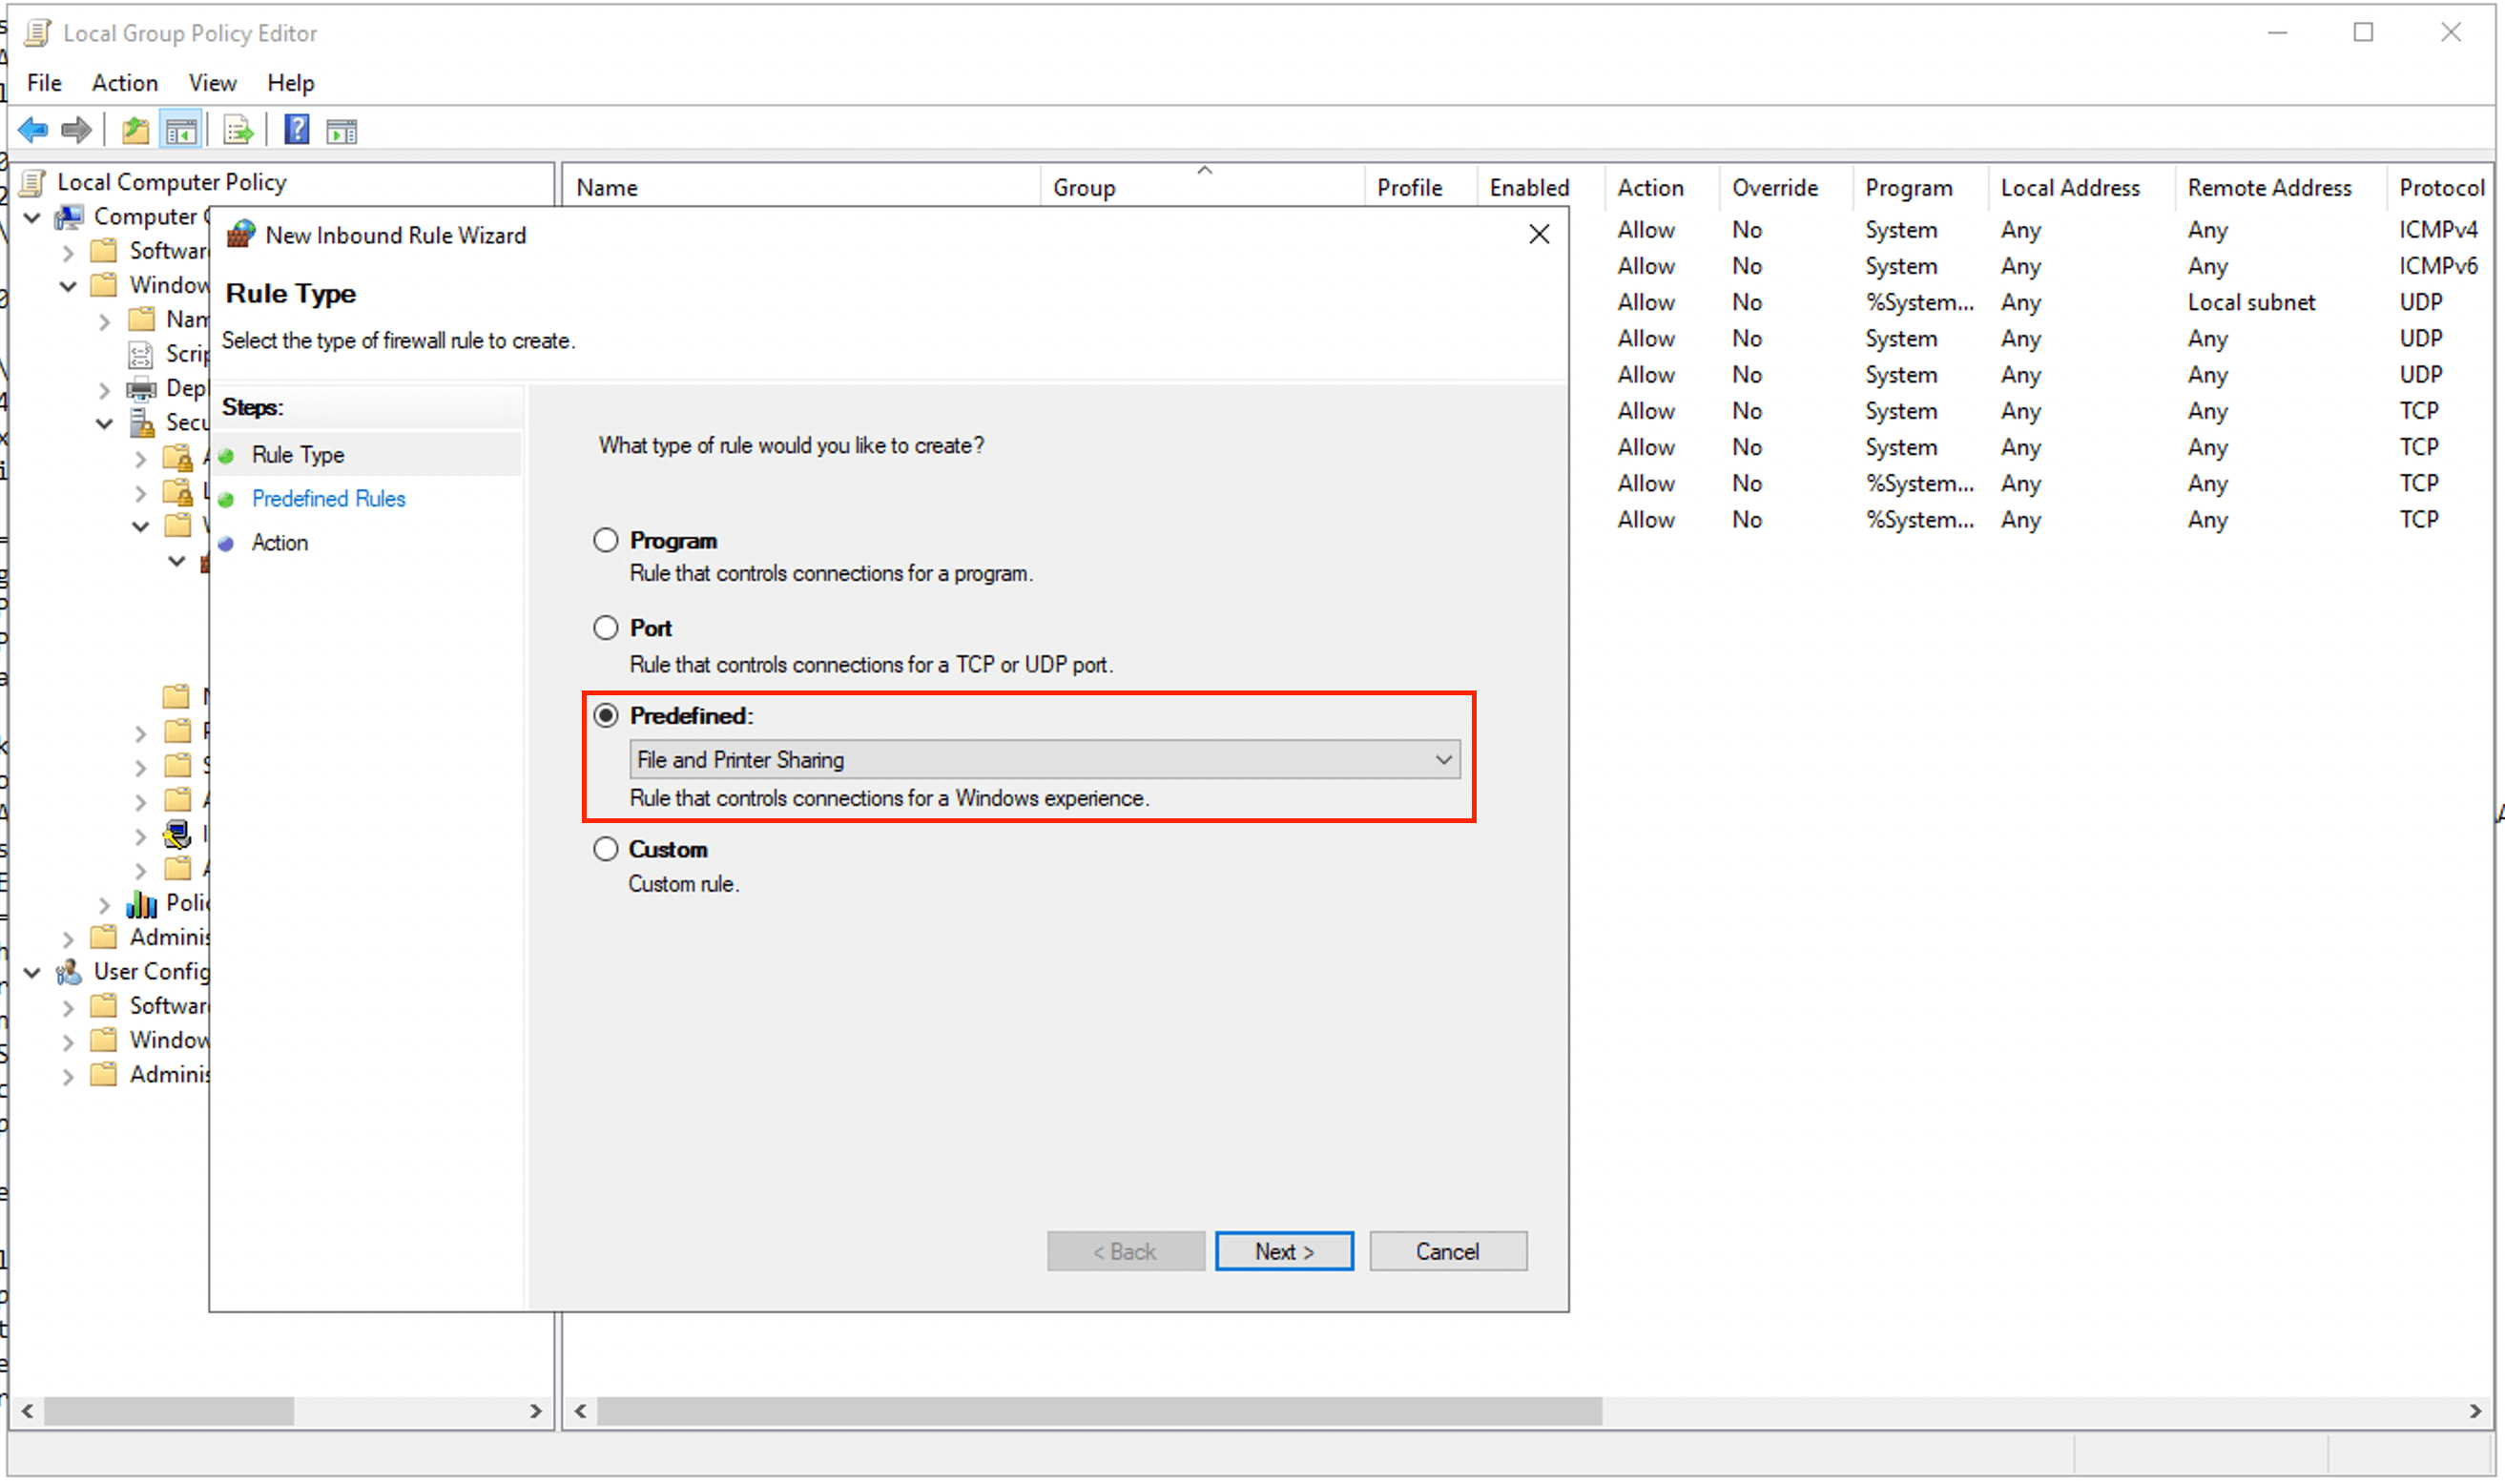
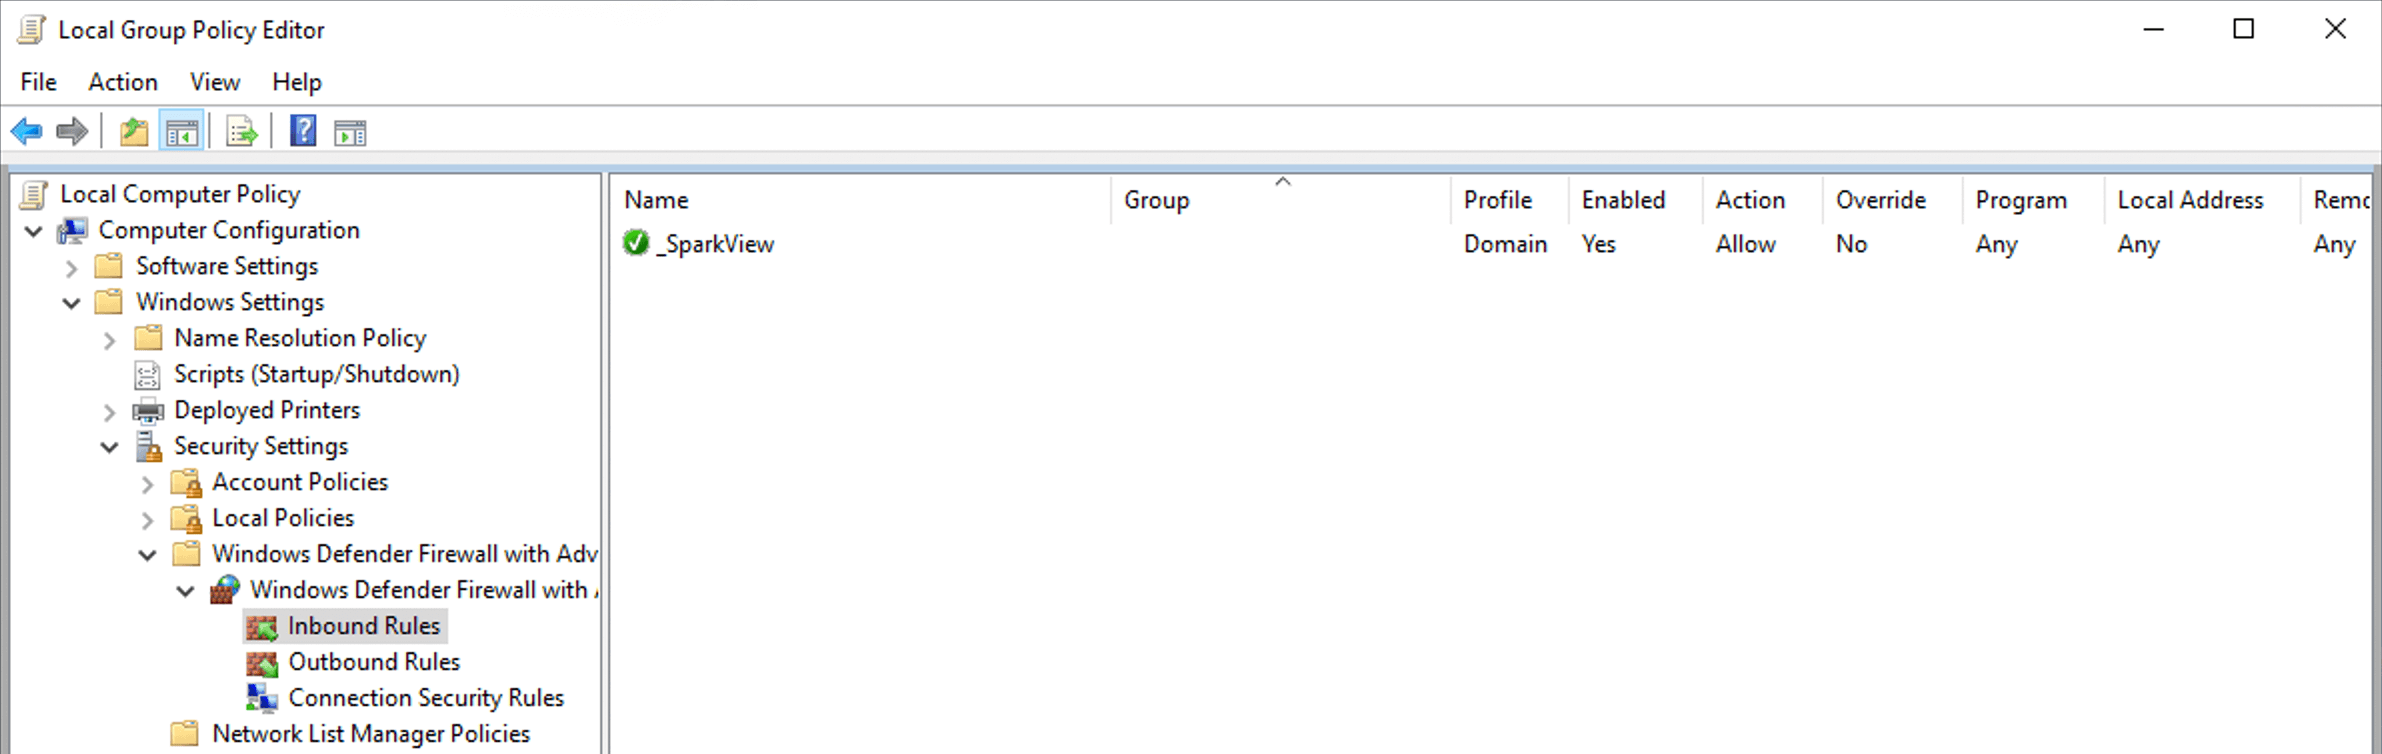
Add rule to allow traffic to SMB/CIFS and RPC
To add a firewall rule to allow TCP/445 (SMB/CIFS) and TCP/135 (RPC):
- Go to Computer Configuration > Policies > Windows Settings > Security Settings > Windows Firewall with Advanced Security > Windows Firewall with Advanced Security - LDAP > Inbound Rules
- Right-click and choose "New Rule"
- Choose "Predefined" and "File and Printer Sharing", then click "Next"

- Check the follwing, then click "Next":
- "File and Printer Sharing (NB-Session-In)"
- "File and Printer Sharing (SMB-In)"
- Select "Allow the connection" and click "Finish"
https://sparkview-server/shadow.html
3.14 – Touch interface (iOS, Android etc)
Spark View can operate on tablets and smart phone devices if you have an html5 browser available.
Following gestures are supported:
| Gesture | Description | Action |
|---|---|---|
 |
Long press | Right click |
 |
Flick | Scroll screen if remote desktop resolution is bigger, otherwise drag |
 |
Pan | Drag |
 |
2 finger tap | Right click |
 |
2 finger scroll | Mouse wheel |
 |
3 finger tap | Show software keyboard (iOS only) |
 |
3 finger pinch open | Maximize window |
 |
3 finger pinch close | Restore window |
 |
3 finger flick left | Previous window |
 |
3 finger flick right | Next window |
 |
3 finger flick down | Minimize all windows |
 |
3 finger flick up | Restore all windows |
You can also tap the keyboard icon  to activate the software keyboard. IE doesn’t support 3 finger gestures and 2 finger scroll (mouse wheel).
Touchpad mode (relative mouse movement)
Tochpad mode allows you to use whole touch screen as a touch pad. You can use the finger to move the cursor and issue a click on the position of the cursor (not the position you are taping on).
Entering text
You can see a button after you tap anywhere on the screen. Taping on this button will activate the software keyboard and allow you entering text. Some PC keys will also be shown on the left top of your screen:

You can see more PC keys by taping on  :
:

Make sure you html page has following part to make PC keys work:
<div id="pc_key">
<span>Ctrl</span><span>Alt</span><span>Del</span><span>Esc</span><span>...</span>
<div id="pc_key_more">
<span>F1</span><span>←</span><span>↑</span><span>→</span><span>↓</span><span>Start</span><span>Alt+F4</span><span>Ctrl+Alt+Del</span>
</div>
</div>
You can also add any other keys by changing the pc_key div.
Recommended browsers:
- Android: Chrome and Firefox.
- iOS: Safari.
- Playbook: Stock browser.
- Windows: Chrome, Firefox, IE10 and Safari
- Mac OS: Chrome, Firefox, and Safari.
- Linux: Chrome and Firefox.
3.15 – Touch remoting
Touch Remoting will be enabled automatically when following conditions are met:
- RDP host is Window 8 or Windows 2012 and
- Local device has multi-touch ability and
- Minimum screen resolution of local device is 1024x768
3.16 – Hyper-V Console and Enhanced Session Mode
Compared with normal RDP connection, Hyper-V console connection has following pros and cons:
Pros:
- Don’t need a network for the VM, don’t need to have RDP enabled. Only need the VM GUID for connection.
- Same as a physical computer, Good for testing and some applications which cannot run under normal RDP.
- Don't require Terminal Services CALs.
Cons (if enhanced session mode is not enabled):
- Limited RDP features, no resource redirection.
- Not all resolutions can be supported; can only change the resolution in Windows.
Since Window 2012 R2, Hyper-V console supports enhanced session mode which allow your redirect local resource in Hyper-V console session. To enable enhanced session mode in Spark View, please append ";EnhancedMode=1" to the VM GUID. Please check following link for more information about enhanced session mode:
http://technet.microsoft.com/en-us/library/dn282274.aspx
To connect to Hyper-V console, make sure:
- Enable CredSSP (Network Level Authentication) in gateway.conf.
- The server address is the Hyper-V server address; User name, password, and domain are all for Hyper-V server, not for the VM you are connecting to. Also be aware default listening port of Hyper-V console is 2179 instead of 3389. To connect to a VM, all you need is the VM GUID.
- Install Microsoft Virtual Machine Integration Services into the VM; disable cursor shadow (important) in the VM. It’s better to adjust your computer for best performance.
3.17 – RDP connection cache/pool
RDP session may take minutes to start (booting, login, user profile etc) which is unacceptable sometimes. RDP connection Cache/pool allows you see you desktop and RemoteApp instantly.
You can cache a connection on client side and display it when user needs it. Cache on client side is faster and recommended.
You can also cache a connection on gateway side (in a connection pool) too. It’s disabled by default, to enable it, set maxCacheTime to a non-zero value in gateway.conf.
Please check example7.html (under html directory) for usage on client side.
Cache API also make integration more easier, here is what you can do with it:
- Your application send http request to the gateway to create a connection and this connection will be cached on gateway:
http://gateway/CACHE?server=hypervServer&port=2179&user=uu&pwd=pp&domain=dd&CACHEID=mycacheid&CACHETIMEOUT=1&CACHEPOLICY=0&DUPLICATE=off&gatewayPwd=5f4dcc3b5aa765d61d8327deb882cf99&width=800&height=600"
In this request, CACHETIMEOUT is 1 minute, CACHEPOLICY=0 means gateway will do nothing if this cache is popped out. DUPLICATE=off means there is only one cache item under one id. You'd better using UUID as CACHEID. gatewayPwd is the MD5 hash of password configured in gateway.conf, 5f4dcc3b5aa765d61d8327deb882cf99 is the MD5 hash of “password”. - On the client side, you can create an RDP connecting by: Using the JS library directly in your web page: new svGlobal.Rdp("ws://gateway/RDP?CACHEID=mycacheid&... or using rdpdirect.html: http://gateway/rdpdirect.html?gateway=yourgatewayaddress&CACHEID=mycacheid
3.18 – Symlink (access link)
You can create a symlink for a RDP host (must be configured in servers.json first). After you created a RDP server in servers.json, you’ll be able to access it with the server id. Symlink is more secure than server id, and it can be a temporary link (set up valid time) or a permanent link.
You can create a symlink file manual and specify this file in gateway.conf. Here is an example of symlink file:
{
  "symlinks": [
    {
      "id": "3645e6db-7afc-4fff-8ad9-92415aa25db0",
      "resourceId": "demo2",
      "validFrom": "2013-05-14 20:43 MDT",
      "validTime": "5d",
      "parameters": "user=uu&pwd=pp",
      "comment": comment"
    }
  ]
}
The pattern for date format is yyyy-MM-dd HH:mm z.
Please check http://docs.oracle.com/javase/7/docs/api/java/text/SimpleDateFormat.html for more information about this format.
You can send extra parameters to the server by configuring the "parameters" property.
You need to specify the location of the symlink file in gateway.conf:
symlink = C:\\Users\\uuu\\workspace\\data\\symlink.json
You can also configure this using config.html:

On the client side, you'll need to use 'symlink=symlinkId' instead of 'server=yourServer' when creating a connection:var rdp = new svGlobal.Rdp('ws://gateway/RDP?symlink=symlinkId&mapClipboard=on&...')
You can also join a symlink:var rdp = new svGlobal.Rdp('ws://gateway/JOIN?symlink=symlinkId&mapClipboard=on&connectif=on&...')
If connectif = on and there is no session established with that symlink, this will create a new connection instead. Make sure you set connectif = on in gateway.conf to enable this feature first.
3.19 – Macro recording
Macro recording can be used on software testing, automated jobs etc. Please add macro.js into your web page and then you can record macro:
- var recorder = new MacroRecorder(rdp);
- recorder.start();//start recording
- recorder.stop();//stop recording
- recorder.play(); //playback
- recorder.stopPlay();//stop playing
- recorder.getScript();//get playback script
Please check the source code of macro.js for more details.
3.20 - Remote assistance
You can provide Remote Assistance with assit.html. With Spark View's cross-platform ability, now you can provide remote assistance from anywhere, and devices:
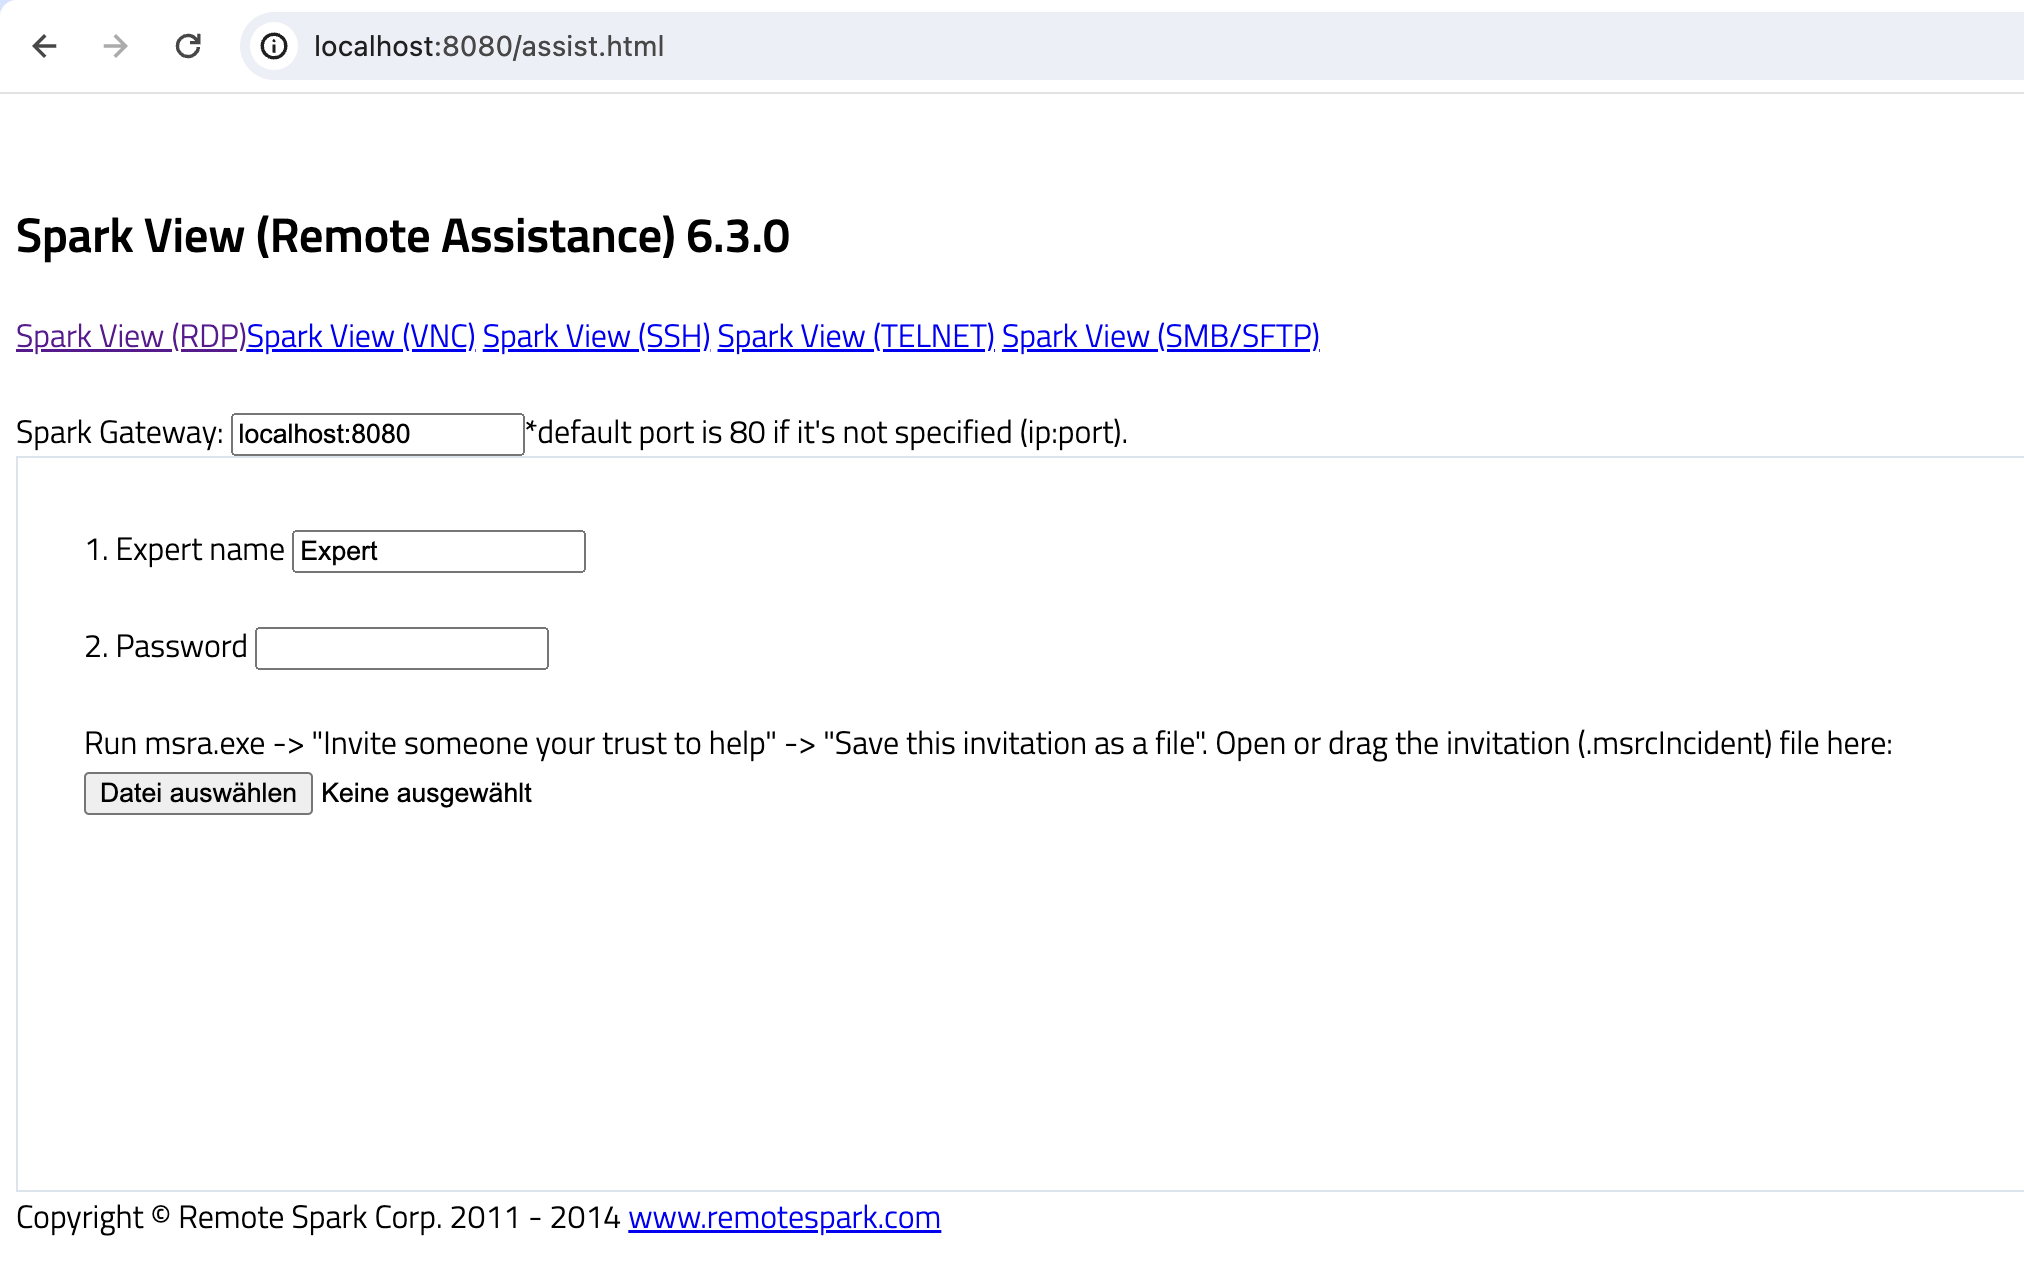
You can connect to Windows XP, Windows 7, Windows 2008, Window 8, Windows 2012 with SparkView remote assistance. SparkView only accepts invitation file which is generated in version 1 format for now.
- Remote Assistance session cannot be joined.
- Remote Assistance is disabled by default. Please set assistance = true in gateway.conf to enable it.
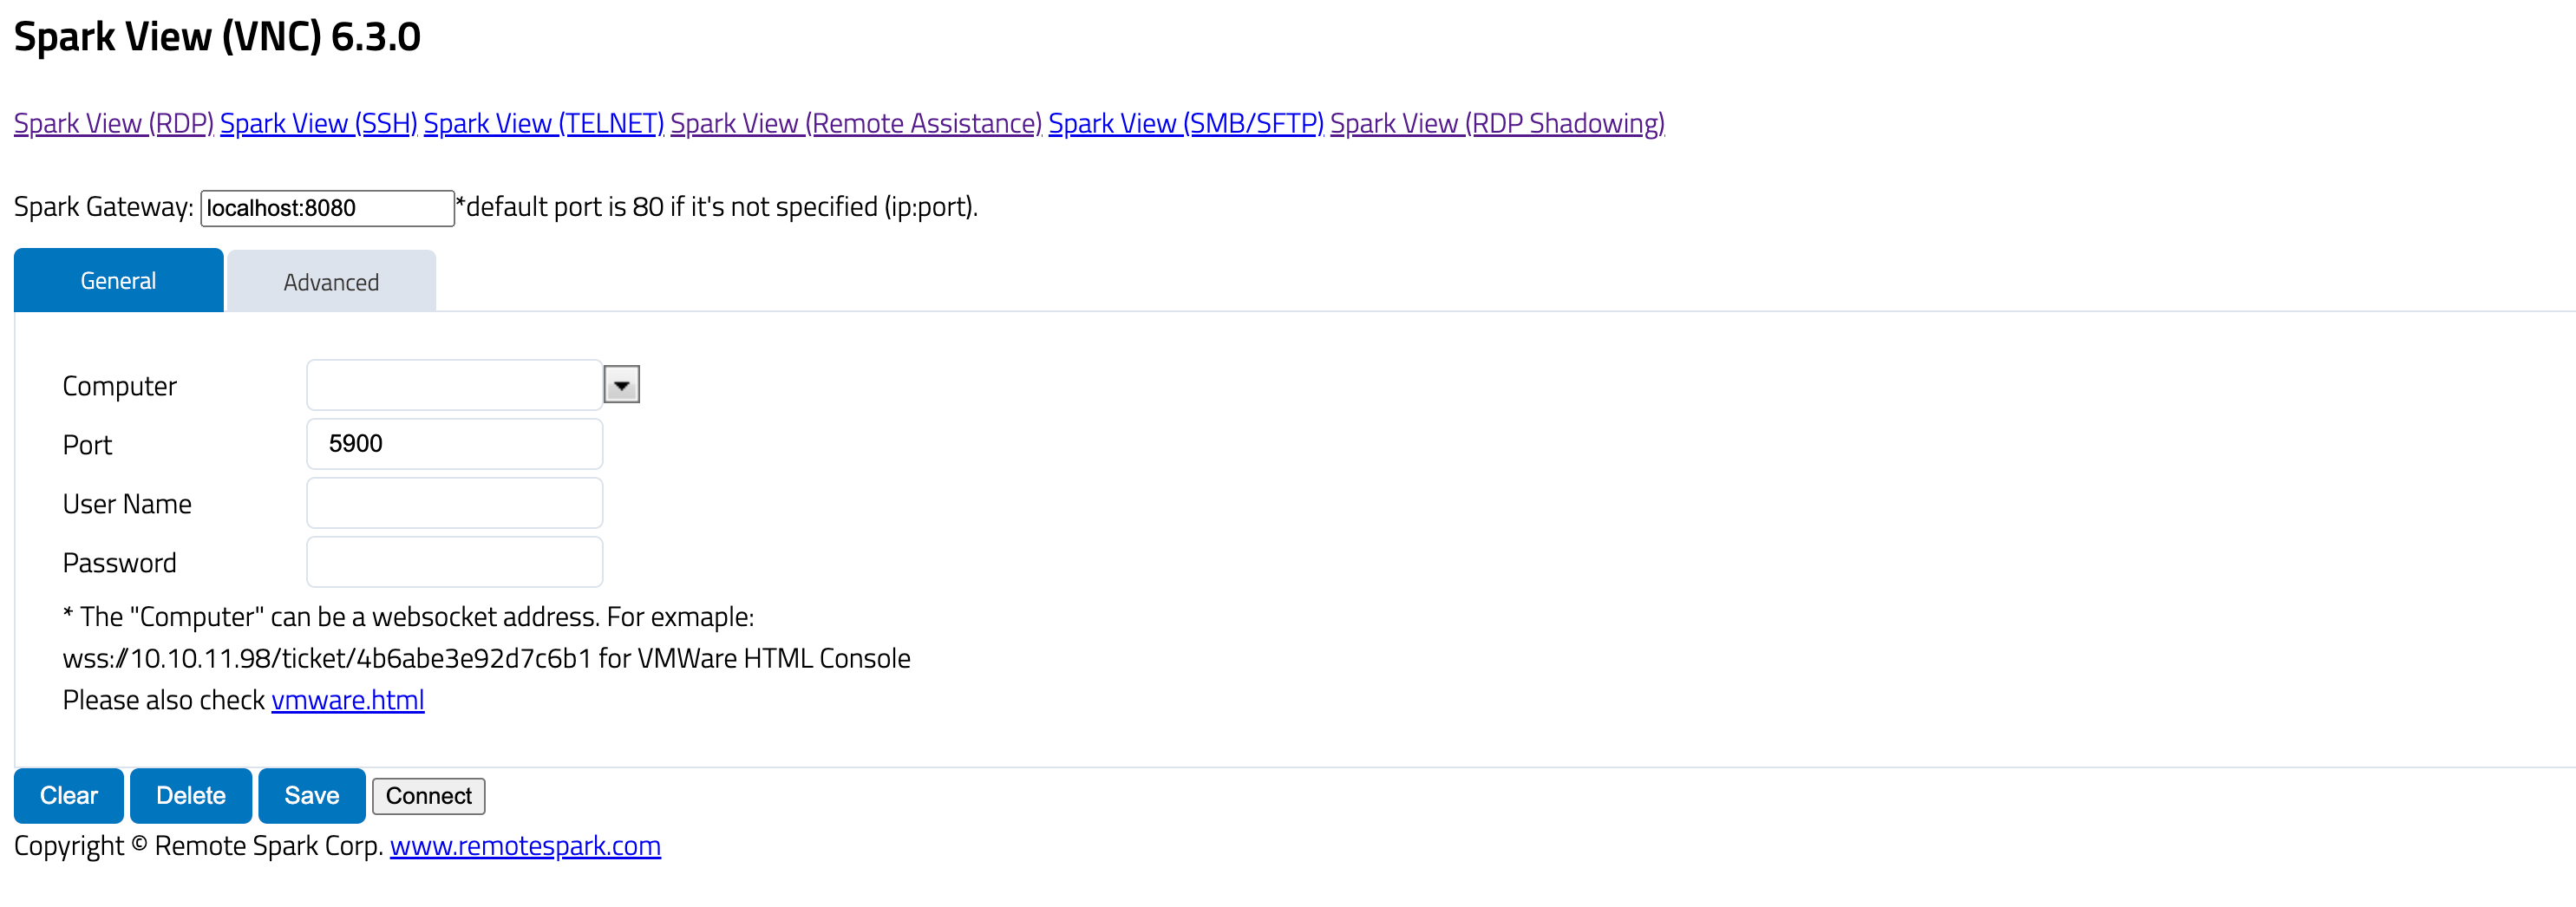
3.21 – RFB (VNC) protocol support
You can connect to any VNC server (Linux, Mac etc) with vnc.html. It also supports session shadowing.
3.22 – SSH and Telnet
You can connect to SSH server with ssh.html, and connect to Telnet server with telnet.html:

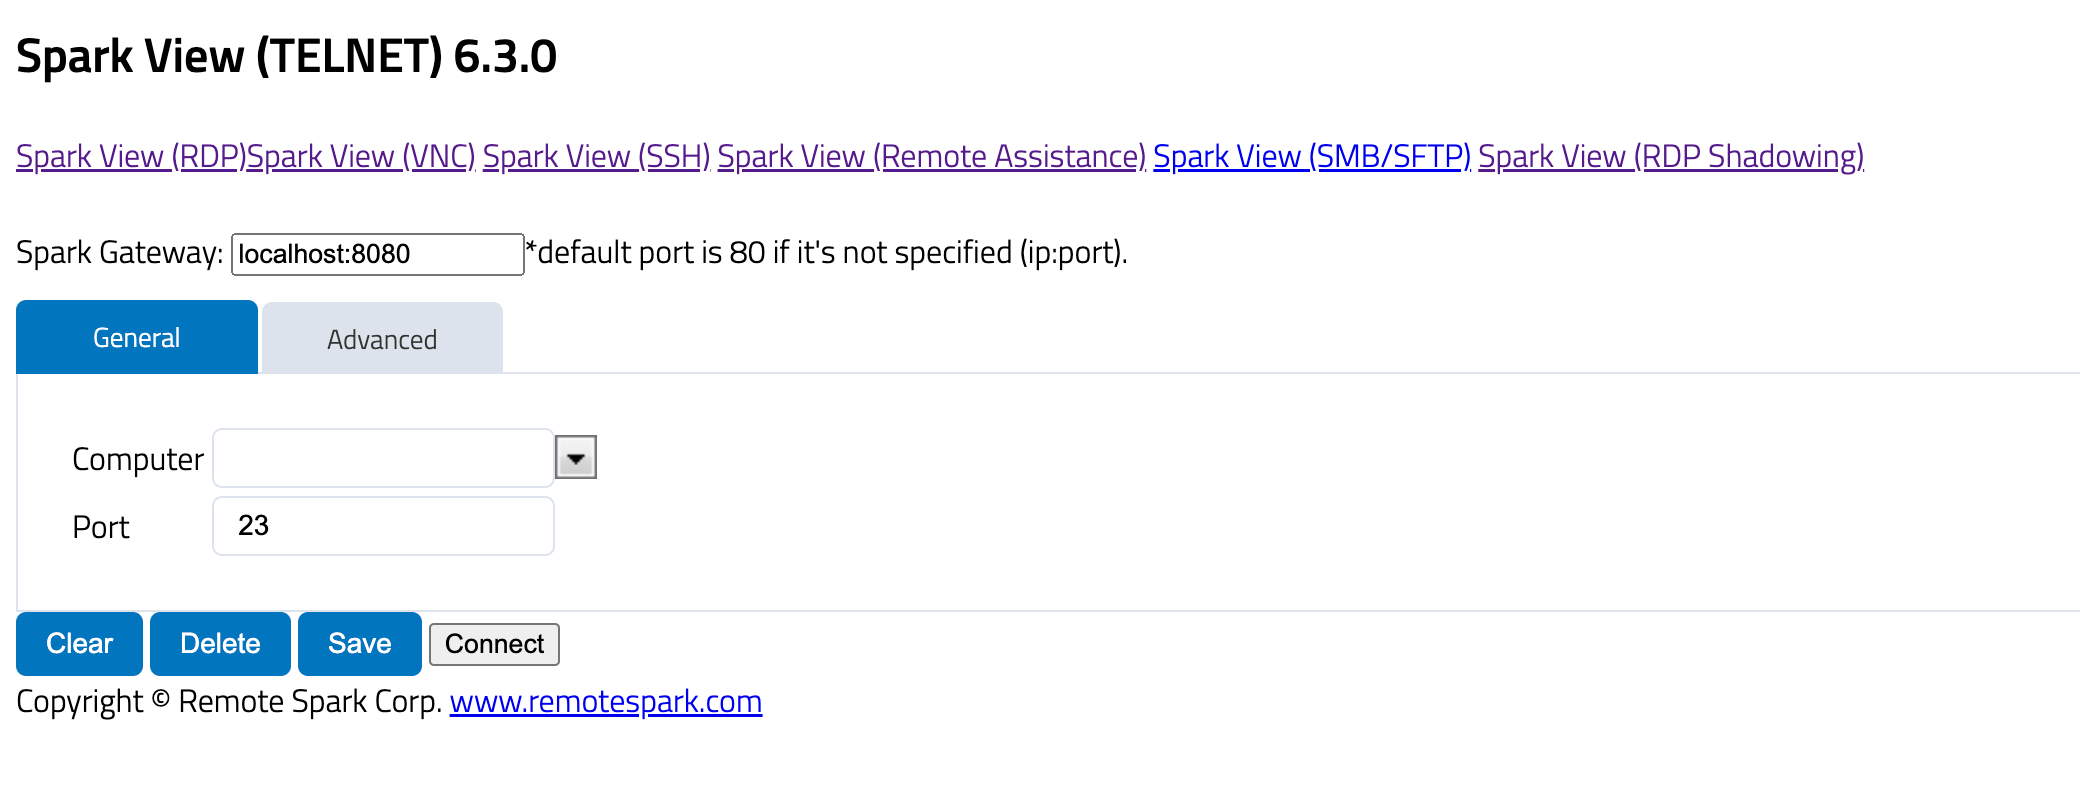
- You can also join SSH and Telnet sessions.
- Telnet doesn't support local echo.
3.23 – Smart Card Redirection
Since version 5.7, Java applet was deprecated. Smart Card redirection need a small native application (sg_agent.exe for Windows, sg_agent.zip for macOS) running on user’s machine to communicate with Smart Card.
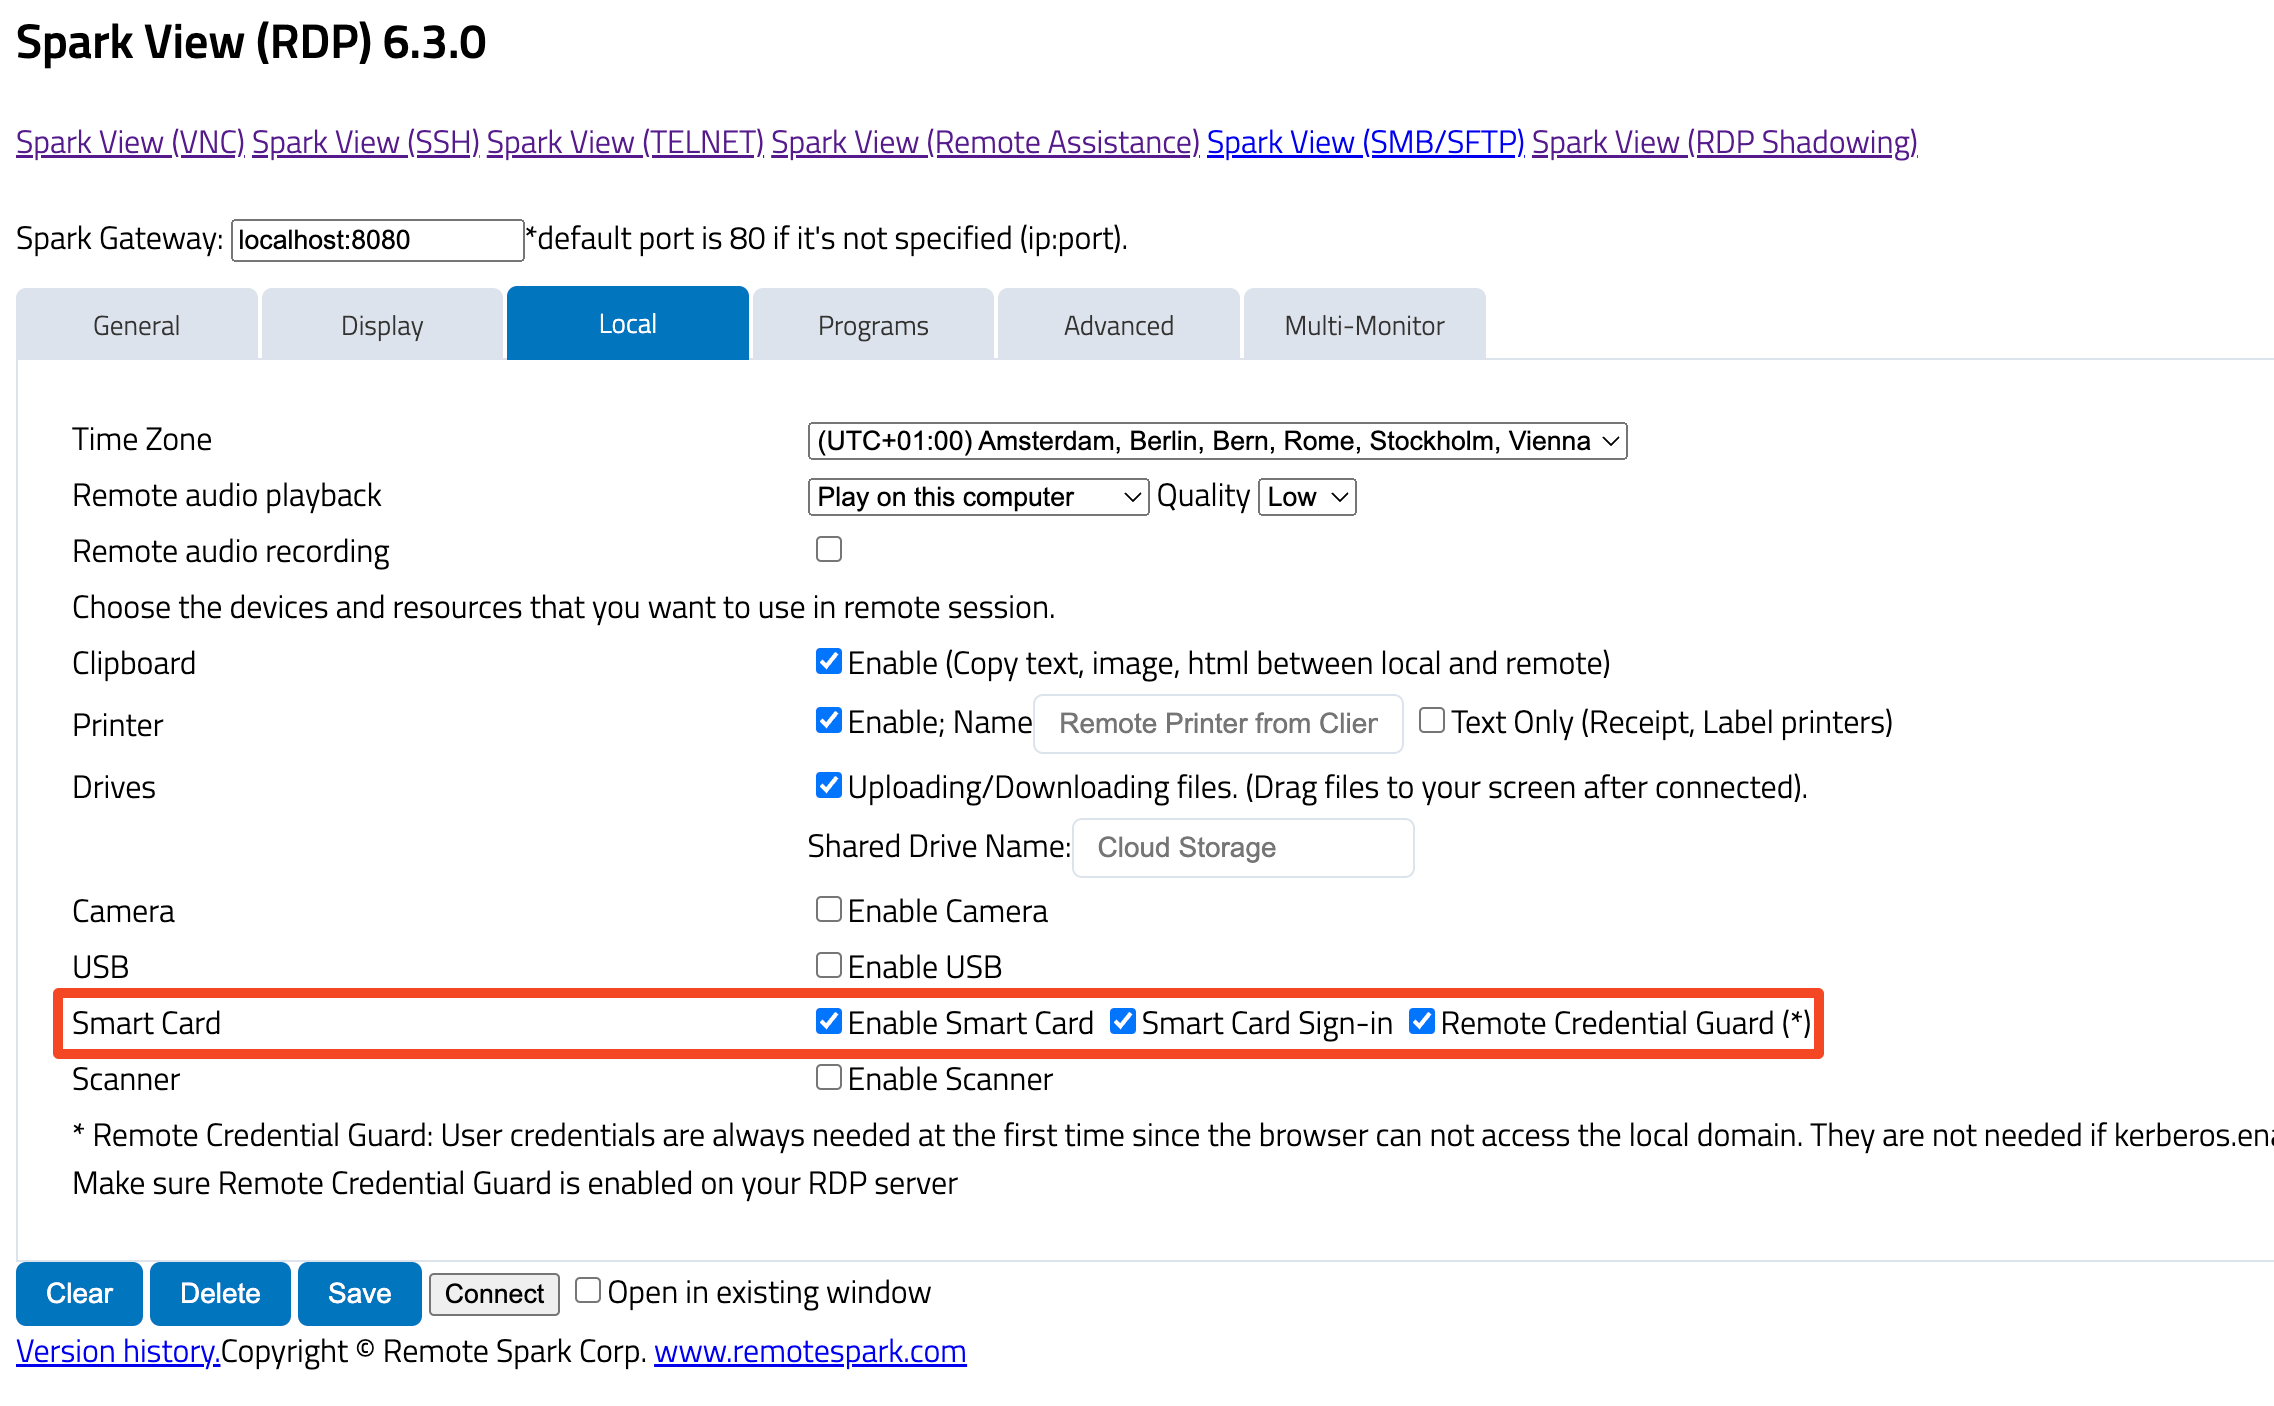
Local hardware (smart card, scanner) redirection needs an agent (native application) running on your computer to acees the local hardware. Please:
- Download the agent from your installation: http://localhost:8080/sg_agent.exe
- Run the agent and keep it running during the connection (you only need to run the agent once for multiple sessions).
- Click the "Open" button to open a new window (bridge.html) to communicate with the agent and keep it open during the connection.
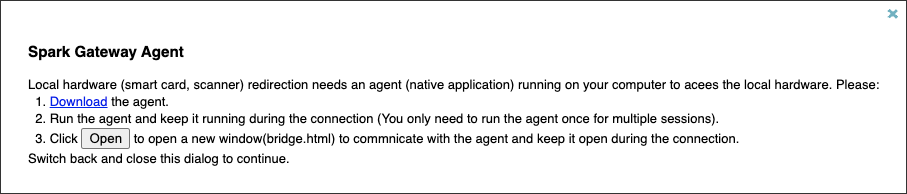
You also need to add the "&smartCard=on" parameter to your websocket URL to enable smart card redirection. Use the "&passwordIsPin=on" parameter if you want to transfer password as the PIN of smart card.
If the green smart card icon is displayed in the traybar, the implementation was successful:
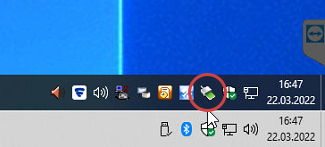
smart card, smartcard, hardware token, hardwaretoken
3.24 – Scanner redirection
Spark View provides two different method for scanner redirection:
- Please use the TWAIN Virtual Data Source if your scanner has TWAIN driver and your application supports TWAIN scanner. OR
- Please run the SparkScan.exe in RDP server to scan from a local scanner which supports TWAIN, WIA (windows) or ICA (Mac OS) scanner.
Virtual TWAIN Data Source deployment (Need to deploy it on the RDP server first):
- Create a directory under windows\windows\twain_32, for example: RemoteSpark
- Copy SparkDataSource.ds to this directory:
windows\windows\twain_32\RemoteSpark\SparkDataSource.ds
The name of the directory or SparkDataSource.ds can be changed.
RunSparkScan /?to show the help information.
3.25 – USB redirection
USB redirection is based on WebUSB: https://wicg.github.io/webusb/. Please check your browser compatibility: https://developer.mozilla.org/en-US/docs/Web/API/USB#browser_compatibility.
- Add "&mapUSB=on" parameter to your websocket URL to enable it.
- It only works on secure contexts (HTTPS only).
- Feature Policy is needed if the session is running in iframe:
<iframe allow="usb; fullscreen"></iframe> - The client try to display all the available USB devices to use. If you want specific device only, you can set up the USB files in appcfg.js:
usb: {filters:[{vendorId:0x2341}]} - List of USB ID’s: http://www.linux-usb.org/usb.ids
3.26 – OAuth 2.0/Okta integration
You need to register your application before you use OAuth 2.0 integration.
| Provider | Registering Address |
|---|---|
| https://support.google.com/cloud/answer/6158849 | |
| Windows Live Connect | https://account.live.com/developers/applications http://msdn.microsoft.com/en-us/windowslive/ff769489.aspx |
Please use http(s)://gatewayAddress/oauth2callback for redirect URI.
You'll get client id and client secret after the registration, and set up them in the oauth2.json configuration file. You can specify the location of oauth2.json in gateway.conf.
Example of oauth2.json:
{
  "providers" : [{
    "name" : "Google",
    "client_id" : "650561938988-t2r66k1ms3hpoi3k1e2g7l2adlarau8s.apps.googleusercontent.com",
    "client_secret" : "-D-nhxWn2E97tZWWLg5IQ6Ak",
    "request_uri" : "https://accounts.google.com/o/oauth2/auth",
    "redirect_uri" : "http://localhost/oauth2callback",
    "access_token_uri": "https://oauth2.googleapis.com/token",
    "auth_uri": "/login_chrome.html",
    "scope": "openid email"
  },
  {
    "name" : "Live",
    "client_id" : "0000000040133A31",
    "client_secret" : "p9WwBr2Pyrq6mtaeZCwTSwqbIF39Br3Z",
    "request_uri" : "https://login.live.com/oauth20_authorize.srf",
    "redirect_uri" : "http://www.remotespark2.com/oauth2callback",
    "access_token_uri": "https://login.live.com/oauth20_token.srf",
    "scope": "wl.emails",
    "profile_uri": "https://apis.live.net/v5.0/me"
  }]
}
Okta SSO
To enable SSO, Spark View application need to be configured as trusted application (Resource Owner Password Flow):
https://developer.okta.com/docs/guides/implement-password/overview/
You don’t need to configure request_uri, redirect_uri , and profile_uri for Okta.
Here is an example for Okta:
{
  "providers": [
    {
      "name" : "okta",
      "client_id" : "0000000040133A31",
      "client_secret" : "p9WwBr2Pyrq6mtaeZCwTSwqbIF39Br3Z",
      "access_token_uri": " https://dev-160206.okta.com/oauth2/v1/token",
      "scope": "openid email"
    }
  ]
}
Then login from http://yourGateway/login_okta.html.
3.27 – Active Directory, Azure AD, LDAP, RADIUS integration
✅ Create configuration files easily
Click here to go to the customizer for the integration of authentication services. Fast, simple, secure. No data is stored on the server!
You can authenticate your users against Active Directory, LDAP or RADIUS server. Please configure your users.json as followings:
Active Directory or LDAP
{
  "source": {
    "type": "AD",
    "properties": {
      "server": "192.168.12.128:389", //can also be specified without the port
      "domain": "mydomain.com",
      "groups": "sales, support",
      "transferCredential": false
    }
  }
}
You can let gateway fetch servers from the AD. The following example will fetch all the servers from the "otherLoginWorkstations" attribute:
{
  "source": {
    "type": "AD",
    "properties": {
      "server": "192.168.12.128:389",
      "domain": "mydomain.com",
      "groups": "sales, support",
      "transferCredential": false,
      "serversAttr": "otherLoginWorkstations"
    }
  }
}
Gateway can also change AD user password if:
- AD has SSL enabled.
- Export the AD certificate (Public key only) in Base-64 encoded X.509 file format.
- Import the AD certificate to Java keystore with following commands:
Please check Microsoft Tech Community Blog for more details on how to setup LDAPS on Windows.cd JRE\bin (use JDK\bin instead if JRE is not found, for example, OpenJDK11). keytool -importcert -alias "anyName" -keystore \lib\security\cacerts -storepass changeit -file "C:\Users\username\Desktop\exported.cer" - users.json:
"tls" or "ssl" can be used for the security protocol (secProtocol).{ "source": { "type": "AD", "properties": { "server": "192.168.12.128:389", "secProtocol": "tls", "domain": "mydomain.com", "groups": "sales, support", "transferCredential": false, "serversAttr": "otherLoginWorkstations" } } }
LDAP debugging
Get LDAP debug logs
If errors occur when trying to connect via LDAP, the following Java parameter can be stored in order to obtain more error information and logging for LDAP:
-Dcom.sun.jndi.ldap.connect.pool.debug=allPlease enter the parameter in SparkView in the Control Panel:
Prevent unmatched name issue
If the LDAP server is specified via an IP address and not the host name, unmatched name issues may occur. To prevent this, set the following Java parameter:
-Dcom.sun.jndi.ldap.object.disableEndpointIdentification=true

RADIUS
{
  "source": {
    "type": "RADIUS",
    "properties": {
      "server": "192.168.12.128",
      "port": "1812",
      "accountingPort": "1813",
      "sharedSecret": "test123"
    }
  }
}
You also need to configure the servers in servers.json.
Azure AD
The Azure AD connection is essentially an OAuth2 connection. You can find more information about OAuth2 here.
To connect Azure AD, you need to create a JSON file (e.g. providers.json) with the following content, or extend an existing OAuth2 JSON file:
{
  "providers" : [
    {
      "name" : "Live",
      "client_id" : "40e0b9e5-a534-4bbe-98d2-f3ff0139b67f",
      "client_secret" : "UVH8Q~_e3MxQknUYzbo.bSy_lYafDBO_-R8pTWaCt",
      "request_uri" : "https://login.microsoftonline.com/common/oauth2/v2.0/authorize",
      "redirect_uri" : "https://www.mygateway.com/oauth2callback",
      "access_token_uri": "https://login.microsoftonline.com/common/oauth2/v2.0/token",
      "scope": "openid profile email"
    }
  ]
}
Please replace https://www.mygateway.com with the address of your SparkView server.
In the gateway.conf file, this file must then be linked (if not already done with an existing file):
oauth2 = C:\\data\\oauth\\providers.json
Please note that the endpoint name "common" in the URL may be different for you. You can find more information about this here:
https://learn.microsoft.com/en-us/azure/active-directory/develop/active-directory-v2-protocols#endpoints
3.28 – Using Java parameters
In some cases, the use of Java parameters during or before the start of SparkView is useful or necessary.
Depending on the system, these must be entered as follows:
Windows
Enter the parameters in the SparkView control panel under the "Java" tab one below the other.

Linux/MacOS
Enter the parameters directly with the start command, e.g.
java -Dcom.sun.jndi.ldap.object.disableEndpointIdentification=true -jar SparkGateway.jar
3.29 – Send logs to syslog
SparkView can collect and forward logs under Linux via syslog. This requires a few adjustments on the part of SparkView and on the server.
Adjustments SparkView:
Create the file logging.properties in the SparkView root directory. You can also copy an existing one from the JRE/lib directory and customize it by adding the following lines at the end:
.level= INFO
handlers= java.util.logging.ConsoleHandler, com.agafua.syslog.SyslogHandler
# Syslog logger
com.agafua.syslog.SyslogHandler.transport = udp
com.agafua.syslog.SyslogHandler.facility = local0
com.agafua.syslog.SyslogHandler.port = 514
com.agafua.syslog.SyslogHandler.hostname = vmuser-xubuntu1604
Then add the Java VM argument to the command that starts SparkView:
-Djava.util.logging.config.file=yourSparkViewFolder/logging.properties
Adjustments Server (Ubuntu):
- Edit the file "/etc/rsyslog.conf" and comment/activate the following two lines:
module(load="imudp") input(type="imudp" port="514") - Go to the directory "/etc/rsyslog.d" and create a new file "60-java.conf" (the name can be chosen arbitrarily) with the following content:
local0.* /var/log/gateway.log - Restart the syslog service:
sudo service rsyslog restart
3.30 — Add HTTP/S proxy entry
From SparkView version 6.4, the HTTP proxy has been completely redesigned to be faster, more secure and more accessible. The handling is fundamentally different from previous versions and there are a few important things to note:
- The URL structure before version 6.4 was
https://yourgateway.com/PXY/serverId. Now virtual hosts are used, resulting in the following structure:https://serverid.yourgateway.com. - This means that a domain name must be used for the SparkView gateway if the HTTP proxy is to be used.
- Your own DNS server must have a wildcard entry on the same IP address as the gateway itself:
*.yourgateway.com - To test the feature without a DNS server, the hosts file of the server/computer can be modified. Host file locations:
- Windows:
%windir%\system32\drivers\etc\hosts - Linux:
/etc/hosts - macOS:
/etc/hostsor/private/etc/hosts -
Example:
192.168.10.4    sparkview.local
192.168.10.4    serverid.sparkview.local
192.168.10.4    server2id.sparkview.local
- Windows:
To add an HTTP/S proxy target, the above requirements must be met and the server must be added via config.html and the Servers tab (see chapter 4.1).
3.31 – Hardware video acceleration
As of build 1075 in version 7.0, SparkView supports hardware video acceleration (via GPU/GPX). Acceleration can currently only be enabled over the RDP protocol for the following areas
- Desktop/Session Mode (no RemoteApp support yet)
- Session shadowing
- Session recording
To use hardware acceleration, you must have the latest version of SparkView installed and two group policies set on the server where Remote Desktop Services is installed and users have access.
The policies can be found at the following location:
Computer Configuration → Administrative Templates → Windows Components → Remote Desktop Services → Remote Desktop Session Host → Remote Session Environment
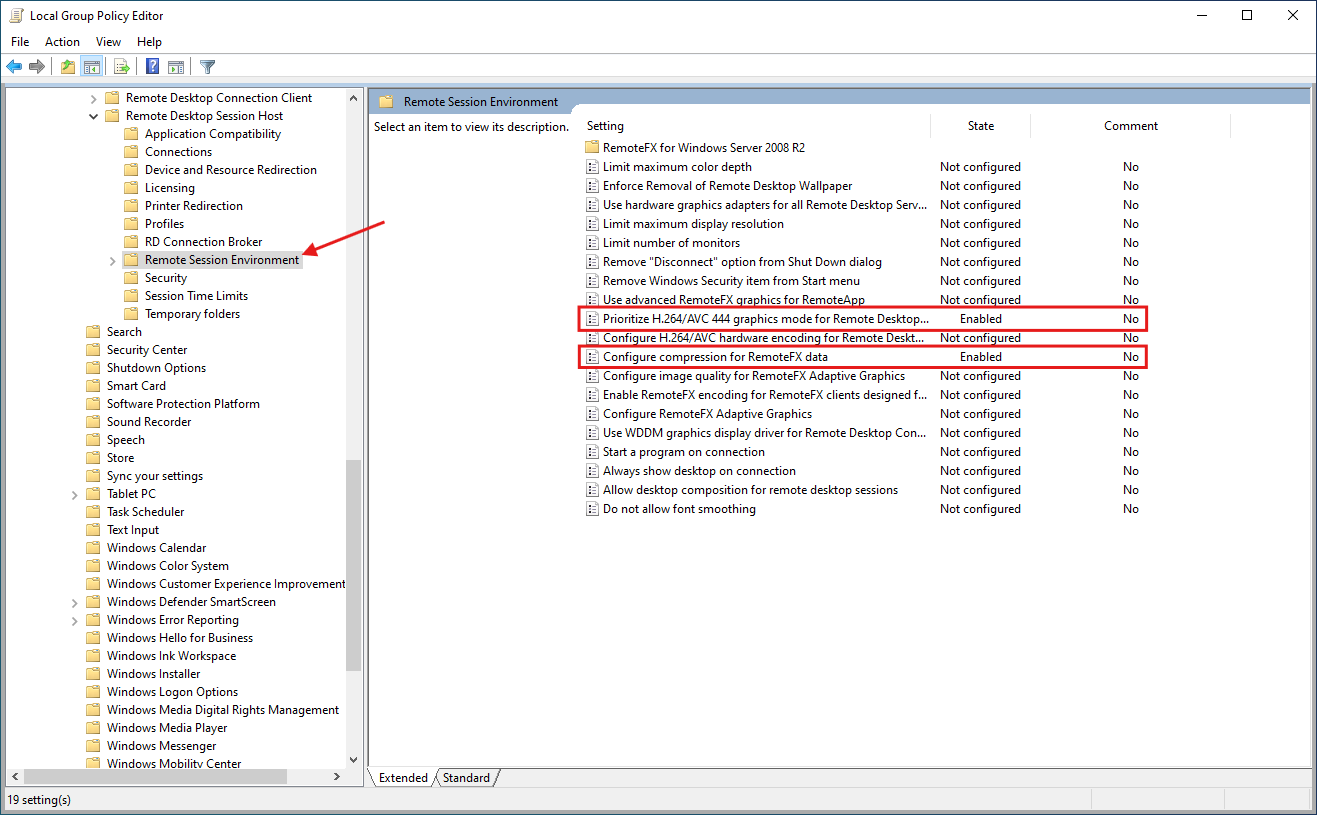
The following two policies must be modified:
- Prioritize H.264/AVC 444 graphics mode for Remote Desktop Connections:
Enable - Configure compression for RemoteFX data:
EnableundDo not use an RDP compression algorithm
