# 2. – Installation
# 2.1 – Install J2SE Software Development Kit (JDK)
Download the Java 2 Standard Edition (J2SE) JDK version 1.8 or later from one of these sources:
- [http://www.oracle.com/technetwork/java/javase/downloads/index.html](http://www.oracle.com/technetwork/java/javase/downloads/index.html)
- [https://developers.redhat.com/products/openjdk/download](https://developers.redhat.com/products/openjdk/download)
- [https://www.azul.com/downloads/zulu/](https://www.azul.com/downloads/zulu/)
- [http://jdk.java.net/](http://jdk.java.net/)
- [https://aws.amazon.com/corretto/](https://aws.amazon.com/corretto/)
> **Note:** Downloading the Java Runtime Environment (JRE) instead is not recommended.
> Open JDK 8, 11 and LTS versions are recommended. JRE is not recommended because it’s updated
automatically and the old version will be uninstalled. Please install JCE 8 if you are using Java 8:
[https://www.oracle.com/technetwork/java/javase/downloads/jce8-download-2133166.html](https://www.oracle.com/technetwork/java/javase/downloads/jce8-download-2133166.html)
Install the JDK according to the instructions included with the release. Set an environment variable JAVA_HOME to the pathname of the directory into which you installed the SDK release:
`echo "export JAVA_HOME=/usr/java/default/"> /etc/profile.d/java_home.sh`
Verify the Java version you are using by running the following command in a command prompt:
`java –version`
If your RDP server has Network Level Authentication enabled, the connection may fail depends on what
Java version you are using.
Java 1.8: Please install TLS 1.2 Windows update on Windows 7 and Windows 2008:\
[https://support.microsoft.com/en-us/kb/3080079](https://support.microsoft.com/en-us/kb/3080079)
# 2.2 – Install as a Windows service
Download SparkView installer for Windows from:
[https://cloud.beyondssl.com/url/sparkviewwindows](https://cloud.beyondssl.com/url/sparkviewwindows)
Install SparkView according the instructions of installer. During the installation, you can choose the
JRE/JDK you want user if you have multiple JRE/JDK installed. You can also choose the gateway listening
port (default is 8080).
If you get the “This app can’t run on your PC” error, you may need to disable Smartscreen functionality
and under Windows Updates – Developers: Allow Sideloads Apps.
If you have an IIS instance running on the same machine and you want SparkView listening on port 80 or 443, you must ensure that IIS is not bound to the IP address and port you want to use for the SparkView service. You must set the bindings in the IIS Manager. However, it may also be necessary to change the HTTP service which by default listens on port 80 for all IP addresses. To do this you can use `netsh http add iplisten ipaddress=xxx.xxx.xxx.xxx` to instruct the HTTP service to listen on IP addresses not used by the
SparkGateway. Then you can use port 80 on the unused IP Addresses with the SparkGateway.
Change the name of your license file to “license” and copy it to installation directory if you are using the full version. You don’t need a license file for the evaluation version.
You can start the “Welcome” page to connect to a computer or “Configuration” page from the start
menu when installation is done.
**Add SparkGateway.exe to your firewall exception list.**
**Make sure you allocate more memory to SparkGateway (in SparkGateway Manger, "Java" tab) if you
have more users:**
[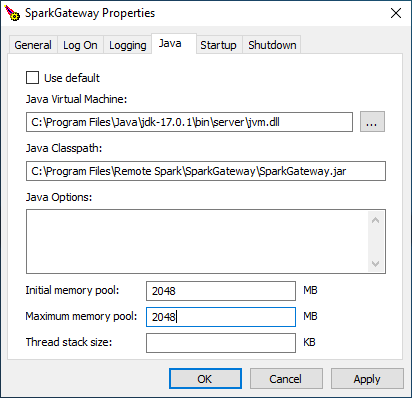](https://docs.sparkview.info/uploads/images/gallery/2022-04/sparkview-config-memory.png)
We are using Apache Procrun as a Windows service wrapper, for more information, please check [http://commons.apache.org/daemon/procrun.html](http://commons.apache.org/daemon/procrun.html)
# 2.3 – Install as Linux/Unix daemon
#### Before installation
---
1. Download SparkView for Linux/Unix: [https://cloud.beyondssl.com/url/sparkviewother](https://cloud.beyondssl.com/url/sparkviewother)
2. Unzip it to your destination directory. Here we use `/usr/local/bin/SparkGateway`.
3. Modify gateway.conf to change gateway listening port or other configurations.
#### Using install script
---
The installation script "installLinux.sh" is located in the unpacked SparkView folder.\
Execute it with sudo and the following command:\
`sudo sh ./installLinux.sh`
#### Manual installation
---
Open gateway listening port (80):
- `firewall-cmd --permanent --add-port=80/tcp`,
`firewall-cmd --reload`
- or
- `iptables -A INPUT -p tcp --dport 80 -j ACCEPT`
> If SparkView can not listen on port 80, 443 or any ports below 1024, you can try this command:
`sudo setcap cap_net_bind_service=+epi "readlink -f \"which java\""`
**Test the gateway in console mode:**
`java –jar SparkGateway.jar`
You can install it as a service if it’s working correctly in console mode:
**For Systemd system:**
Create file: `/etc/systemd/system/SparkGateway.service` with the following contents:
```
[Unit]
Description=SparkView Service
After=network.target
[Service]
User=yourUserName
WorkingDirectory=/usr/local/bin/SparkGateway
ExecStart=/usr/bin/java -jar /usr/local/bin/SparkGateway/SparkGateway.jar
SuccessExitStatus=143
[Install]
WantedBy=multi-user.target
```
Then notify the systemd fo the new service: `systemctl daemon-reload`
Service commands:
- Enable the service: `systemctl enable SparkGateway`
- Start the service: `systemctl start SparkGateway`
- Stop the service: `systemctl stop SparkGateway`
- Check the status if the service is not started: `systemctl status SparkGateway`
- Uninstall the service: `systemctl disable SparkGateway`
Please check the following documentation for SUSE: [http://remotespark.com/view/SUSE_Install.txt](http://remotespark.com/view/SUSE_Install.txt)
**For SysVinit init system:**
To build the daemon wrapper you will need:
- GNU AutoConf (at least version 2.53)
- An ANSI-C compliant compiler (GCC is good)
- GNU Make
- A Java Platform 2 compliant SDK
`yum groupinstall "Development Tools"` (CentOS)
`apt-get install build-essentials` (Debian/Ubuntu)
Run the following commands:
```
cd /usr/local/bin/SparkGateway
tar xvfz commons-daemon-native.tar.gz
cd commons-daemon-1.0.10-native-src/unix
./configure
make
cp jsvc ../..
cd ../..
chmod a+x SparkGateway.sh
```
Change the name of your license file to “license” and copy it to installation directory if you are using the full version.
Modify gateway.conf file, change listening port and file path according to your installation directory.
Starting the daemon: `./SparkGateway.sh start`
Stopping the daemon: `./SparkGateway.sh stop`
We are using Apache Jsvc as a Linux/Unix daemon wrapper, for more information, please check
[http://commons.apache.org/daemon/jsvc.html](http://commons.apache.org/daemon/jsvc.html)
The script (SparkGateway.sh) is only tested on CentOS, you may need to change it on other Linux.
Run as a service and start automatically:
```
cp SparkGateway.sh /etc/init.d/SparkGateway
chmod +x /etc/init.d/SparkGateway
chkconfig --add SparkGateway
chkconfig SparkGateway on
```
Start the service: `service SparkGateway start`
Stop the service: `service SparkGateway stop`
# 2.4 – Install as macOS daemon
Run the following commands:
1. `cd /Library`
2. `sudo unzip SparkGateway.zip`
3. `sudo chown username SparkGateway` *username should be the login name under which gateway will run*
4. `sudo chgrp admin SparkGateway`
5. `cd SparkGateway`
6. `sudo nano start.sh` with following content:
```
#!/bin/sh
SPARK_HOME=/Library/SparkGateway
java -jar $SPARK_HOME/SparkGateway.jar -c=$SPARK_HOME/gateway.conf
```
7. Save the file and run `sudo chmod a+x start.sh`
8. Change the default directory and listening port if port 80 is occupied in gateway.conf:
```
port = 8080
logfile = /Library/SparkGateway/logs/gateway.log
html = /Library/SparkGateway/html
license = /Library/SparkGateway/license
```
9. Use `sudo ./start.sh` to test if there are any errors within the script.
10. `cd /Library/LaunchDaemons`
11. `sudo nano com.toremote.gateway.plist` with following content:
```
Label
com.toremote.gateway
Disabled
OnDemand
RunAtLoad
ProgramArguments
/Library/SparkGateway/start.sh
EnvironmentVariables
SPARK_HOME
/Library/SparkGateway
StandardErrorPath
/Library/SparkGateway/logs/gateway.stderr
StandardOutPath
/Library/SparkGateway/logs/gateway.stdout
UserName
_appserver
```
12. Service commands:
- Load the service: `sudo launchctl load /Library/LaunchDaemons/com.toremote.gateway.plist`
- Unload the service: `sudo launchctl unload /Library/LaunchDaemons/com.toremote.gateway.plist`
# 2.5 – Install HTML client on other web servers
Spark View (the HTML5 Client part) doesn't include any server side logic. You can also install it on any
other web servers, like IIS, Apache, Tomcat etc.
Recommended to use Gateway as the web server, or install it in Chrome Web Store.
# 2.6 – Run SparkView as a container (Docker)
SparkView is fully executable as a container on many platforms. Advantages here are certainly the flexibility and transportability of the installation independently of the data between different systems.
### Installation
To install the container, please pull the [latest version from the official Docker Hub](https://hub.docker.com/r/beyondssl/sparkview):
`docker pull beyondssl/sparkview`
SparkView is then installed inside a new container and has the following special default values:
- Listening ports are 80 and 443 (HTTP and HTTPS with self-signed certificate).
- remoteManage=true (configuration can be accessed from outside the localhost).
- management password is "password"
- Four volumes for configuration and data:
- data (created data from configuration like server and user)
- conf (configuration)
- keystore (certificates and Java keystore)
- logs (log files)
Then go to http://localhost to start the web application.
### Configuration
All manual changes should be made within the volumes, otherwise the changes will be reset after a restart. The rest of the configuration is done via the web under /config.html.
#### Importing a license
Unlike the manual installation of SparkView, the license for the container version should be uploaded via the web. Under /config.html you will find the item "Upload license file" in the "General" tab. Upload your license here and save the configuration. This makes the new license active.
# 2.7 – Install as PWA
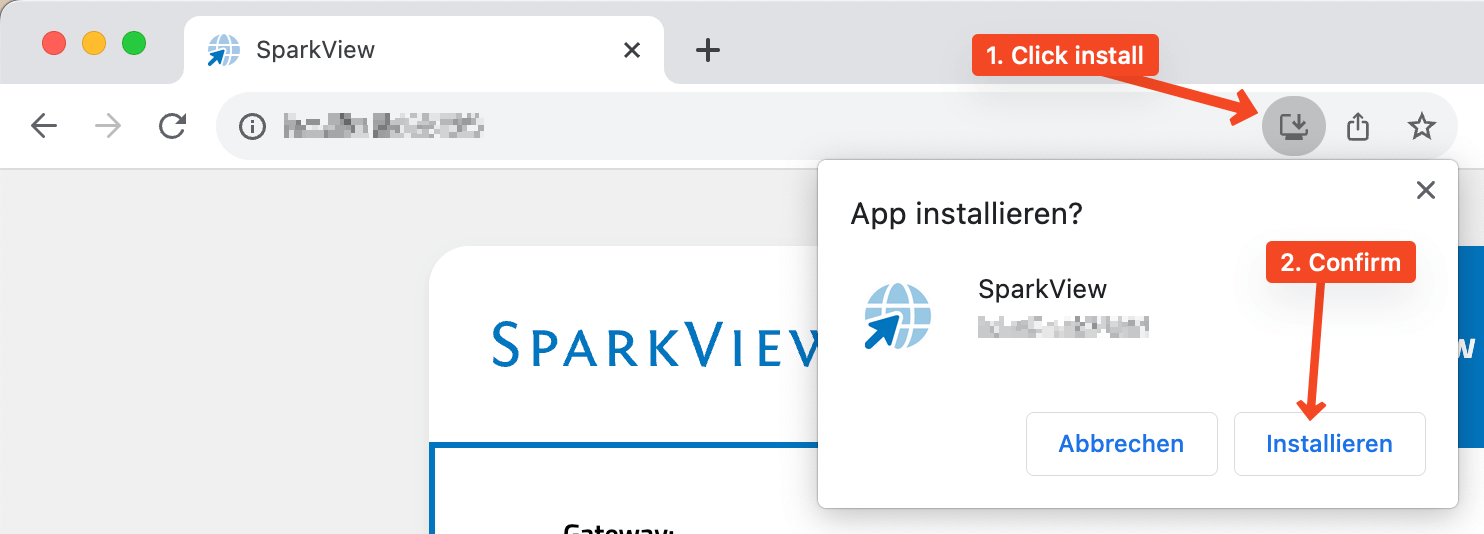
SparkView offers native PWA support from version 1036 and can be installed as such on all operating systems under Google Chrome - including Chromebooks and ChromeOS.
To "install" the PWA on a client, the following steps are necessary:
1. Navigate to SparkView via Google Chrome
2. Click on the install icon on the right-hand side of the address bar
3. Confirm
4. Done ✔
 # 2.8 – Integrating a license
To integrate a license file into SparkView, please note the following steps:
1. Stop SparkView service
2. Copy the license file into the SparkView root directory
- Windows default: `C:\Program Files\Remote Spark\SparkGateway`
- Linux/macOS default: `/usr/local/bin/SparkGateway`
4. Rename the license file to `license`. **Important: no file extension!**
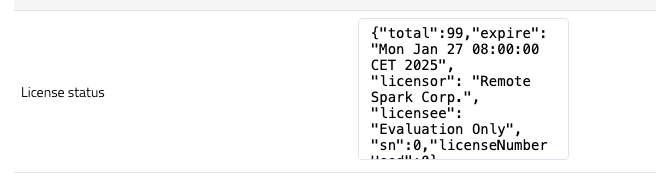
5. Start SparkView Service
You can then check the license status via config.html at the bottom:
# 2.8 – Integrating a license
To integrate a license file into SparkView, please note the following steps:
1. Stop SparkView service
2. Copy the license file into the SparkView root directory
- Windows default: `C:\Program Files\Remote Spark\SparkGateway`
- Linux/macOS default: `/usr/local/bin/SparkGateway`
4. Rename the license file to `license`. **Important: no file extension!**
5. Start SparkView Service
You can then check the license status via config.html at the bottom:
 If the license file is in a different location, please specify this via the corresponding parameter in the gateway.conf file:
```bash
# Example for Windows
license = C:\\Program Files\\Remote Spark\\SparkGateway\\licensefile
# Example for Linux/macOS
license = /usr/local/bin/SparkGateway/licensefile
```
If the license file is in a different location, please specify this via the corresponding parameter in the gateway.conf file:
```bash
# Example for Windows
license = C:\\Program Files\\Remote Spark\\SparkGateway\\licensefile
# Example for Linux/macOS
license = /usr/local/bin/SparkGateway/licensefile
```